Garage Door Maintenance Guide South Africa – Keep Your Door Running for 20+ Years
🔧 10 minutes a month can add years to your garage door’s life. Complete maintenance schedule for South African homes.
Your garage door is probably the largest and heaviest moving object on your property. In South Africa, it faces unique challenges – from the harsh Highveld sun in Johannesburg and Pretoria to corrosive salt air in Durban and Cape Town, and of course, the constant stress of loadshedding power cycles. Yet most homeowners ignore their garage door until something breaks – usually at the most inconvenient time. This comprehensive maintenance guide covers everything you need to know to keep your garage door operating safely, quietly, and reliably for decades. We’ll show you what you can DIY safely, what needs a professional, and how to spot problems before they become expensive repairs.
📋 Need a Professional Service?
Not comfortable doing your own maintenance? Get free quotes from experienced garage door technicians who can service your door and spot potential problems.
Servicing Johannesburg, Pretoria, Cape Town, Durban, and all major areas
📖 Table of Contents – Garage Door Maintenance Guide
⚠️ SAFETY FIRST – What NOT to Touch
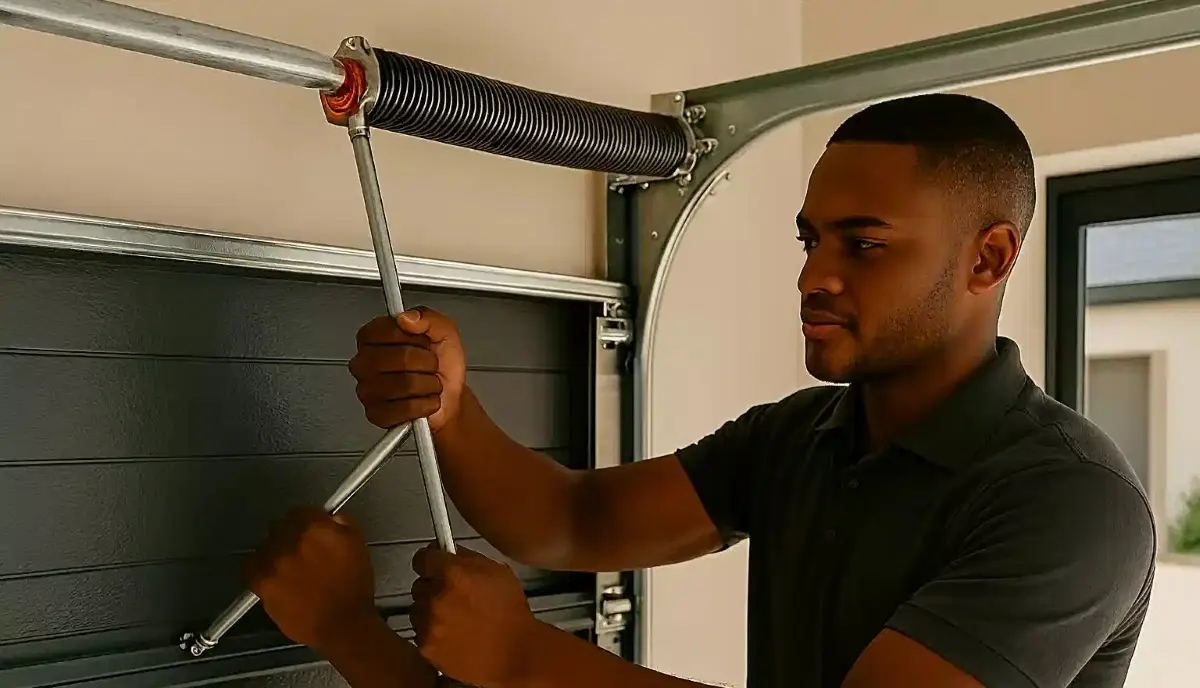
GARAGE DOOR SPRINGS, CABLES, AND RED-PAINTED HARDWARE ARE UNDER EXTREME TENSION. Never attempt to adjust, repair, or remove these components yourself. A single mistake can cause serious injury or death. This guide covers safe DIY maintenance only. If your problem involves springs, cables, or anything you’re unsure about, stop and call a professional immediately.
With that critical warning out of the way, let’s look at the many maintenance tasks you CAN safely perform to extend your door’s life.
✅ Safe for DIY
- Visual inspection
- Cleaning tracks
- Lubricating rollers and hinges
- Tightening visible nuts and bolts (not red-painted)
- Testing safety features
- Balance test
- Replacing weather seal
- Cleaning photo eye sensors
❌ PROFESSIONAL ONLY – DANGEROUS
- Spring adjustment or replacement
- Cable adjustment or replacement
- Track alignment or straightening
- Any work involving red-painted hardware
- Motor internal repairs
- Panel replacement
📅 Complete Garage Door Maintenance Schedule
Follow this schedule to keep your door in peak condition. Adjust frequency based on your location (coastal areas need more frequent attention).
| Task | Frequency | Time Needed | DIY Safe? |
|---|---|---|---|
| Visual inspection | Monthly | 5 minutes | ✅ Yes |
| Clean tracks | Every 3 months | 10 minutes | ✅ Yes |
| Lubricate rollers, hinges, bearings | Every 6 months | 15 minutes | ✅ Yes |
| Tighten hardware (except red-painted) | Every 6 months | 10 minutes | ✅ Yes |
| Test auto-reverse safety | Every 3 months | 5 minutes | ✅ Yes |
| Test photo eye sensors | Every 3 months | 5 minutes | ✅ Yes |
| Balance test | Annually | 5 minutes | ✅ Yes |
| Spring inspection | Annually | 5 minutes (visual only) | ⚠️ Visual only – NO touching |
| Cable inspection | Annually | 5 minutes (visual only) | ⚠️ Visual only – NO touching |
| Professional service | Annually | 1-2 hours | ❌ Professional |
| Check battery backup (if fitted) | Every 3 months | 5 minutes | ✅ Yes |
| Test manual release | Every 6 months | 5 minutes | ✅ Yes |
South African Specifics: Coastal homes (Durban, Cape Town) should lubricate every 3-4 months and inspect for rust monthly. Highveld homes (Joburg, Pretoria) should focus on dust removal and UV protection. We’ll cover regional differences later.
👁️ Monthly Visual Inspection Checklist
Spend 5 minutes each month walking around your garage door, looking for potential problems.
🔍 What to Check:
- ☐ Look for rust spots on steel doors – especially along bottom edge and around bolt holes.
- ☐ Check for dents or damage to panels.
- ☐ Inspect weather seal at bottom – is it cracked, brittle, or missing?
- ☐ Look at springs (from a safe distance) – any gaps, rust, or signs of wear?
- ☐ Check cables – any fraying, rust, or loose strands?
- ☐ Examine rollers – do they spin freely? Any flat spots?
- ☐ Look at tracks – any dents, bends, or debris?
- ☐ Check hinges – any loose screws or damage?
- ☐ Inspect photo eye sensors – clean lenses, steady indicator lights.
- ☐ Look for oil leaks from motor or bearings.
🚩 Red Flags – Call a Pro:
- ✗ Visible gap in torsion spring
- ✗ Frayed or broken cables
- ✗ Door that’s hard to lift or falls quickly
- ✗ Loud grinding or banging noises
- ✗ Door off its tracks
- ✗ Rust that has eaten through metal
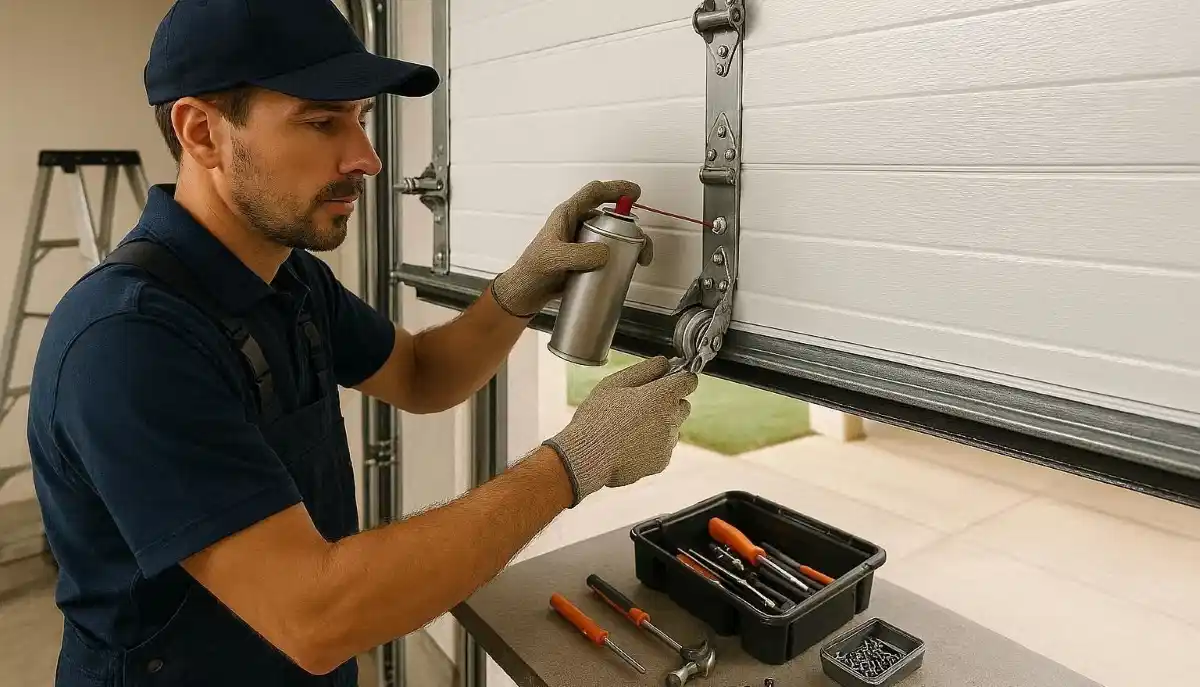
🛢️ Lubrication Guide – What to Use & Where
Proper lubrication is the single most important maintenance task. It reduces friction, prevents wear, and eliminates noise.
What to Use
- Silicone-based lubricant: Best for most applications. Won’t attract dirt. Available at hardware stores.
- Lithium grease: Good for bearings and hinge pins. Heavier than silicone.
- White lithium spray: Easy to apply, good for metal-on-metal contact.
- NEVER use WD-40: It’s a solvent and water displacer, not a lubricant. It will wash away existing lubricant and make things worse.
Where to Lubricate
- Rollers: Apply to the roller stem (where it goes into the hinge) and the bearing area. Wipe off excess.
- Hinges: Apply to the hinge pins where they pivot.
- Bearings: If your door has bearing plates at the ends of torsion springs, apply a small amount.
- Springs: Lightly coat the surface of springs to prevent rust. DO NOT attempt to lubricate inside springs.
- Lock: If you have a manual lock, lubricate the mechanism.
- Chain or screw drive (if exposed): Follow motor manufacturer’s recommendations.
Where NOT to Lubricate
- Tracks: Never lubricate tracks – it attracts dirt and gum up rollers. Tracks should be clean and dry.
- Plastic rollers: Some plastic rollers are self-lubricating – check manufacturer’s guide.
- Photo eye sensors: Keep lenses clean and dry, but no lubricant.
Pro Tip: After lubricating, operate the door a few times to work the lubricant in, then wipe off any excess with a clean cloth. Excess lubricant attracts dirt.
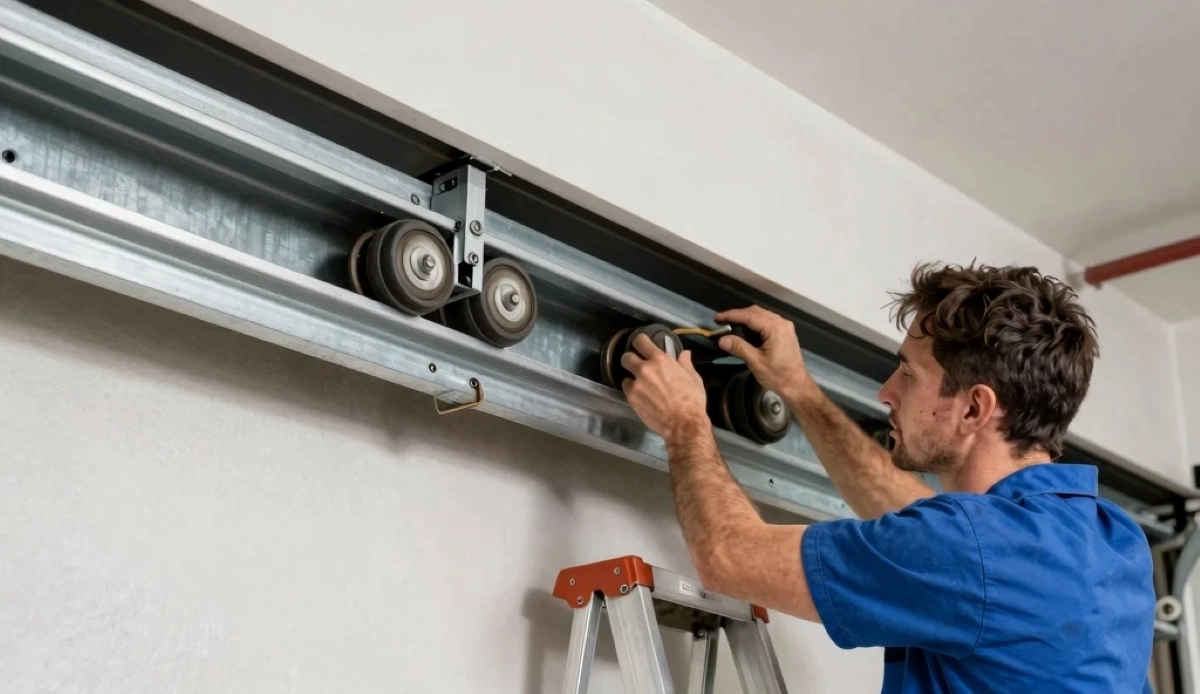
🛤️ Track Cleaning & Maintenance
Dirty tracks cause jerky operation, noise, and premature roller wear.
How to Clean Tracks
- Use a damp cloth or brush to remove dirt, dust, and debris from inside the tracks.
- For stubborn grime, use a mild detergent solution and a scrub brush.
- Rinse with clean water and dry thoroughly.
- DO NOT use oil or grease on tracks – it will attract more dirt.
What to Look For
- Dents or bends: If tracks are damaged, they need professional replacement or straightening.
- Loose mounting brackets: Tracks should be firmly attached to the wall or ceiling.
- Alignment: Tracks should be parallel and straight. If the door binds, tracks may be misaligned.
If you find track damage: Call a professional. Attempting to straighten tracks yourself can make things worse.
🔩 Tightening Hardware – What’s Safe
Vibration from daily operation can loosen nuts and bolts over time.
Safe to Tighten
- Hinge bolts (except those painted red – these are part of the spring system)
- Track mounting brackets
- Motor mounting brackets
- Rail brackets (for sectional doors)
- Handle and lock hardware
NEVER Tighten
- Red-painted hardware: These are part of the spring tension system. Adjusting them can cause springs to release.
- Spring set screws: These hold springs under tension. Only professionals with proper tools should touch these.
How to tighten: Use a socket wrench or screwdriver to ensure bolts are snug, but don’t overtighten and strip threads.
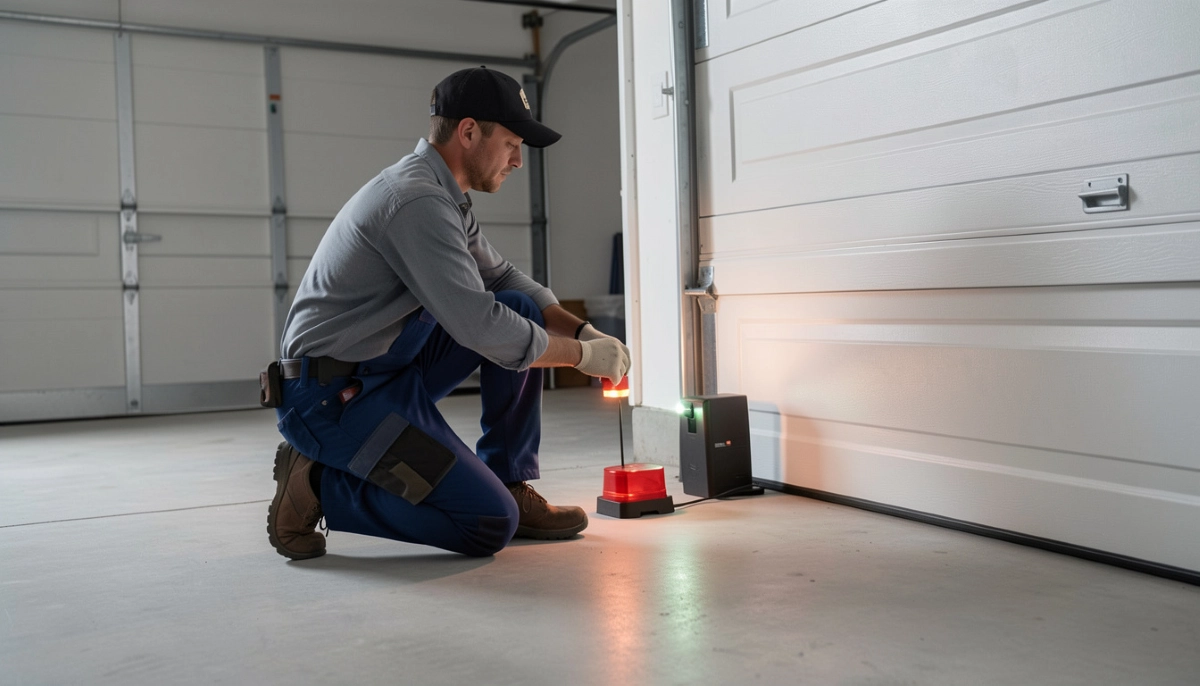
🛡️ Testing Safety Features – Auto-Reverse & Sensors
These features prevent the door from closing on people, pets, or vehicles. Test them every 3 months.
How to Test Auto-Reverse
- Place a roll of paper towels, a small block of wood, or an empty cardboard box on the floor under the centre of the door.
- Press the close button and allow the door to close on the object.
- The door should stop and reverse within 1 second of contact.
- If the door doesn’t reverse or crushes the object, disconnect the opener and call a technician immediately.
How to Test Photo Eye Sensors
- With the door open, press the close button.
- As the door starts closing, wave a broom handle or your leg in front of one sensor (without touching it).
- The door should immediately stop and reverse.
- Test both sensors.
- If the door doesn’t reverse, clean the sensor lenses and check alignment. If still not working, call a professional.
Safety Note: These tests could save a life – especially if you have children or pets. Don’t skip them. If your door fails either test, stop using the automatic opener and get it fixed immediately.
⚖️ Balance Test – Is Your Door Properly Counterbalanced?
A properly balanced door should stay in place when lifted halfway. If it falls or rises, the springs need adjustment.
How to Perform the Balance Test
- Disconnect the opener by pulling the emergency release cord.
- Manually lift the door to about halfway (waist height).
- Let go gently. The door should stay in place – not fall, not rise.
- If the door falls rapidly, the springs are weak or broken.
- If the door rises on its own, the springs are too tight.
- Re-engage the opener by pulling the release cord towards the motor.
If the door fails the balance test: Springs need adjustment or replacement. Call a professional immediately. Do not use the automatic opener until fixed – the motor is fighting the springs and will wear out quickly.
🔧 Failed a Safety Test or Balance Test?
Don’t risk injury or further damage. Get a professional garage door technician to diagnose and fix the problem safely.
🔄 Spring Inspection – Visual Only
REMINDER: Visual inspection only. DO NOT touch springs, attempt to adjust them, or remove any red-painted hardware.
What to Look For
- Gaps in the spring: Torsion springs should be tightly coiled. If you see a visible gap between coils, the spring is broken.
- Rust: Surface rust is normal, but heavy rust weakens the spring.
- Bent or distorted shape: Springs should be straight and uniform.
- Oil leaks: Some springs are oil-tempered – a little oil is normal, but puddles indicate a problem.
If you see any problems: Call a professional. Spring replacement is dangerous and requires specialized tools.
🪢 Cable Inspection – Signs of Trouble
Cables work with springs to lift the door. Frayed or damaged cables can snap without warning.
What to Look For
- Fraying: Any broken strands or “whiskers” on the cable.
- Rust: Heavy rust weakens cables.
- Kinks or bends: Cables should be straight and smooth.
- Loose strands: If you see loose wire strands, the cable is failing.
- Uneven tension: If one side looks tighter than the other, there may be a problem.
If you see any damage: Do not use the door. Call a professional immediately. A broken cable can cause the door to crash down.
🌧️ Weather Seal Replacement – Easy DIY
The rubber seal at the bottom of your door keeps out water, dust, leaves, and pests. Over time, it cracks and hardens.
When to Replace
- Cracks or splits in the rubber
- Hardened, brittle material
- Gaps between seal and floor when door is closed
- Water or dust entering garage
How to Replace
- Purchase replacement seal – measure your door width and check the profile (T-type, bulb, etc.).
- Open the door fully.
- Remove the old seal – usually held by screws along the bottom edge or slid into a channel.
- Clean the bottom edge of the door.
- Install the new seal – slide into channel or screw into place.
- Close door and check for even contact with floor.
Cost: R300 – R800 depending on door width and seal type.
🌊 Coastal Maintenance – Fighting Rust & Corrosion
If you live in Durban, Cape Town, Ballito, or anywhere near the ocean, your maintenance routine needs to be more aggressive.
Coastal Maintenance Schedule
- Wash door monthly: Use fresh water to remove salt deposits. Pay special attention to bottom edge and behind decorative elements where salt collects.
- Inspect for rust every 2-3 months: Look at bolt heads, hinges, bottom edge, and anywhere paint is chipped.
- Touch up paint immediately: Any chip in paint becomes a rust spot within weeks.
- Lubricate every 3-4 months: Salt air dries out lubricant faster.
- Consider waxing: A coat of car wax on steel doors adds protection.
If You’re Replacing Your Door
Seriously consider aluminium. It doesn’t rust and will save you years of maintenance. See our steel vs aluminium guide for details.
☀️ Highveld Maintenance – Dust & UV Protection
In Johannesburg, Pretoria, and other Highveld areas, the challenges are different.
Highveld Maintenance Focus
- Dust: Clean tracks more frequently – every 2 months instead of 3. Dust acts as abrasive on rollers.
- UV protection: The intense Highveld sun fades paint and dries out weather seals. Consider UV-protective coatings.
- Lubrication: Dust can turn lubricant into grinding paste. Clean old lubricant before reapplying.
- Wood doors: Need more frequent sealing – sun dries and cracks wood faster.
⚡ Loadshedding Care – Battery & Manual Release
South Africa’s unique challenge requires specific maintenance.
Battery Backup Maintenance
- Check battery every 3 months: Most motors have an indicator light for battery status.
- Test during loadshedding: When power is out, test that your gate still operates.
- Replace every 2-3 years: Batteries lose capacity over time. If your backup doesn’t last through a full loadshedding session, replace it.
- Upgrade if needed: Consider a larger 12Ah or lithium battery for longer backup.
Test Manual Release
Twice a year, practice using the emergency release cord:
- With door closed, pull release cord to disengage motor.
- Manually open and close door to ensure it moves freely.
- Re-engage motor by pulling cord towards door or operating door slightly.
This ensures you’re not trapped during an emergency.
⚙️ Garage Door Motor Maintenance
The motor needs some attention too.
Motor Maintenance Tasks
- Keep it clean: Dust the motor housing and surrounding area. Ensure ventilation slots aren’t blocked.
- Check chain/belt tension: If you have a chain drive, it should have about 1cm of sag. Adjust if needed (consult manual).
- Listen for unusual noises: Grinding, squealing, or rattling from motor indicates a problem.
- Check remote batteries: Replace annually or when range decreases.
- Keep antenna clear: The antenna wire should hang freely, not tucked away.
Motor Lifespan
Quality motors from Centurion or ET Systems last 7-12 years with proper maintenance. See our gate motor guide for more.
📞 When to Call a Professional
Some tasks are beyond DIY. Call a professional if you encounter:
🚨 Emergency – Stop Using Door
- Broken spring (visible gap)
- Frayed or broken cables
- Door off tracks
- Door crashes down when closing
- Auto-reverse fails safety test
⚠️ Schedule Service Soon
- Door feels heavy or unbalanced
- Persistent noise after lubrication
- Motor making unusual sounds
- Remote range decreasing
- Annual professional inspection
Use our installer selection guide to find a qualified professional.

❌ 7 Common Maintenance Mistakes
Learn from others’ errors: These mistakes shorten garage door life and create safety hazards.
Mistake #1: Using WD-40 as Lubricant
WD-40 is not a lubricant – it’s a solvent and water displacer. It will wash away existing lubricant, leaving parts dry and noisy. Use proper silicone or lithium grease.
Mistake #2: Lubricating the Tracks
Oil on tracks attracts dirt and dust, which turns into grinding paste that wears out rollers. Tracks should be clean and dry.
Mistake #3: Ignoring the Balance Test
A door that’s out of balance puts enormous strain on the motor. If you never test balance, you’ll wear out your motor years before its time.
Mistake #4: Tightening Red-Painted Hardware
Those red-painted bolts are part of the spring system. Adjusting them can cause springs to release with lethal force. Never touch them.
Mistake #5: Neglecting Coastal Maintenance
In coastal areas, skipping one year of maintenance can lead to irreversible rust damage. Steel doors need constant attention near the ocean.
Mistake #6: Forgetting to Test Safety Features
Safety sensors and auto-reverse can fail without you knowing – until someone gets hurt. Test them every 3 months without fail.
Mistake #7: DIY Spring Repair
The most dangerous mistake. Garage door springs are under thousands of pounds of tension. DIY spring repair kills and injures people every year. Always call a professional.
❓ Frequently Asked Questions – Garage Door Maintenance
How often should I lubricate my garage door?
Every 6 months for inland areas like Johannesburg and Pretoria. Every 3-4 months for coastal areas like Cape Town and Durban. Use a silicone-based lubricant or lithium grease – never WD-40.
What’s the best lubricant for garage doors?
Silicone-based spray lubricant or white lithium grease are best. They don’t attract dirt and provide long-lasting protection. Avoid heavy oils or WD-40. Brands like 3-in-One make specific garage door lubricant.
How do I know if my garage door spring is broken?
Signs include: a visible gap in the spring (torsion springs), the door won’t open, you heard a loud bang, or the door feels extremely heavy when lifted manually. If you suspect a broken spring, do not use the door – call a professional.
Why is my garage door making a grinding noise?
Grinding usually indicates dry or worn rollers, or bad bearings. Try lubricating the rollers and hinges first. If the noise persists, rollers may need replacement. This requires a professional as the door must be safely supported.
How do I test my garage door’s safety reverse?
Place a roll of paper towels or a small block of wood on the floor under the door. Close the door using the automatic opener. The door should stop and reverse within 1 second of hitting the object. Test every 3 months.
How long does a garage door motor last?
A quality motor from Centurion or ET Systems typically lasts 7-12 years with proper maintenance. Regular lubrication, balance tests, and protecting it from power surges extend its life.
Do I need to maintain my garage door if it’s aluminium?
Yes, but less. Aluminium doesn’t rust, so you can skip rust prevention. However, you still need to lubricate rollers and hinges, clean tracks, test safety features, and check balance. Aluminium doors still have steel components (hinges, springs, cables) that need attention.
How much does professional garage door maintenance cost?
A professional service call typically costs R500 – R1,200 depending on your location and the scope of work. This usually includes inspection, lubrication, tightening, and safety tests. Repairs (if needed) are extra.
Can I paint my garage door myself?
Yes, for steel or wood doors. Clean thoroughly, sand if needed, use metal primer for steel, and apply exterior-grade paint. For aluminium, painting is more complex – it requires etching primer. Factory powder coating is best left untouched.
How do I prepare my garage door for loadshedding?
Ensure your battery backup is working (replace if older than 2-3 years). Test the manual release twice a year so you know how to operate the door manually. Consider a UPS for the motor if you have frequent long outages.
✅ Final Thoughts – Your Maintenance Action Plan
Regular maintenance is the secret to a long-lasting, safe, and quiet garage door. It takes minimal time but saves thousands in repairs and replacements.
Your 4-Step Maintenance Action Plan:
- Mark your calendar: Set reminders for monthly visual checks, quarterly safety tests, and bi-annual lubrication.
- Create a maintenance kit: Keep silicone lubricant, a cloth, a soft brush, and a socket set handy.
- Know your limits: Do the safe DIY tasks, but never hesitate to call a professional for springs, cables, or anything dangerous.
- Book an annual professional service: Even if you do your own maintenance, a professional once a year catches things you might miss.
🔑 The Bottom Line:
30 minutes of maintenance twice a year
adds 10+ years to your garage door’s life and keeps your family safe.
🔧 Need Professional Help?
Not comfortable doing your own maintenance? Have a problem you can’t fix? Get quotes from experienced garage door technicians who can service your door safely.
📞 Call our maintenance helpline: 073 138 4726
📚 Official Resources & Standards:
- Garage Doors Cape Town – Seasonal maintenance guide for coastal areas.
- Centurion Systems – Motor maintenance schedules and battery care.
- SABS – Safety testing standards for garage doors (SANS 10400-T).
- 3-In-One – Approved lubricant types and application guides.
This guide is for informational purposes. Always prioritize safety and consult a professional for any task involving springs, cables, or structural components.
Written by: ServiceLink SA Research Team
Industry analysis and technical research for South African homeowners
Our team has decades of combined experience in garage door installation, repair, and maintenance across all South African climates. This guide synthesises best practices from manufacturers and experienced technicians.