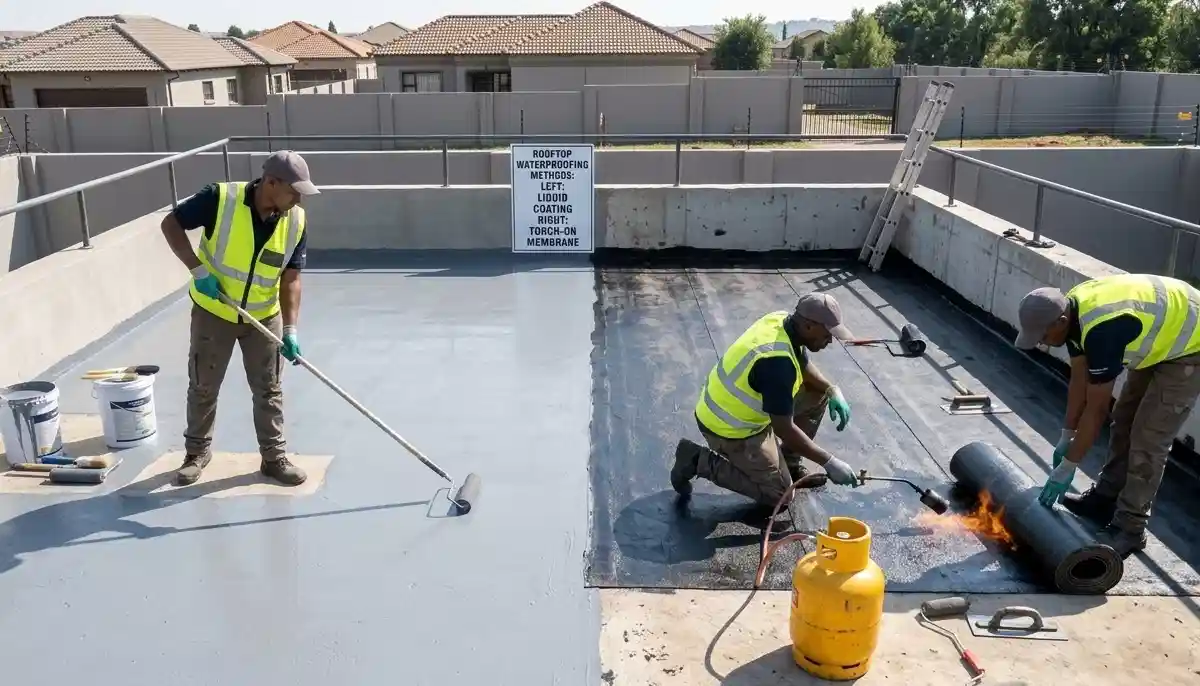
Torch-on vs Liquid Waterproofing Comparison – Which System is Best for Your South African Home?
🔥💧 Torch-on membrane or liquid rubber? Bitumen or polyurethane? Hot applied or cold applied? Here’s how to choose the right waterproofing system for your roof, balcony, or basement.
You’re planning to waterproof your flat roof in Sandton. Or maybe you need to seal a balcony in Cape Town. The contractor offers two options: torch-on bitumen or liquid polyurethane. Which one should you choose?
The torch-on vs liquid waterproofing comparison is one of the most common debates in the industry. Both systems have proven track records, but they have different strengths, weaknesses, and ideal applications. Your choice affects cost, durability, installation time, and even whether the work can proceed at all (open flame restrictions apply in some buildings).
This guide provides a head-to-head comparison across every factor: application method, lifespan, cost, suitability for different surfaces, curing time, VOC emissions, and more. By the end, you’ll know exactly which system is right for your specific project.
If you’re ready for professional help, explore our Services Overview or visit our Waterproofing Services page to find vetted contractors near you. For more on how we work, see How It Works.
📋 INDUSTRY STANDARDS: Both systems must comply with SABS standards for waterproofing. Torch-on applications have specific flammability requirements, and ECASA provides guidance on electrical safety near torch-on work. The Corporation of Waterproofing Professionals offers best practice comparisons.
Not Sure Which System You Need?
Get free, no-obligation quotes from vetted waterproofing specialists who can assess your project and recommend the right solution.
Find Waterproofing Experts Near Me
Servicing Johannesburg, Pretoria, Cape Town, Durban, and nationwide
📋 Table of Contents – Torch-on vs Liquid Guide
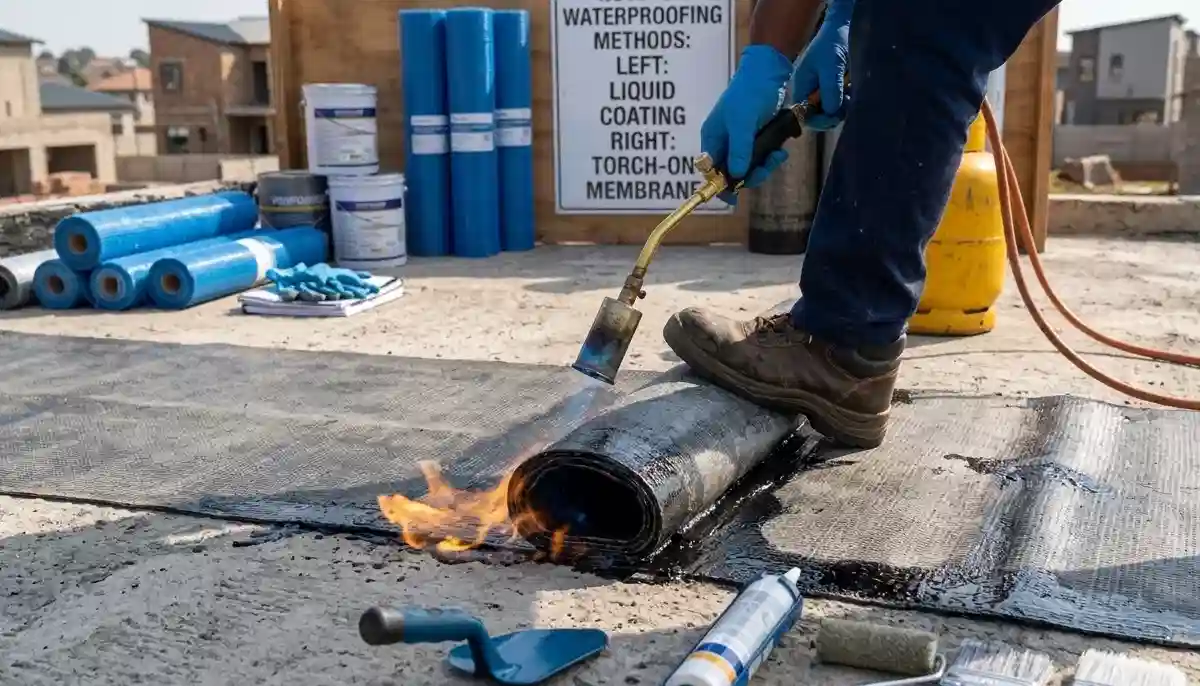
🔥 Torch-on Bitumen Overview – The Traditional Workhorse
Torch-on bitumen (also called torch-applied membrane) consists of modified bitumen sheets that are melted onto the substrate using a gas torch. It’s been the standard for flat roof waterproofing for decades.
How It Works
- Sheets of bitumen membrane (typically 1m wide, 10m long) are rolled out
- A propane torch melts the underside of the sheet
- The molten bitumen bonds to the substrate or previous layer
- Sheets are overlapped by 100-150mm to create sealed joints
- Multiple layers can be applied for reinforcement
- A reflective or protective coating is often applied on top
Common Applications
- Flat roofs (concrete, timber, or metal deck)
- Parapet walls and gutters
- Concrete podium decks
- Basement tanking (external)
Typical Thickness
3mm (standard) or 4mm (premium) for single layer. Often applied as two-layer system for critical areas.
Learn more about our approach on our About Us page or read why clients choose us on our Benefits page.
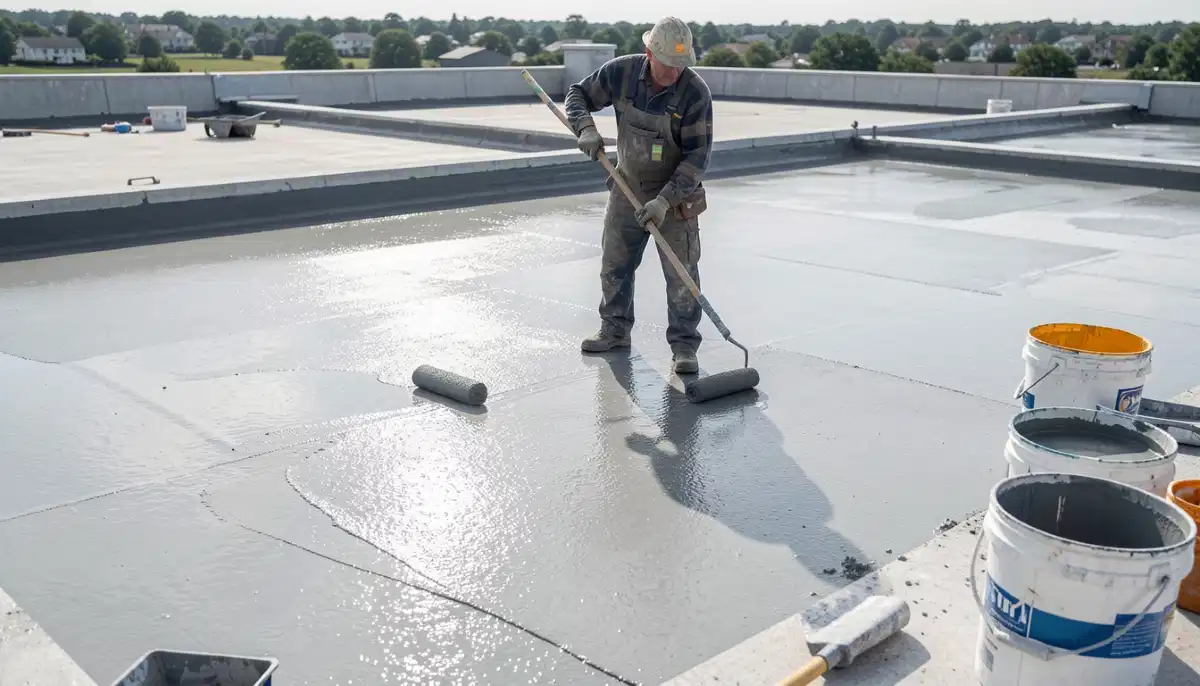
💧 Liquid Polyurethane Overview – The Modern Seamless Solution
Liquid polyurethane is a cold-applied liquid that cures to form a seamless, rubber-like membrane. It’s increasingly popular for complex details and areas where torches can’t be used.
How It Works
- Two-component liquid is mixed on site (resin and hardener)
- Applied by roller, brush, or spray
- Reinforcement fabric (scrim) embedded in critical areas
- Cures by chemical reaction to form seamless membrane
- Multiple coats build up to required thickness
- Topcoat provides UV protection (if required)
Common Applications
- Balconies and terraces
- Complex roof shapes with many penetrations
- Wet areas (bathrooms, showers)
- Concrete decks
- Areas where open flames are prohibited
Typical Thickness
1.5mm (standard) or 2.0mm (heavy duty) dry film thickness, built up in multiple coats.
🛠️ Application Method Comparison – Hot vs Cold Applied
The fundamental difference is hot applied (torch-on) vs cold applied (liquid). This affects everything else.
| Aspect | Torch-on Bitumen | Liquid Polyurethane |
|---|---|---|
| Application temperature | Hot (torch melts membrane) | Cold (ambient temperature) |
| Equipment needed | Gas torch, rollers, knives | Mixer, rollers, brushes, spray equipment |
| Skill level required | High – torch control, overlap accuracy | High – mixing ratios, even application |
| Weather restrictions | Dry conditions, can be applied in cold | Dry, temperature >5°C, low humidity ideal |
| Application speed | Moderate (sheet placement) | Fast (liquid covers quickly) |
| Number of applicators | Typically 2-3 person team | Can be done by 1-2 people |
💰 Cost Comparison – Which is More Affordable?
Cost is often a deciding factor. Here’s how they compare:
| Cost Component | Torch-on Bitumen | Liquid Polyurethane |
|---|---|---|
| Materials cost (per m²) | R80 – R150 (3mm) | R120 – R200 (1.5mm) |
| Labour cost (per m²) | R80 – R150 | R80 – R140 |
| Total installed cost (per m²) | R180 – R350 | R220 – R380 |
| Cost for 100m² roof | R18,000 – R35,000 | R22,000 – R38,000 |
| Long-term value (cost per year) | R900 – R2,300/year (15-20 yrs) | R880 – R2,500/year (15-25 yrs) |
Verdict: Torch-on is generally slightly cheaper upfront, but liquid systems can offer better value on complex shapes where torch-on requires more detailing labour. For detailed pricing, see our waterproofing cost guide.
⏱️ Lifespan & Durability – Which Lasts Longer?
Both systems can last decades when properly installed. Here’s how they compare:
Torch-on Bitumen Lifespan
- Standard (3mm): 15-20 years
- Premium (4mm, reinforced): 20-25 years
- Two-layer system: 25-30 years
Liquid Polyurethane Lifespan
- Standard (1.5mm): 15-20 years
- Heavy duty (2.0mm with topcoat): 20-25 years
- With reinforcement fabric: 20-25 years
Factors Affecting Lifespan
- UV exposure: Both need protection – torch-on needs reflective coating, liquid needs UV-stable topcoat
- Foot traffic: Liquid is generally more flexible and handles movement better
- Ponding water: Both can handle occasional ponding, but neither should have permanent water
- Installation quality: The biggest factor – poor installation dramatically shortens lifespan
Verdict: Similar lifespan potential – torch-on slightly ahead for straight roofs, liquid for complex areas.
🧹 Substrate Preparation – Critical for Both
Substrate preparation is essential for both systems, but the requirements differ.
Torch-on Preparation
- Surface must be clean, dry, and free of loose material
- Primer applied to porous surfaces (concrete, timber)
- Minor irregularities acceptable – membrane is flexible
- Sharp edges need rounding or protection
- Moisture content must be below 4% (concrete)
Liquid Preparation
- Surface must be clean, dry, and sound
- Primer specific to substrate required
- Surface must be smooth – liquid will show imperfections
- Cracks may need filling or reinforcement
- Moisture content critical – some systems tolerate damp, others require bone-dry
- Profile (roughness) affects bond
Verdict: Torch-on is slightly more forgiving of surface irregularities. Liquid requires smoother preparation but can be more tolerant of moisture with appropriate primers.
🔗 Seams, Joints & Overlaps – Potential Weak Points
This is where the systems fundamentally differ.
Torch-on – Overlap Joints
- Sheets overlapped by 100-150mm
- Joints are torch-welded – molten bitumen fuses sheets
- Side and end laps required
- Quality depends on proper heating and pressure
- Joints are potential failure points if poorly done
- Multiple sheets mean multiple joints
Liquid – Seamless Application
- No joints – truly seamless
- Reinforcement fabric at changes of plane (corners, edges)
- Continuous membrane with no overlaps
- One of the biggest advantages of liquid systems
Verdict: Liquid wins for seamless application – no joints means no joint failures. Torch-on requires skilled work to ensure watertight overlaps.
⏳ Curing Time & Liquid Waterproofing Drying Time
Liquid waterproofing drying time affects project schedules. Torch-on is ready immediately.
Torch-on Curing
- Membrane is ready as soon as it cools (minutes)
- Can be walked on immediately
- No waiting between coats (if multiple layers)
- Project can progress same day
Liquid Curing
- Touch dry: 2-4 hours (depends on temperature, humidity)
- Recoat time: 4-24 hours between coats
- Fully cured: 24-72 hours
- Foot traffic: 24 hours typically
- Heavy traffic/tiling: 3-7 days for full cure
- Cold or humid conditions extend curing time significantly
Verdict: Torch-on wins for speed – immediate readiness. Liquid requires planning for curing time between coats and before traffic.
☀️ UV Resistance & Weathering – South African Sun
South Africa’s high UV levels mean UV resistance is critical.
Torch-on UV Resistance
- Standard bitumen is UV sensitive – degrades in sunlight
- Must be protected with reflective coating or mineral finish
- Mineral-surfaced cap sheets provide UV protection
- Aluminium or white coating reflects UV and heat
- Without protection, lifespan drops dramatically
Liquid UV Resistance
- Polyurethane is UV sensitive unless specially formulated
- Must have UV-stable topcoat (aliphatic polyurethane)
- Some systems are UV stable throughout (acrylics, but not polyurethane)
- White/topcoat reflects heat and UV
- Regular inspection and recoat of topcoat may be needed
Verdict: Both require UV protection. Neither should be left exposed without appropriate coating.
🔥 Open Flame Restriction – Critical Safety Difference
Open flame restriction can make torch-on impossible on some buildings.
When Torch-on Can’t Be Used
- Heritage buildings (fire risk to structure)
- Buildings with flammable insulation
- Areas with gas pipes or electrical hazards nearby
- Some body corporates prohibit open flames
- Fire risk areas during high fire danger periods
- Structures where fire could spread into cavities
Safety Requirements for Torch-on
- Fire extinguisher must be on site
- Hot work permit may be required (commercial)
- Fire watch after work (30-60 minutes)
- No work near flammable materials
- ECASA provides electrical safety guidelines
Verdict: Liquid wins where open flames are prohibited – it’s the only choice for many buildings.
🌿 VOC Emissions & Environmental Impact
VOC emissions (volatile organic compounds) affect indoor air quality and environmental permits.
Torch-on VOC
- Low VOC during application (no solvents)
- Some fumes from heating bitumen, but minimal
- Can be used in occupied buildings with ventilation
Liquid VOC
- Solvent-based polyurethanes have high VOC
- Water-based options available (lower performance)
- Strong odour during application and curing
- Occupants may need to vacate during application
- Ventilation critical
Verdict: Torch-on has lower VOC impact. Liquid requires ventilation and may not suit occupied spaces.
🔀 Performance on Complex Shapes
Complex roofs with many penetrations, upstands, and changes of plane favour one system.
Torch-on on Complex Shapes
- Sheets must be cut and fitted around penetrations
- Multiple small pieces increase joint count
- Detailing at pipes and corners is labour-intensive
- Potential for errors at complex details
- Good for simple rectangular roofs
Liquid on Complex Shapes
- Conforms to any shape – seamless
- Pipes and penetrations easily detailed
- Reinforcement fabric can be cut to shape
- Ideal for complex roofs with many details
- Excellent for balconies with drains and edges
Verdict: Liquid wins for complex shapes and areas with many penetrations.
🛠️ Repair & Maintenance – Which is Easier to Fix?
Torch-on Repair
- Localised damage can be patched with new membrane
- Patch must overlap surrounding area (torch-welded)
- Requires torch – may not be possible in some situations
- Patches visible but effective
- Blisters can be cut and repaired
Liquid Repair
- Small area can be re-coated with liquid
- Must prepare existing coating (clean, abrade)
- Primer may be needed for adhesion
- Invisible repair if done well
- Easy to recoat entire area for maintenance
Verdict: Liquid is generally easier to repair and maintain, especially for small areas.
📊 Complete Torch-on vs Liquid Comparison Table
Here’s every factor side by side:
| Factor | Torch-on Bitumen | Liquid Polyurethane |
|---|---|---|
| Cost per m² installed | R180 – R350 | R220 – R380 |
| Lifespan | 15-25 years | 15-25 years |
| Application method | Hot – torch applied | Cold – roller/brush/spray |
| Seams/joints | Overlapped, welded | Seamless |
| Curing time | Immediate | 24-72 hours full cure |
| Open flame risk | Yes – restriction on some buildings | No – safe for all buildings |
| VOC emissions | Low | Moderate-high (solvent-based) |
| Complex shapes | Challenging, many joints | Excellent – seamless |
| Substrate preparation | Moderate – forgiving | Critical – smooth surface needed |
| UV protection needed | Yes – coating or mineral finish | Yes – UV-stable topcoat |
| Foot traffic resistance | Good with protection | Excellent – flexible |
| Ease of repair | Moderate – needs torch | Easy – recoat |
| Best for | Simple flat roofs | Complex shapes, balconies |
🎯 Best Applications for Each System
Choose Torch-on Bitumen When
- You have a large, simple flat roof with few penetrations
- Budget is a primary concern
- Open flames are permitted
- You need immediate readiness (no curing time)
- The roof has good access for sheet handling
- You want a proven, traditional system
Choose Liquid Polyurethane When
- You have complex shapes, many penetrations, or details
- Open flames are prohibited (heritage buildings, flammable structures)
- You’re waterproofing a balcony or terrace (seamless is better)
- You want a seamless membrane with no joints
- The area has many corners, drains, and upstands
- You need to waterproof a wet area (bathroom, shower)
- Future maintenance and recoating is a priority
For specific applications, see our roof waterproofing guide and balcony waterproofing page.
📍 Regional Considerations by City
📌 Johannesburg & Pretoria
In Johannesburg and Pretoria, both systems work well. Torch-on is popular for large flat roofs on townhouses. Liquid is preferred for complex architectural roofs with many features. UV protection is essential for both at altitude.
📌 Durban & Umhlanga
In Durban and Umhlanga, high humidity can affect liquid curing times. Plan for longer drying periods. Torch-on is less affected by humidity. Both must handle tropical downpours – proper detailing is critical.
📌 Cape Town & Bellville
In Cape Town and Bellville, winter rain means work must be scheduled carefully. Liquid application needs several dry days. Torch-on can be applied in cooler conditions but must be dry. Heritage areas may restrict open flames.
📌 Centurion & Midrand
In Centurion and Sandton, both systems are common. The choice often comes down to roof complexity and contractor preference.
❌ 8 Common Waterproofing Selection Mistakes
Avoid these errors when choosing between systems:
- Mistake #1: Choosing based on price alone. The cheapest quote may use thin materials or inexperienced applicators. Consider value over lifespan.
- Mistake #2: Ignoring open flame restrictions. Some buildings simply can’t use torch-on. Check before specifying.
- Mistake #3: Not considering future maintenance. Liquid is easier to recoat. Torch-on repairs need torches.
- Mistake #4: Underestimating complexity. On complex roofs with many penetrations, liquid often outperforms despite higher cost.
- Mistake #5: Forgetting about curing time. Liquid needs dry weather for several days. Schedule accordingly.
- Mistake #6: No UV protection specified. Both systems need UV protection. Ensure it’s in the quote.
- Mistake #7: Assuming all liquids are the same. Polyurethane, acrylic, and cementitious are very different. Know what you’re getting.
- Mistake #8: Not checking contractor experience. Some contractors specialise in torch-on, others in liquid. Choose accordingly.
For more guidance, see our contractor selection guide.
❓ Frequently Asked Questions
Which is better – torch-on or liquid waterproofing?
In the torch-on vs liquid waterproofing comparison, neither is universally better. Torch-on is excellent for simple flat roofs, offering good value and immediate readiness. Liquid is better for complex shapes, balconies, and where open flames are prohibited. Choose based on your specific application, not a general preference.
How long does torch-on membrane last?
Torch-on membrane lifespan is 15-20 years for standard 3mm, 20-25 years for premium 4mm with proper UV protection. Two-layer systems can last 25-30 years. Regular inspection and maintenance extend life.
What is liquid waterproofing drying time?
Liquid waterproofing drying time varies: touch dry 2-4 hours, recoat 4-24 hours, foot traffic 24 hours, full cure 3-7 days. Cold or humid conditions significantly extend drying times. Plan projects accordingly.
Is torch-on waterproofing safe for all buildings?
Torch-on uses open flames, so it’s not safe for all buildings. Open flame restriction applies to heritage buildings, structures with flammable insulation, areas with gas pipes, and where body corporates prohibit flames. Always check before specifying torch-on.
Which is more expensive – torch-on or liquid?
Torch-on vs liquid cost comparison: torch-on is generally slightly cheaper (R180-R350 per m²) than liquid polyurethane (R220-R380 per m²). However, on complex roofs where torch-on requires extensive detailing, liquid can be cost-competitive. Consider long-term value, not just upfront cost.
Can liquid waterproofing be applied over torch-on?
Yes, liquid can be applied over existing torch-on for maintenance or repairs. Surface must be clean, sound, and properly primed. Check compatibility with manufacturer recommendations. This is a common way to extend the life of an existing torch-on roof.
Do both systems need UV protection?
Yes, both need UV protection. Torch-on requires reflective coating or mineral finish. Liquid needs UV-stable topcoat. Without protection, UV degrades both systems, dramatically shortening lifespan.
Which is better for balconies – torch-on or liquid?
Liquid is generally better for balconies due to seamless application around drains and edges, better flexibility for foot traffic, and easier detailing. Torch-on can be used but requires careful detailing at all penetrations.
✅ Final Thoughts – Your System Selection Action Plan
Choosing between torch-on and liquid doesn’t have to be difficult. Focus on your specific roof type, access, and constraints.
Key takeaways:
- Torch-on for simple flat roofs – cost-effective, proven, immediate
- Liquid for complex shapes – seamless, flexible, ideal for details
- Check flame restrictions – some buildings can’t use torch-on
- Consider curing time – liquid needs dry weather windows
- Both need UV protection – never leave either exposed
- Get expert advice – consult qualified waterproofing contractors
🔥💧 The Bottom Line:
Choose the system that fits your roof
Both torch-on and liquid are proven when properly installed. Match the system to your specific application.
Your 5-Step Action Plan
- Assess your roof – flat or complex? Many penetrations?
- Check restrictions – are open flames permitted?
- Consider timeline – do you have dry days for liquid curing?
- Get expert opinions – consult qualified contractors
- Choose based on fit – not just price, but suitability
Not Sure Which System You Need?
Get free, no-obligation quotes from vetted waterproofing specialists who can assess your project and recommend the right solution.
📞 Call us: 073 138 4726 for personalised assistance
Free site inspections •
Beat-your-quote guarantee •
Our guarantees
📚 Official resources & standards:
- SABS – Flammability standards for torch-on applications
- ECASA – Electrical safety near torch-on work
- Corporation of Waterproofing Professionals – Industry best practice comparisons
Information accurate as of publication. Prices are indicative and may vary by location and contractor. This guide is for informational purposes.
Written by: Innocent T Hanyani
21+ years construction and digital industry experience, ServiceLink SA
Innocent has specified and overseen both torch-on and liquid waterproofing systems on hundreds of projects across South Africa. His experience with both methods ensures this comparison reflects real-world performance and practical considerations.
For more detailed information, explore our waterproofing cost guide for pricing on both systems, our roof waterproofing guide for specific roof applications, our flat roof problems guide for troubleshooting, and our best products guide for brand recommendations. These resources work together to give you complete knowledge about waterproofing options.