
Planning a Tile Installation?
Get free quotes from verified tiling specialists who understand tile leveling system requirements and proper tile alignment techniques.
Servicing Gauteng, Johannesburg, Pretoria, Sandton, and across South Africa
Tile Spacers and Levelling Systems Explained: Perfect Tile Alignment SA
📐 From consistent grout lines to perfectly flat floors – the complete guide to tile alignment tools
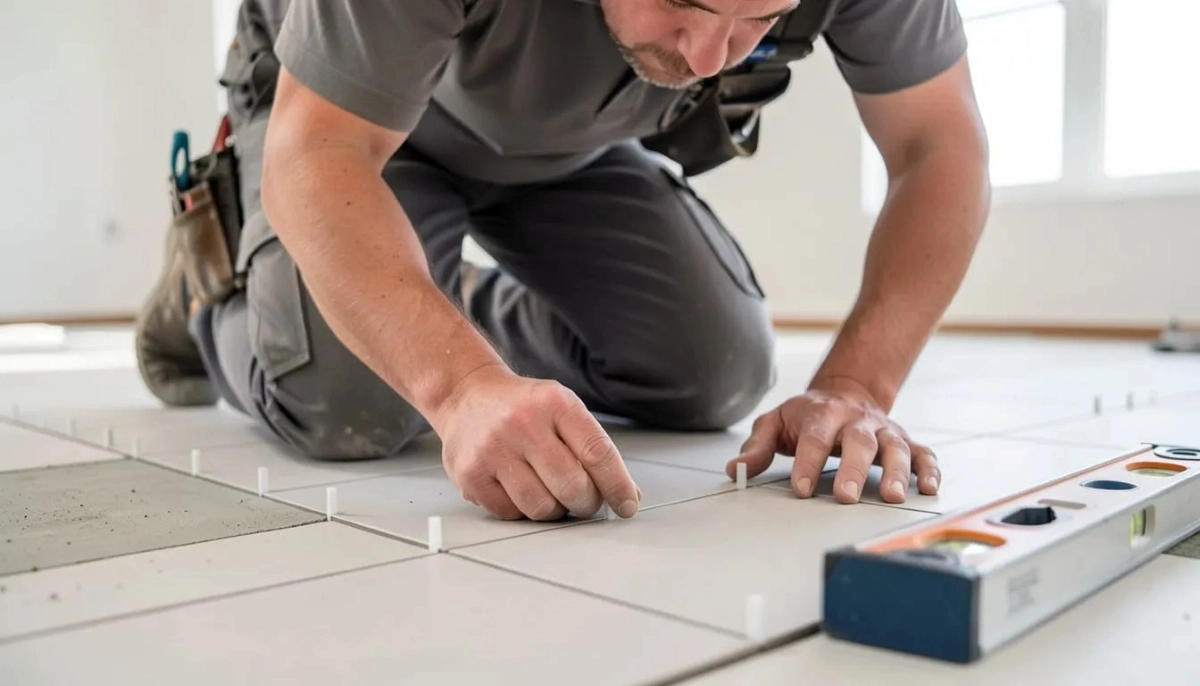
You’ve seen them. Floors where the grout lines are perfectly straight, where every tile sits flush with its neighbour, where you can’t feel a single edge underfoot. That’s not luck – that’s the result of using the right tile spacers leveling system.
I’ve been tiling across Gauteng, from Johannesburg to Pretoria and Sandton, for over two decades. And I can tell you that the difference between an amateur installation and a professional one often comes down to two things: spacers and leveling systems. Spacers give you consistent grout lines. Leveling systems eliminate lippage. Together, they’re unbeatable.
In this complete guide to tile leveling system and spacer use, I’ll answer how to use tile spacers and leveling system correctly. You’ll learn about different tile spacer sizes, types of leveling systems, when to use each, and step-by-step techniques for perfect tile alignment. By the end, you’ll know exactly how to achieve professional results – whether you’re a DIYer or a pro.
For more installation guidance, check out our guides on essential tile installation tools, tile adhesives explained, self-levelling compounds, tile lippage guide, and large format tiles installation.
📋 Table of Contents – Tile Spacers & Leveling Systems Guide
📏 Why Tile Spacers Matter
Never trust your eye to judge grout line consistency. Here’s why tile spacers leveling system components are essential:
What Spacers Do:
- Maintain consistent gap width between tiles
- Ensure straight rows (when used with guidelines)
- Allow for expansion and contraction of tiles
- Create space for grout to bond properly
- Prevent tiles from shifting during adhesive curing
Consequences of NOT Using Spacers:
- Uneven, wavy grout lines that look amateur
- Tiles that touch (no grout space) – leads to cracking from expansion
- Crooked rows that drift over distance
- Inconsistent appearance – some gaps wide, some narrow
- Grout that doesn’t penetrate properly (too narrow)
According to SANS 10400 spacing standards, minimum grout joint width is 1.5mm for rectified tiles and 3mm for standard tiles.
For more on industry guidelines, refer to Tile Association of South Africa industry guidelines.
📐 Tile Spacer Sizes – Which to Choose
Different tile spacer sizes suit different tiles and applications:
| Spacer Size | Best For | Tile Type | Look |
|---|---|---|---|
| 1.5mm – 2mm | Rectified tiles, modern minimalist | Precision-cut porcelain, large format | Seamless, almost invisible joints |
| 2mm – 3mm | Standard wall tiles, polished tiles | Ceramic wall tiles, subway tiles | Clean, modern, subtle joints |
| 3mm – 4mm | Standard floor tiles (most common) | Ceramic, porcelain floor tiles | Classic, balanced appearance |
| 4mm – 5mm | Large format tiles, outdoor tiles | Large porcelain, natural stone | Rustic, traditional, accommodates size variation |
| 5mm – 6mm | Natural stone, rustic tiles, outdoor | Slate, travertine, quarry tiles | Rustic, Mediterranean, accommodates uneven edges |
General Rule: Larger tiles need wider grout joints to accommodate size variations. Rectified tiles (precision-cut) can use narrower joints. Outdoor tiles need wider joints for expansion.
🧩 Types of Tile Spacers
Several tile alignment spacer options are available:
Cross Spacers (Most Common):
Traditional plastic crosses. Simple, cheap, effective. Available in sizes 1mm-10mm. Can be stacked for thicker joints. Best for floors and walls. Disposable – single use.
T-Shaped Spacers:
Similar to cross spacers but one leg is longer. Good for wall tiles where gravity pulls tiles down. The long leg provides more stability.
Wedge Spacers:
Adjustable wedges that can fine-tune gaps. Useful for correcting small size variations in natural stone. Also used in leveling systems. Reusable.
Horseshoe Spacers:
U-shaped spacers that slide under tiles from the edge. Useful for large tiles where you can’t insert cross spacers from the top.
Spin Spacers / Screw Spacers:
Threaded spacers that allow micro-adjustment. Very precise but slower. Often used in high-end installations.
Leveling System Spacers (Clips):
Part of tile leveling systems (see below). The clip goes between tiles and the wedge/cap provides tension. Combines spacing AND leveling.
Pro Tip: For most DIY projects, standard cross spacers (3-4mm) are sufficient. For large format or natural stone, consider a leveling system.
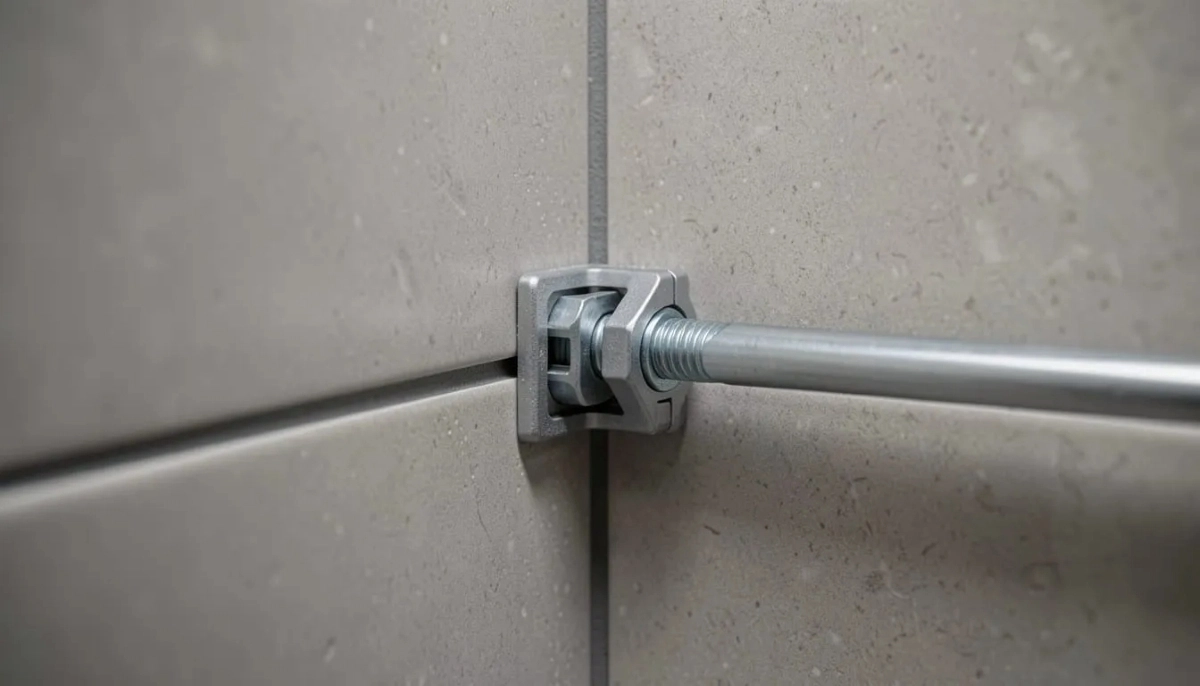
🔧 What Is a Tile Leveling System?
A tile leveling system (also called lippage control system) eliminates height differences between adjacent tiles.
The Problem It Solves:
Even with a flat subfloor, tiles can have slight warpage (bowing). When you place two tiles next to each other, the edges may not align perfectly – one sits higher than the other. This is lippage.
How It Works:
A leveling system uses clips placed between tiles and wedges or caps that tighten down. When tightened, the system pulls both tiles flush, eliminating lippage before the adhesive sets.
Components:
- Clips / Bases: Plastic pieces that sit between tiles, extending under both tile edges
- Wedges or Caps: Tightened into the clips to pull tiles flush
- Tensioning tool (pliers or gun): Applies consistent pressure to wedges/caps
After adhesive cures (typically 24 hours), you break off the tops of clips or remove wedges. The base remains permanently under the tile.
For more on lippage, read our tile lippage guide.
Need Professional Tile Installation?
Get free quotes from verified tiling specialists who use proper tile spacers and leveling system techniques for flawless results.
Free inspections available. Beat Your Quote guarantee.
⚙️ Types of Tile Leveling Systems
Several tile leveling system designs are available:
1. Clip and Wedge Systems (Most Common)
How it works: Clip goes between tiles. Wedge slides into clip and is tightened with pliers. The wedge pulls the clip upward, which pulls both tile edges down flush.
Pros: Affordable, reusable wedges, widely available, effective.
Cons: Wedges can pop out if over-tightened.
Examples: Raimondi, Tuscan Leveling, Spin Doctor.
2. Cap and Base Systems
How it works: Base clips between tiles. Caps screw or snap onto the base, tightening to pull tiles flush.
Pros: Very secure, less likely to pop out.
Cons: More expensive, caps not reusable.
Examples: Perfect Level Master.
3. Spin / Ratchet Systems
How it works: Plastic base with threaded post. A spinning cap ratchets down the post, tightening progressively.
Pros: Very precise, consistent tension, no pliers needed.
Cons: Slower installation, more expensive.
Examples: Spin Doctor, MLT System.
4. Strap Systems
How it works: Straps inserted between tiles. A gun tool tensions the strap, pulling tiles flush.
Pros: Very fast for large areas, consistent tension.
Cons: Expensive, requires special gun tool.
Examples: RTC Professional Leveling System.
For most DIY and professional applications, clip-and-wedge systems offer the best balance of cost and effectiveness.
📋 When You Need a Leveling System
Not every project requires a tile leveling system. Here’s when to use one:
Leveling System IS Essential:
- ✓ Large format tiles (300x300mm or larger) – especially 600x600mm+
- ✓ Rectified tiles (precision edges, narrow grout lines)
- ✓ Natural stone tiles (inherent warpage)
- ✓ Porcelain tiles (can have slight bowing)
- ✓ Floors where lippage would be noticeable (hallways, open-plan)
- ✓ When using a tile leveling system prevents lippage – read our tile lippage guide
- ✓ Professional installations expecting perfect results
Leveling System Helpful But Not Essential:
- ✓ Small ceramic wall tiles (100x100mm) – less prone to lippage
- ✓ Mosaic sheets (many small tiles) – individual tiles are small
- ✓ Uneven subfloors (though fix subfloor first!)
Leveling System Usually Not Needed:
- ✗ Very small tiles (under 100x100mm)
- ✗ Mosaics on sheets (the sheet provides some leveling)
- ✗ Walls (gravity helps, but large wall tiles still benefit)
✅ Pro Tip:
For large format tiles (600x600mm and larger), a tile leveling system is NOT optional – it’s essential. Even the most experienced tilers cannot eliminate lippage on large tiles without one. Read our large format tiles guide.

📝 How to Use Tile Spacers and Leveling Systems
Follow these steps for how to use tile spacers and leveling system correctly:
Using Standard Spacers Only (Small Tiles):
- Spread adhesive with notched trowel
- Place first tile, press into adhesive
- Insert spacers on all four sides of the tile
- Place next tile, pressing against spacers
- Check alignment with level frequently
- Remove spacers before grouting (or leave in if designed for grouting)
Using a Clip-and-Wedge Leveling System (Large Tiles):
- Spread adhesive with notched trowel (larger notches for large tiles – 8-10mm)
- Place first tile, press into adhesive
- Slide leveling clips under all four edges of the tile (or place clips between tiles as you go)
- Apply adhesive for adjacent area
- Place next tile, pressing down so the clip sits between both tiles
- Insert wedge into the clip
- Use leveling pliers to tighten wedge – tighten until tiles are flush
- Don’t over-tighten – can crack tiles or pop wedges
- Check with level – adjust if needed
- Continue for all tiles
- Wait 24-48 hours for adhesive to cure
- Remove wedges (they’re reusable)
- Snap off clip tops (or remove entire clip depending on system)
- Grout as normal
Important Tips:
- Don’t walk on tiles before leveling system is tightened
- Work in small sections – adhesive skins over quickly
- For large rooms, install leveling system every 2-3 tiles, not every edge (saves clips)
- Remove wedges within 24 hours – leaving longer can make removal difficult
- Always follow manufacturer instructions for your specific system
For more on tools, read our essential tile installation tools guide.

🚫 Common Mistakes to Avoid with Spacers and Leveling Systems
⚠️ Warning: These Mistakes Ruin Tile Alignment
Avoid these errors when using tile spacers leveling system components.
- Not using spacers at all: “I can eyeball it” – no, you can’t. Even professional tilers use spacers. Eyeballing leads to uneven, wavy grout lines.
- Using wrong spacer size: Too narrow = no room for grout, tiles may crack from expansion. Too wide = looks rustic when you want modern. Match size to tile type.
- Not using a leveling system for large tiles: “I’m experienced enough” – doesn’t matter. The physics of tile warpage requires leveling systems. Use them.
- Over-tightening wedges: Can crack tiles, pop wedges, or create lippage in the opposite direction. Tighten until tiles are flush – no more.
- Leaving wedges in too long: Adhesive hardens around wedges, making removal difficult or impossible. Remove within 24 hours (or per manufacturer instructions).
- Not checking level frequently: Assuming the leveling system fixes everything – you still need to check that the overall floor is flat. Use a long level.
- Using spacers as a leveling system: Spacers control WIDTH only, not HEIGHT. For height differences, you need a leveling system.
- Not removing spacers before grouting: Some spacers are designed to stay in (recessed), but most need removal. Check manufacturer instructions. Removing after grout sets is very difficult.
💰 Cost Guide for Spacers and Leveling Systems
Here’s what you can expect to pay for tile spacer sizes and leveling systems in South Africa:
| Product | Cost Range | Coverage / Quantity | Notes |
|---|---|---|---|
| Standard cross spacers (bag) | R50 – R150 | 200-500 pieces | Very affordable, single use |
| Wedge spacers | R100 – R250 | 50-100 pieces | Reusable, adjustable |
| Clip-and-wedge leveling kit | R300 – R800 | 100 clips + 100 wedges + pliers | Wedges reusable, clips single-use |
| Leveling clips (refill) | R150 – R400 | 200-500 clips | Consumable – order extra |
| Spin doctor system (starter) | R600 – R1,200 | 100 bases + caps + tool | Caps not reusable |
| Professional strap system | R2,000 – R5,000 | Gun tool + straps | Commercial use |
How Many Spacers/Clips Do You Need?
Estimate: For standard spacers, count the number of tile edges. Each tile has 4 edges, but adjacent tiles share edges. Rough formula: (number of tiles × 2) = approximate spacers needed. For leveling clips: 4 clips per large tile (one on each side) – or 1-2 clips per side for very large tiles.
For a complete breakdown of tile costs, read our tile installation cost per square meter guide.
❓ Frequently Asked Questions About Tile Spacers and Leveling Systems
Do I really need a tile leveling system?
For tiles 300x300mm and larger – YES. A tile leveling system eliminates lippage (height differences between tiles) that even experienced tilers can’t avoid with large tiles. For small tiles (under 150x150mm), standard spacers are usually sufficient. For large format tiles (600x600mm+), leveling systems are essential – not optional.
What size tile spacers should I use?
Tile spacer sizes by application: 1.5-2mm for rectified tiles (modern seamless look), 2-3mm for wall tiles, 3-4mm for standard floor tiles (most common), 4-5mm for large format or outdoor tiles, 5-6mm for natural stone or rustic looks. Larger tiles need wider joints to accommodate size variations.
Can I reuse tile leveling wedges?
Yes – wedges in clip-and-wedge systems are reusable. After adhesive cures, remove wedges (they pop out). Clean them and use again on future projects. Clips (the bases) are single-use – they remain under the tile after you snap off the tops. Some systems (like spin doctor) have non-reusable caps.
Do I need spacers if I’m using a leveling system?
Most tile spacers leveling system clips include built-in spacing (the clip thickness determines grout width). For example, a 3mm clip gives 3mm grout lines. However, you may still need separate spacers at room edges or for positioning. Check your leveling system – many combine both functions.
Can I use a tile leveling system on walls?
Yes – leveling systems work on walls too, though gravity makes lippage less of an issue. For large wall tiles (300x600mm or larger), a leveling system ensures perfect alignment. Use the same technique as floors – clips between tiles, wedges tightened. However, gravity helps keep wall tiles flat, so leveling is less critical than floors.
How do I remove tile spacers after installation?
Remove standard spacers BEFORE grouting. Once adhesive is thumbprint-dry (but not fully cured), pull spacers out with pliers or fingers. If you forget and grout over them, you’ll need to dig them out – difficult and may damage tiles. For leveling systems, remove wedges within 24 hours, then snap off clip tops. The clip base remains under the tile permanently.
Why do my tiles have lippage even with a leveling system?
Possible causes: uneven subfloor (leveling system can’t fix this – subfloor must be flat first), over-tightened wedges (can create reverse lippage), not enough clips (space clips every 200-300mm), or adhesive not properly applied (no back-buttering). First check subfloor flatness with a straight edge. Read our tile lippage guide for diagnosis.
Which tile leveling system is best for DIY?
For DIY, a clip-and-wedge system (R300-800 for starter kit) is best. They’re affordable, easy to use, and wedges are reusable. Avoid spin systems (slower) and strap systems (expensive). Popular brands: Raimondi, Tuscan Leveling, or generic clip-and-wedge systems available at tile shops. Watch online tutorials before starting.
✅ Final Thoughts: Small Tools, Big Difference
Tile spacers and leveling system components are among the most affordable tools in your tiling kit – yet they make the biggest difference in final appearance. A few hundred rand spent on spacers and leveling clips can save you from a floor with uneven grout lines and dangerous lippage.
Don’t skip spacers. Don’t skip leveling systems for large tiles. These small plastic pieces are cheap insurance against a failed installation. Professional tilers use them every time – that’s why their work looks flawless.
Key takeaways for tile spacers and leveling systems:
- Always use spacers – never eyeball grout lines
- Match spacer size to tile type (3-4mm is most common for floors)
- Use a leveling system for tiles 300x300mm and larger – essential for 600x600mm+
- Clip-and-wedge systems offer best value for DIY and pros
- Remove wedges within 24 hours – don’t let adhesive harden around them
- Spacers control width; leveling systems control height – you need both
- Even with leveling systems, check subfloor flatness first
Your next step: Ready to start your tiling project? Get free quotes from verified tiling specialists who use proper tile alignment techniques and professional leveling systems.
Ready to Start Your Tiling Project?
Get free quotes from verified tiling specialists who use proper tile spacers and leveling system techniques for flawless results.
📞 Call us: 073 138 4726 to discuss your tiling project.
Free inspections •
Beat Your Quote guarantee •
Workmanship guarantees
Are You a Tiling Professional?
Join ServiceLink SA’s network of verified tiling contractors. Get qualified leads and grow your business.
📚 Official resources & standards referenced:
- SANS 10400 – South African National Standard for spacing standards, minimum grout joint requirements, and installation specifications.
- Tile Association of South Africa – Industry guidelines for tile alignment, leveling systems, and professional installation standards.
Information provided for general guidance. Always follow manufacturer instructions for specific spacer and leveling system products.
Written by: Innocent T Hanyani
Construction & Home Services Industry Specialist | 21+ Years Experience
Innocent T Hanyani has over two decades of experience working across South Africa’s construction and home improvement sectors. Throughout his career, he has used every type of spacer and leveling system – from simple crosses to advanced strap systems. His practical experience helps homeowners understand when basic spacers are sufficient and when professional leveling systems are essential. He has seen beautiful large format floors ruined by lippage because the installer refused to use a leveling system. His advice emphasises that these small tools are the secret to professional results.
For more information about tile installation tools and techniques, explore our related resources: essential tile installation tools, tile adhesives explained, self-levelling compounds, tile lippage guide, and large format tiles installation. Learn about our process on what is ServiceLink SA and how we verify contractors. Find tilers in your area: Gauteng, Johannesburg, Pretoria, and Sandton. For related services, see our flooring services and building construction guides.