Planning a Tiling Project?
Get free quotes from verified tiling specialists who understand floor leveling compound requirements and proper floor preparation techniques.
Servicing Gauteng, Johannesburg, Pretoria, Midrand, and across South Africa
Self Levelling Compounds for Tile Floors: Complete Guide SA
🏗️ The secret to perfect tile installation starts beneath your feet – a completely flat subfloor
You’ve chosen beautiful tiles. You’ve bought premium adhesive. You’re ready to start tiling. But there’s a problem you can’t see yet – your floor isn’t flat. And if you tile over an uneven subfloor, all that beauty will be ruined by lippage, cracked tiles, and hollow spots.
I’ve walked into too many homes across Gauteng, from Johannesburg to Pretoria and Midrand, where beautiful tiles were ruined by an uneven base. The homeowners blamed the tiles or the installer – but the real culprit was inadequate floor preparation. The solution? Self levelling compounds for tile floors.
In this complete guide to floor leveling compound, I’ll explain everything you need to know about self leveler for tiles. You’ll learn when you need it, how to choose the right product, and how to use self levelling compound before tiling step by step. By the end, you’ll understand why professional tilers never skip this critical step – and how it saves you from expensive failures.
For more installation guidance, check out our guides on floor leveling and surface preparation, tile lippage guide, tile spacers and leveling systems, large format tiles installation, and essential tile installation tools.
📋 Table of Contents – Self Levelling Compounds Guide
📏 Why Floors Must Be Flat Before Tiling
Skipping floor leveling compound leads to multiple problems:
Consequences of Uneven Floors:
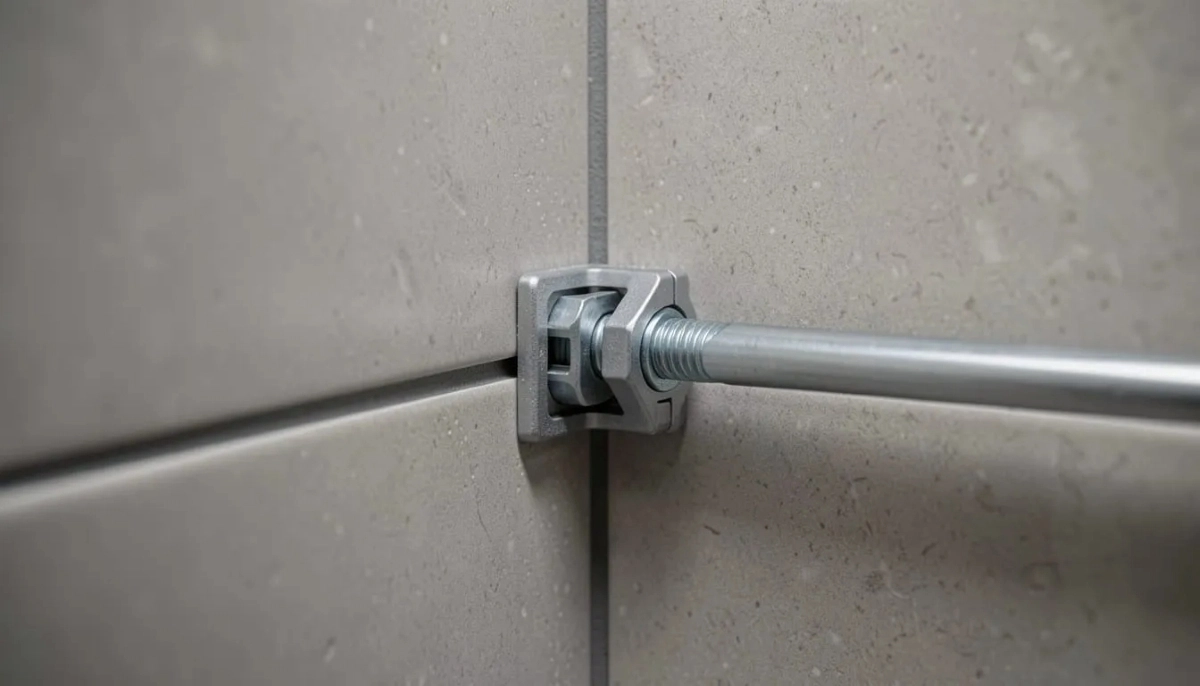
- Lippage: Uneven tiles that trip you and look terrible. Read our tile lippage guide.
- Cracked tiles: Tiles flex over voids and crack under foot traffic
- Hollow sounds: Poor contact between tile and substrate creates drumminess
- Grout cracking: Movement from uneven substrate cracks grout lines
- Failed waterproofing: Uneven surfaces compromise membrane integrity
- Difficult large format installation: Large tiles demand perfectly flat floors
Flatness Standards for Tiling:
According to SANS 10400 leveling standards:
- Standard tiles (up to 300x300mm): Within 5mm over 2 meters
- Medium tiles (300-600mm): Within 3mm over 2 meters
- Large format tiles (600mm+): Within 2mm over 2 meters
- Rectified tiles (precision edges): Within 1.5mm over 2 meters
Most concrete slabs don’t meet these standards. That’s where self leveller for tiles becomes essential.
For more on preparation, read our floor leveling and surface preparation guide.
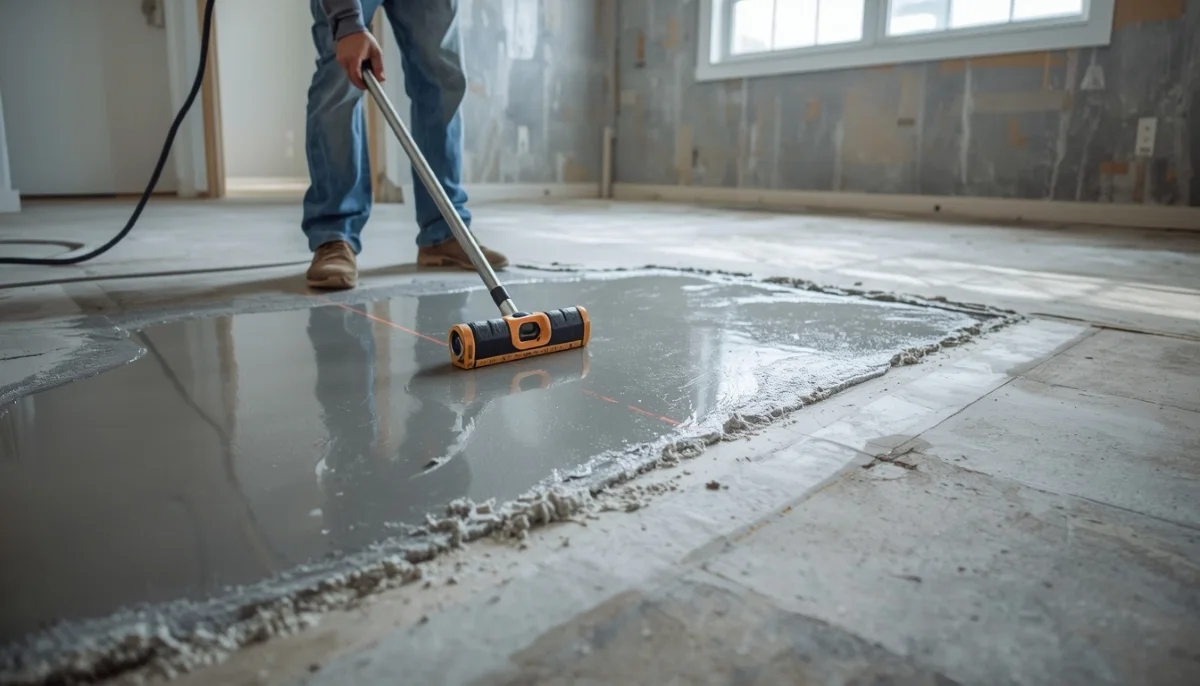
🧪 What Is Self Levelling Compound?
Self levelling compounds for tile floors are cement-based, pourable mixtures that flow to create a perfectly flat, level surface.
How It Works:
The compound has high fluidity (like a thick liquid). When poured, gravity pulls it to the lowest points, filling dips and depressions. The result is a flat, smooth surface ready for tiling.
Key Properties:
- Self-levels – flows to create flat surface without manual spreading
- Quick-drying – typically 2-6 hours for foot traffic, 24-48 hours for tiling
- High compressive strength – supports tile and foot traffic
- Bonds to concrete, cement board, plywood, and existing tiles
- Can be applied from 1mm to 50mm thickness (in multiple layers)
What It’s NOT:
- Not a substitute for structural repairs (large holes, deep cracks)
- Not a waterproofing membrane (though some are water-resistant)
- Not a finishing surface – it’s meant to be tiled over
For material standards, refer to SABS material specifications.
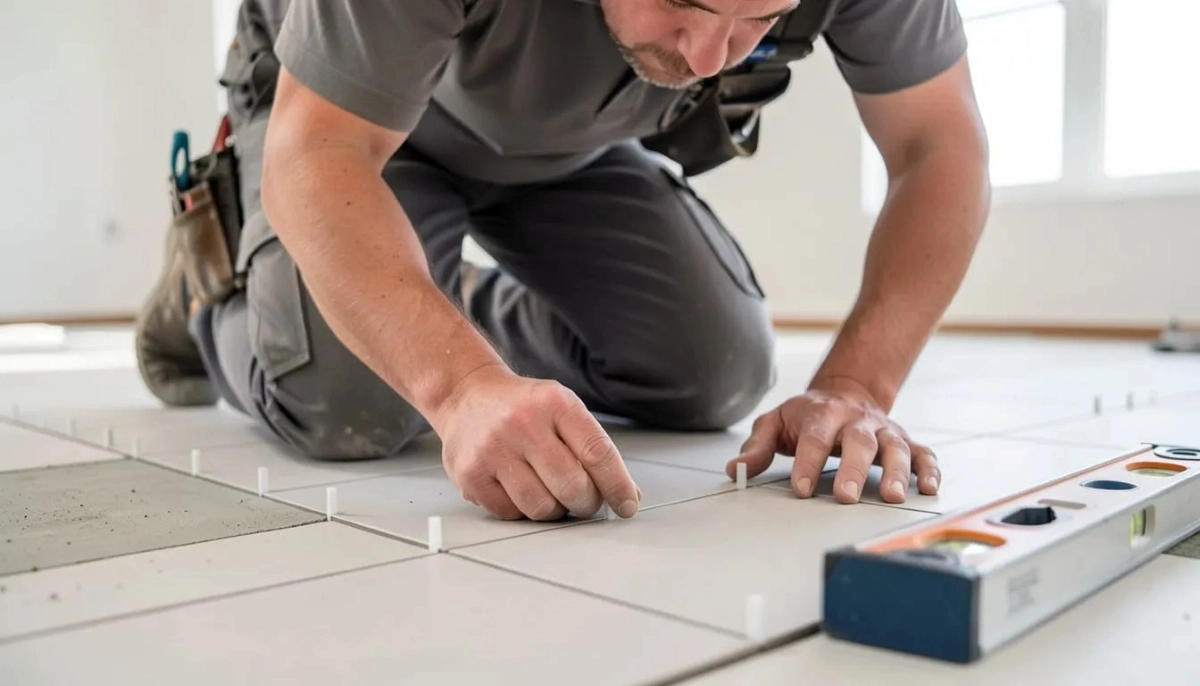
🔍 When to Use Self Leveller – Testing Your Floor
Before using self leveler for tiles, test your floor:
The Straight Edge Test:
- Place a 2-meter straight edge or spirit level on the floor
- Slide it in multiple directions across the area
- Measure the gap between the straight edge and the floor at the deepest point
- If gap exceeds the standards below, you need leveling
When You NEED Self Leveller:
- ✓ Floor slopes more than 2mm over 1 meter (affects large tiles)
- ✓ Dips deeper than 3mm over 2 meters for standard tiles
- ✓ Dips deeper than 2mm over 2 meters for large format tiles
- ✓ High spots that would require extensive grinding
- ✓ Uneven concrete slab after removing old tiles
- ✓ New concrete that wasn’t finished perfectly flat
- ✓ Before installing large format tiles or rectified tiles
When You MIGHT NOT Need It:
- Very small dips (under 2mm) that can be accommodated by mortar
- Using very small mosaic tiles (more forgiving)
- Floor is already within flatness standards
✅ Pro Tip:
For large format tiles (600x600mm or larger), ALWAYS use self levelling compounds for tile floors. Large tiles cannot conform to uneven surfaces – the results will be disastrous. Read our large format tiles guide.
📦 Types of Floor Leveling Compounds
Different projects need different floor leveling compound types:
| Type | Best For | Max Thickness | Drying Time | Price Range |
|---|---|---|---|---|
| Standard cement-based | General indoor leveling, most floors | 10-30mm per layer | 3-6 hours walk, 24hr tile | R200 – R400 per 20kg bag |
| Rapid-setting / Fast-dry | Time-sensitive projects, same-day tiling | 10-20mm per layer | 1-2 hours walk, 4-6hr tile | R300 – R600 per 20kg bag |
| Fibre-reinforced | Thicker pours, crack resistance | 30-50mm per layer | 4-8 hours walk, 24-48hr tile | R350 – R700 per 20kg bag |
| Underlayment (for tiles) | Specifically for tiling over, high bond strength | 3-10mm per layer (thin) | 2-4 hours walk, 16-24hr tile | R250 – R500 per 20kg bag |
| Gypsum-based | Over wooden subfloors, not for wet areas | 5-30mm | 6-12 hours walk, 24-48hr tile | R200 – R400 per 20kg bag |
For most tile installations, standard cement-based or underlayment compound is best. Avoid gypsum-based in bathrooms or wet areas – it absorbs moisture.
Not Sure If Your Floor Needs Leveling?
Get free quotes from verified tiling specialists who can assess your subfloor and recommend the right floor leveling compound for your project.
Free inspections available. Beat Your Quote guarantee.
🛠️ Tools and Materials for Self Levelling
Gather these items before starting how to use self levelling compound before tiling:
Essential Tools:
- Mixing drill (heavy-duty, 800W+) and mixing paddle – essential for proper mixing
- Clean mixing bucket – 20-30 litre capacity
- Gauge rake (spiked roller or smoother) – for spreading compound
- Spiked roller – removes air bubbles and aids flow (optional but recommended)
- Measuring tape and chalk line
- Level and straight edge (2m)
- Margin trowel – for edges and corners
- Plastic sheeting and duct tape – to protect walls
- Spike shoes – to walk on wet compound (optional)
Materials:
- Self levelling compound (enough for your area)
- Primer (specifically for self leveller – essential!)
- Water (clean, cool – follow manufacturer’s ratio)
- Silicon sealant – to seal gaps at walls
For more on tools, read our essential tile installation tools guide.
🏗️ Surface Preparation – The Critical First Step
Proper floor preparation is essential for self levelling compounds for tile floors:
Step 1: Clean Thoroughly
Remove all dirt, dust, grease, oil, paint, and old adhesive. Use a vacuum and then a mop. Any contamination prevents bonding. For stubborn adhesive, use a scraper or grinder.
Step 2: Repair Major Damage
Fill large holes or deep cracks with concrete patching compound before using self leveller. Self leveller is for minor dips (under 30mm), not structural repairs.
Step 3: Grind High Spots
Use an angle grinder with diamond cup wheel to remove high spots. Self leveller can’t fix high spots – they must be ground down.
Step 4: Apply Primer
Primer is NOT optional. It seals the substrate, improves bonding, and prevents air bubbles. Apply with roller, allow to dry (typically 1-4 hours). Do NOT skip this step.
Step 5: Seal Gaps
Use silicon sealant to seal gaps at walls, around pipes, and doorways. This prevents compound from leaking out.
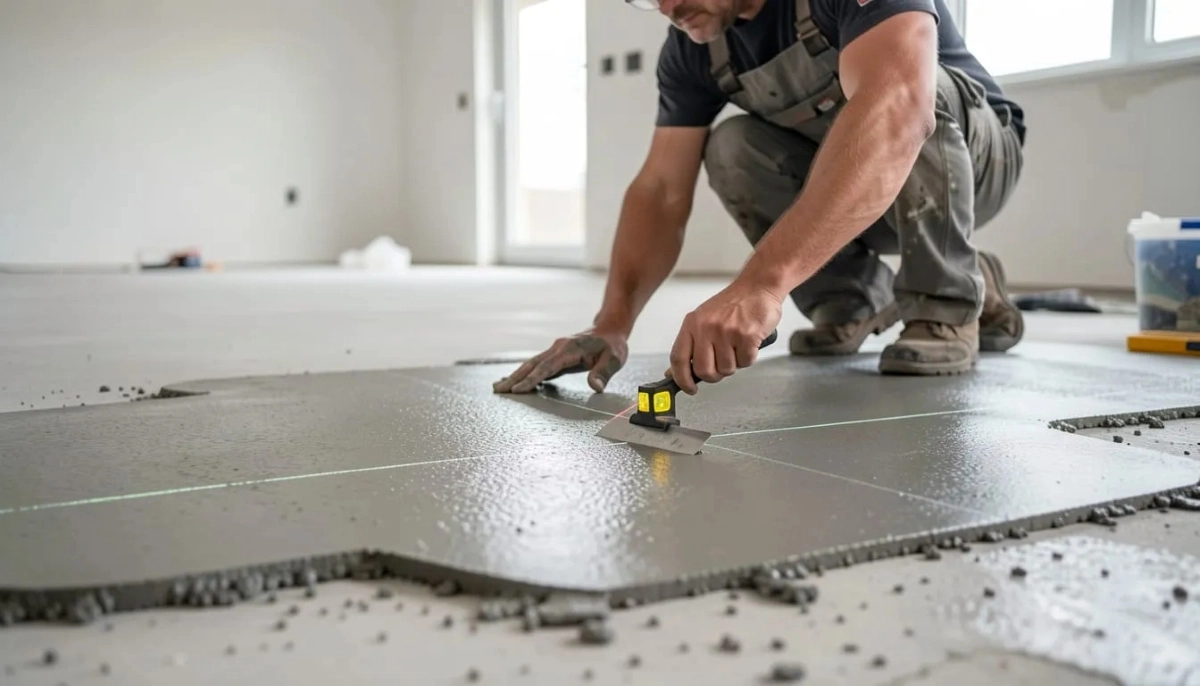
Step 6: Mark Height Levels
Use chalk line or laser level to mark desired finished height on walls. This guides how much compound to pour.
🥣 How to Mix and Apply Self Levelling Compound
Follow these steps for how to use self levelling compound before tiling:
Mixing Instructions:
- Pour clean, cool water into a clean bucket (follow manufacturer’s exact water ratio – too much water weakens compound)
- Add powder slowly while mixing with heavy-duty drill and mixing paddle
- Mix for 2-3 minutes until smooth, like pancake batter – no lumps
- Let sit for 2 minutes (slake), then mix again for 1 minute
- Use immediately – pot life is typically 15-30 minutes
- Mix only what you can pour in 15 minutes – don’t mix entire floor at once for large areas
Application Process:
- Start at the furthest point from the exit, work backward
- Pour compound onto the primed floor in ribbons or puddles
- Use a gauge rake or smoother to spread if needed (though it will self-level)
- For large areas, use a spiked roller to remove air bubbles and aid flow
- Don’t overwork – let gravity do its job
- Use a margin trowel for edges and corners
- Pour adjacent batches while previous batch is still wet – avoid cold joints
Important Tips:
- Work quickly – pot life is short
- Maintain consistent temperature (10-25°C is ideal)
- Don’t add water to extend working time – it weakens the compound
- For deep areas (over 30mm), apply in multiple layers (let each cure)
⏱️ Drying and Curing Times
Don’t rush to tile – proper curing is essential:
Drying Timeline (Standard Cement-Based):
- 2-4 hours: Foot traffic (walking carefully)
- 12-24 hours: Light foot traffic, can apply primer
- 24-48 hours: Ready for tiling (most compounds)
- 72 hours: Full cure for heavy traffic
Factors Affecting Drying Time:
- Temperature: Warm (20-25°C) = faster; cold (under 10°C) = much slower
- Humidity: Low = faster; high = slower
- Thickness: Thicker pours take longer to cure
- Airflow: Good ventilation speeds drying
- Substrate: Concrete dries slower than cement board
How to Test if Ready:
- Surface should be hard and dry (no damp spots)
- No white powdery residue (efflorescence)
- Tape a plastic sheet to the surface – if moisture collects underneath, not ready
Never tile over compound that isn’t fully dry – trapped moisture will cause adhesive failure and mould.

🚫 Common Mistakes to Avoid with Self Leveller
⚠️ Warning: These Mistakes Ruin Self Levelling Applications
Avoid these errors when using self levelling compounds for tile floors.
- Skipping primer: “The bag says self-leveller, I don’t need primer” – WRONG. Primer is essential for bonding. Without it, compound can delaminate.
- Adding too much water: Makes compound weak, prone to cracking, and dusty. Follow manufacturer’s water ratio precisely – no guessing.
- Not cleaning substrate properly: Dust, oil, or old adhesive prevents bonding. Clean thoroughly – vacuum then damp mop.
- Not sealing gaps: Compound will leak through cracks at walls, around pipes, or under doors. Seal everything first.
- Pouring too thick in one layer: Most compounds have maximum thickness per layer (typically 30mm). For deeper areas, pour multiple layers.
- Overworking the compound: Self leveller does the work – don’t spread excessively. Overworking can cause unevenness.
- Not mixing enough at once: Cold joints occur when new compound is poured next to partially set compound. Plan batches carefully.
- Tiling before compound is fully dry: Trapped moisture causes adhesive failure. Wait recommended time – 24-48 hours minimum.
💰 Self Leveller Cost Guide
Here’s what you can expect to pay for floor leveling compound in South Africa:
| Item | Cost Range | Notes |
|---|---|---|
| Self levelling compound (20kg bag) | R200 – R600 | Standard R200-400, rapid-set R300-600 |
| Primer (per litre) | R100 – R250 | Covers approximately 10-20m² per litre |
| Coverage per 20kg bag | 3-5 m² at 3mm thickness | Thicker pours cover less area |
| Professional installation/m² | R80 – R150 | Labour only (materials extra) |
| Typical room (20m², 5mm depth) | R800 – R1,500 (DIY) | R2,500 – R4,500 (professional) |
Calculating How Much You Need:
Coverage varies by product. Typical 20kg bag covers:
- At 3mm thickness: 4-5 m² per bag
- At 5mm thickness: 2.5-3 m² per bag
- At 10mm thickness: 1.2-1.5 m² per bag
Formula: Area (m²) x thickness (mm) ÷ coverage factor = number of bags. Add 10% for waste.
For a complete breakdown of tile costs, read our tile installation cost per square meter guide.
❓ Frequently Asked Questions About Self Levelling Compounds
Do I really need to use self levelling compound before tiling?
For most floors, yes – especially for large format tiles (600x600mm+). Self levelling compounds for tile floors create the flat substrate needed to prevent lippage, cracked tiles, and hollow spots. Even new concrete slabs rarely meet the flatness standards required for quality tile installation. Skipping leveling is a gamble that usually fails.
Can I apply self leveller over old tiles?
Yes – but the existing tiles must be perfectly bonded (no hollow sounds), clean, and free of wax or sealers. Roughen glossy surfaces with sandpaper or grinder. Use a primer designed for “tile over tile” applications. For best results, remove old tiles – but if they’re sound, self leveller can go over them.
How long does self levelling compound take to dry before tiling?
Standard compounds need 24-48 hours before tiling. Rapid-setting compounds can be ready in 4-6 hours. Factors affecting drying: temperature (warm = faster), humidity (low = faster), thickness (thicker = slower). Always test before tiling – surface should be hard and dry. Read manufacturer instructions – don’t rush.
Can I use self leveller on wooden subfloors?
Yes – but use a gypsum-based or fibre-reinforced compound designed for wood. Plywood must be exterior-grade, clean, and screw-reinforced (no movement). Apply primer specifically for wood. For thick pours, use a reinforcement mesh. Wood moves more than concrete – flexible compounds work best.
How much self levelling compound do I need?
Calculate: measure floor area (m²) and average depth needed (mm). Most 20kg bags cover 4-5m² at 3mm thickness. Formula: (area in m² × depth in mm) ÷ 4 = approximate bags. Example: 30m² floor needing 5mm depth = (30×5)÷4 = 37.5 → 38 bags. Add 10% for waste. For floor leveling compound, it’s better to have too much than run out mid-pour.
Is primer really necessary for self leveller?
YES – primer is NOT optional. It seals the substrate, prevents air bubbles, and ensures proper bonding. Without primer, self leveller can delaminate (separate from the substrate), causing hollow sounds and cracked tiles. Don’t skip this step – it’s cheap insurance.
Can I walk on self levelling compound?
Standard compounds: 2-4 hours for careful foot traffic (with clean, soft-soled shoes). 24 hours for regular walking. 48-72 hours for heavy traffic or before tiling. Walking too early can damage the surface or leave footprints. For how to use self levelling compound before tiling, wait the full recommended time before tiling – don’t rush.
Why is my self leveller cracking?
Common causes: too much water in mix (weakens compound), poured too thick in one layer (over 30mm), substrate movement (floor flexing), no primer (bond failure), or poured in very hot conditions (dries too fast). Also check: was the compound expired? Did you mix properly? Read our tile cracking guide for more on failure causes.
✅ Final Thoughts: A Flat Floor Is the Foundation of Great Tiling
Self levelling compounds for tile floors are not optional – they’re essential for professional results. The cost of leveling (R800-1,500 for a typical room) is tiny compared to the cost of fixing failed tiles, lippage, and cracked grout.
Whether you’re a DIY enthusiast or hiring a professional, understanding floor leveling compound and proper floor preparation ensures your beautiful tiles stay beautiful for decades. Don’t skip this step. Don’t cut corners. A flat floor is the foundation of great tiling.
Key takeaways for self levelling compounds:
- Always test floor flatness before tiling – use a 2m straight edge
- Large format tiles (600mm+) need extremely flat floors (2mm over 2m)
- Primer is NOT optional – always prime before pouring
- Follow water ratios precisely – too much water weakens the compound
- Seal all gaps – compound will leak everywhere
- Work quickly – pot life is short (15-30 minutes)
- Wait full cure time (24-48 hours) before tiling
- For large areas or complex floors, hire a professional
Your next step: Ready to start your tiling project? Get free quotes from verified tiling specialists who understand self leveller for tiles and proper floor preparation techniques.
Ready to Start Your Tiling Project?
Get free quotes from verified tiling specialists who understand self levelling compounds for tile floors and proper floor preparation techniques.
📞 Call us: 073 138 4726 to discuss your tiling project.
Free inspections •
Beat Your Quote guarantee •
Workmanship guarantees
Are You a Tiling Professional?
Join ServiceLink SA’s network of verified tiling contractors. Get qualified leads and grow your business.
📚 Official resources & standards referenced:
- SANS 10400 – South African National Standard for leveling standards and substrate flatness requirements.
- SABS – South African Bureau of Standards for material standards and quality specifications for leveling compounds.
Information provided for general guidance. Always follow manufacturer instructions for specific leveling products.
Written by: Innocent T Hanyani
Construction & Home Services Industry Specialist | 21+ Years Experience
Innocent T Hanyani has over two decades of experience working across South Africa’s construction and home improvement sectors. Throughout his career, he has applied thousands of bags of self levelling compound – from thin underlayments to deep pours. His practical experience helps homeowners understand when leveling is essential, how to choose the right product, and how to apply it correctly. He has seen beautiful tile installations ruined by uneven subfloors and others saved by proper leveling. His advice emphasises that a flat floor is the most important investment in any tiling project.
For more information about floor preparation and tiling, explore our related resources: floor leveling and surface preparation, tile lippage guide, tile spacers and leveling systems, large format tiles installation, and essential tile installation tools. Learn about our process on what is ServiceLink SA and how our service works. Find tilers in your area: Gauteng, Johannesburg, Pretoria, and Midrand. For related services, see our flooring services and building construction guides.