Got Uneven Tiles That Bother You?
Get free quotes from verified tiling specialists who can diagnose lippage causes and provide professional uneven tile repair.
Get Free Lippage Repair Quotes
Servicing Gauteng, Johannesburg, Midrand, and across South Africa
Tile Lippage: Causes, Fixes & Prevention for Uneven Tiles SA
📐 From annoying edges to dangerous trip hazards – everything you need to know about fixing tile lippage
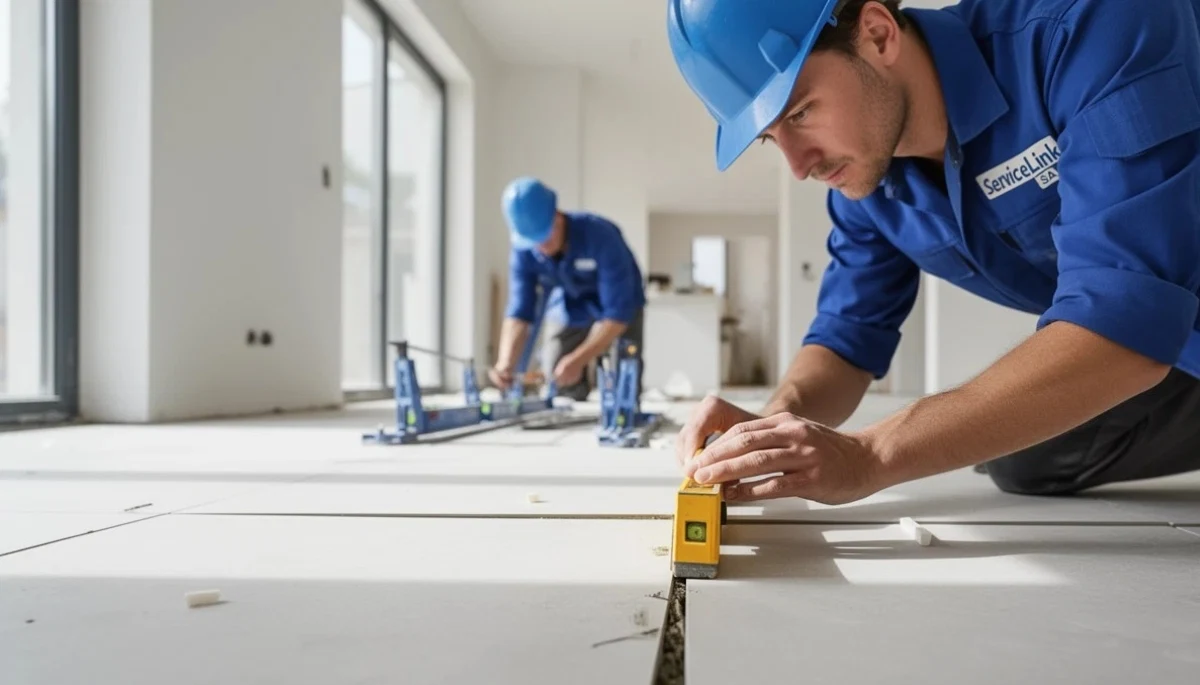
You feel it every time you walk across that spot. Your toe catches on a tile edge. Maybe it’s a small ridge, maybe it’s a noticeable height difference. It’s annoying, it’s ugly, and depending on where it is – it’s dangerous. That’s tile lippage, and it’s one of the most common tile installation defects I see.
I’ve inspected floors across Gauteng, from Johannesburg to Midrand, where homeowners lived with uneven tiles for years – tripping, stubbing toes, and watching their beautiful floors look terrible. The sad part? Most lippage is preventable. And much of it is fixable.
Tile height difference isn’t just cosmetic. It creates shadows that highlight every imperfection, traps dirt and moisture around raised edges, and most importantly – creates trip hazards that can send you or your family to the emergency room. In commercial spaces, lippage is a liability nightmare.
In this complete guide to tile lippage fix, I’ll explain what causes uneven tiles, how to measure lippage severity, when you can fix it, and when you need to tear out and redo. You’ll learn how to fix lippage on floor tiles – from minor sanding to complete re-installation. By the end, you’ll know whether you can salvage your floor or if it’s time to call in professionals.
For related topics, check out our guides on tile spacers and leveling systems, self-levelling compounds, floor leveling preparation, and large format tiles installation.
📋 Table of Contents – Tile Lippage Guide
📐 What Is Tile Lippage?
Tile lippage (also called tile height difference or uneven tiles) occurs when adjacent tiles are not flush with each other. One tile sits higher than its neighbour, creating a raised edge or ridge.
How Lippage Affects Your Floor:
- Safety hazard: Raised edges catch toes and shoes, causing trips and falls. Especially dangerous for elderly people, children, or anyone with mobility issues.
- Cosmetic problem: Shadows cast by raised edges highlight every imperfection. Your beautiful floor looks cheap and poorly installed.
- Cleaning difficulty: Dirt, dust, and moisture collect around raised edges, making floors harder to clean and potentially causing staining.
- Edge damage: Raised tile edges are vulnerable to chipping and cracking from foot traffic or furniture being dragged.
- Grout failure: The grout joint at a lippage edge is under constant stress and will crack or crumble faster than level joints.
Understanding lippage causes is essential for both prevention and repair. For more on installation techniques that prevent lippage, read our tile spacers and leveling systems explained guide.
📏 Industry Standards – How Much Lippage Is Acceptable?
According to SANS 10400 and the Tile Association of South Africa, acceptable lippage depends on tile type and joint width:
| Tile Type | Joint Width | Maximum Acceptable Lippage | Action Required |
|---|---|---|---|
| Rectified Tiles (precision-cut) | 2-3mm | 0.5mm | Any lippage over 0.5mm is defective |
| Standard Ceramic/Porcelain | 3-5mm | 1mm | Up to 1mm acceptable, over 1mm requires repair |
| Large Format Tiles | 3-5mm | 0.5mm – 1mm | Stricter standards due to longer edges |
| Natural Stone | 2-5mm | 0.5mm | Very strict – stone edges chip easily |
| Mosaic Sheets | 2-3mm | 0.5mm across sheet, 1mm overall | Sheet-to-sheet lippage most critical |
How to test: Place a straight edge across adjacent tiles. The gap between the straight edge and the lower tile is the lippage measurement. Anything over the standards above is a defect.
For large format tiles specifically, see our large format tiles installation guide for detailed requirements.
🔍 7 Common Causes of Tile Lippage
Understanding lippage causes helps you prevent future problems and determine the right repair approach:
1. Uneven Subfloor (Most Common)
If your subfloor isn’t flat, tiles will follow the contours. A dip in the floor means lower tiles; a hump means higher tiles. For large format tiles, the subfloor must be flat within 3mm over 2 meters. Read our floor leveling guide for proper preparation.
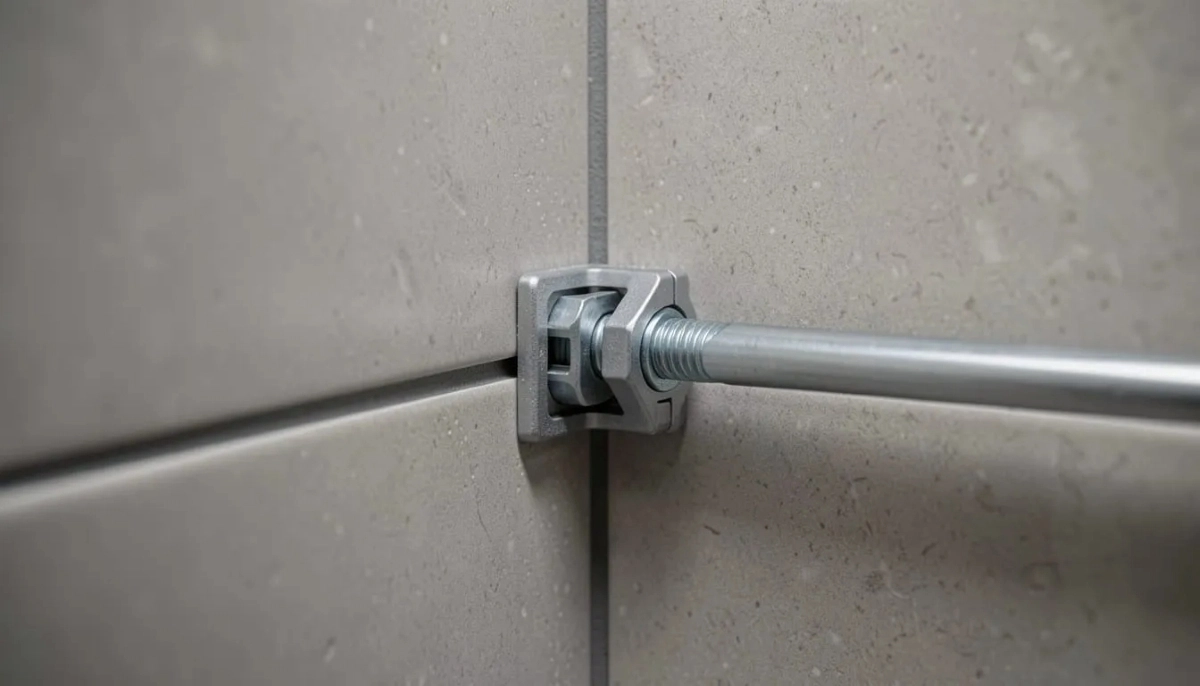
2. No Tile Leveling System Used
Standard spacers only control grout width – they don’t control height. Without a leveling system, even experienced tilers struggle to eliminate lippage, especially with large format tiles. See tile leveling systems explained.
3. Tile Warpage or Bow (Inherent to Large Tiles)
All large format tiles have some warpage – they’re never perfectly flat. Without a leveling system, this natural bowing creates lippage at the edges. Quality tiles have less warpage, but leveling systems are still essential.
4. Improper Adhesive Application
Too much adhesive under one tile, too little under another. Adhesive that’s too thick doesn’t compress properly. Not back-buttering large tiles creates voids that allow tiles to sink unevenly.
5. Walking on Tiles Before Adhesive Cured
Adhesive needs 24-48 hours to cure. Walking on tiles too early can shift them, creating lippage that wasn’t there originally. The weight of a person can press one tile down while leaving adjacent tiles higher.
6. Subfloor Movement or Settlement
If your subfloor is moving or settling after installation, tiles can shift relative to each other. This often causes lippage that appears months or years after installation.
7. Poor Tiling Technique
Rushing the installation, not using a beating block to seat tiles evenly, or inconsistent trowel technique all cause lippage. Experience matters.
✅ Key Takeaway:
The #1 cause of tile lippage is an uneven subfloor. The #2 cause is not using a tile leveling system. Fix these two things, and you eliminate 90% of lippage problems.
Frustrated by Uneven Tiles?
Get free quotes from verified tiling specialists who can diagnose your tile height difference and provide professional uneven tile repair.
Get Free Lippage Repair Quotes
Free inspections available. Workmanship guarantees.
📏 How to Measure Tile Height Difference
Before attempting how to fix lippage on floor tiles, you need to measure the severity accurately:
Tools Needed:
- Long straight edge (at least 600mm, preferably 1 meter)
- Feeler gauge or set of business cards (each card is about 0.3mm thick)
- Flashlight (to see gaps clearly)
- Notepad to record measurements
Measurement Process:
Step 1: Place the straight edge across two adjacent tiles, spanning the grout line.
Step 2: Shine a flashlight from behind the straight edge. If you see light under the straight edge, there’s a gap.
Step 3: Slide feeler gauges or business cards under the straight edge until they just touch the lower tile. Count the thickness.
Step 4: Record the measurement. Business cards: 1 card = approximately 0.3mm, 3 cards = approximately 1mm.
Step 5: Repeat in multiple locations – across different tile pairs and in different directions.
What Your Measurements Mean:
- Less than 0.5mm: Within industry standards. Monitor but no action needed.
- 0.5mm – 1.5mm: Acceptable for standard tiles with wide joints. May need repair for rectified or large format tiles.
- 1.5mm – 3mm: Noticeable lippage. Requires repair – trip hazard for some people.
- Over 3mm: Severe lippage. Significant trip hazard. Requires professional repair or replacement.
📊 Tile Lippage Severity Scale
Use this scale to determine the urgency of your tile lippage fix:
| Severity Level | Height Difference | Symptoms | Action |
|---|---|---|---|
| Minor | Under 1mm | Visible shadow but not felt underfoot, no trip hazard | Monitor only – within standards for most tiles |
| Moderate | 1mm – 2mm | Noticeable when walking, catches socks, visible shadow, dirt collects at edges | Repair recommended – may qualify for warranty claim |
| Severe | 2mm – 4mm | Catches bare feet and shoes, visible trip hazard, grout cracking around edges | Professional repair required – safety concern |
| Extreme | Over 4mm | Serious trip hazard, adjacent tiles may be cracked, floor feels uneven when walking | Immediate professional assessment – may need full re-installation |
For severe or extreme cases, stop using the area if possible and call for professional tiling services immediately.

🛠️ DIY Tile Lippage Fix – Minor Cases (Under 1.5mm)
For minor tile lippage, you may be able to fix it yourself. These methods work best for isolated raised edges, not widespread lippage.
Method 1: Grinding Down the Raised Edge (For Ceramic Tiles Only)
Tools needed: Diamond sanding pads (50, 100, 200, 400 grit), angle grinder with variable speed, vacuum, safety glasses, dust mask.
Process:
- Protect surrounding area with plastic sheeting – this creates significant dust
- Attach coarse grit (50) diamond pad to angle grinder
- Grind the raised edge very gently – work in small passes
- Check frequently – you cannot add material back
- Progress to finer grits (100, 200, 400) for smooth finish
- Clean area thoroughly and seal the ground edge with tile sealer
Warning: This removes the glaze on ceramic tiles. The ground area will be matte, not glossy. Only use on tiles where appearance isn’t critical, or on all tiles for a consistent matte finish.
Method 2: Feathering with Grout (For Very Minor Lippage Under 1mm)
For lippage so minor you only notice it by feel, you can feather grout over the edge:
- Remove existing grout around the lippage area
- Apply new grout that slopes gradually from the high tile to the low tile
- This creates a ramp that reduces the perceived height difference
- Only works for differences under 1mm
Method 3: Add a Transition Strip (For Lippage at Room Boundaries)
If lippage occurs where tile meets another flooring type (wood, carpet, vinyl), a transition strip can bridge the height difference safely.
⚠️ Critical Warning:
Do NOT attempt to grind porcelain tiles yourself. Porcelain is extremely hard and requires professional diamond grinding equipment. DIY grinding of porcelain often damages the tile permanently and creates an uneven, scratched surface that cannot be fixed.

🔧 Professional Uneven Tile Repair – Moderate to Severe Cases
For moderate to severe tile lippage, professional uneven tile repair is required:
Method 1: Professional Grinding (For Porcelain and Natural Stone)
Professionals use industrial diamond grinding equipment with dust extraction. They can grind porcelain without damaging the surface and can achieve a consistent finish. After grinding, they re-polish the area to restore appearance. This works for lippage up to 2mm.
Method 2: Remove and Re-install Affected Tiles (For Lippage Over 2mm)
For significant tile height difference, the best solution is removing the affected tiles, fixing the underlying issue (uneven subfloor, poor adhesive coverage), and installing new tiles. Process:
- Remove affected tiles (may break – have replacements ready)
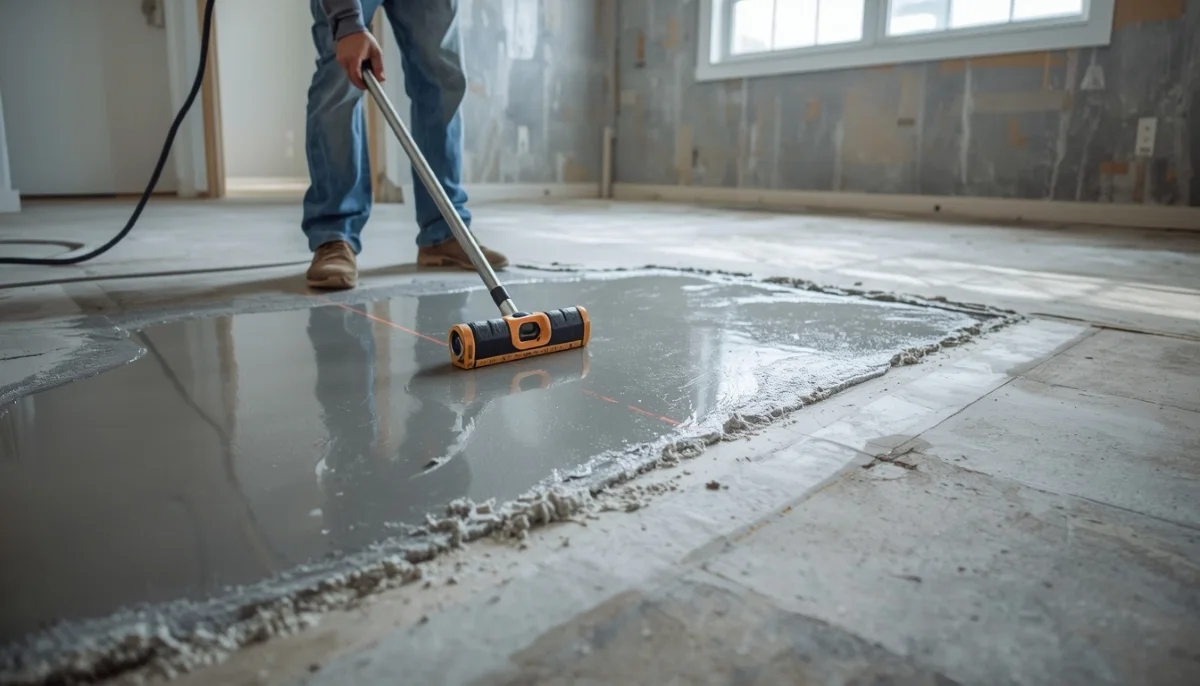
- Check subfloor flatness – apply self-levelling compound if needed
- Ensure proper adhesive coverage – back-butter new tiles
- Use a tile leveling system during re-installation
- Allow proper cure time before grouting
Method 3: Full Floor Replacement (For Widespread Lippage Over 3mm)
If more than 30% of your floor has lippage over 3mm, or if the subfloor is the root cause, full replacement may be more cost-effective than spot repairs. This is especially true for large format tiles where one bad area affects surrounding tiles.
ServiceLink SA connects you with verified tiling specialists who carry workmanship guarantees. Learn more about what is ServiceLink SA and how we verify contractors.
🛡️ How to Prevent Tile Lippage During Installation
Preventing tile lippage is far easier than fixing it. Here’s how:
Before Installation (Critical):
- Ensure subfloor is flat: Check with a 2-meter straight edge. Flatness must be within 3mm over 2 meters for standard tiles, 2mm for large format. Use self-levelling compound to correct dips.
- Use the correct trowel notch size: 6mm for standard tiles, 8-10mm for large format. Inconsistent notch depth causes height differences.
- Back-butter large format tiles: This ensures full adhesive coverage and compensates for tile warpage.
During Installation:
- USE A TILE LEVELING SYSTEM: This is non-negotiable for large format tiles and highly recommended for all floor tiles. Leveling systems pull adjacent tiles flush.
- Use a beating block and rubber mallet: Tap each tile after placement to seat it evenly into the adhesive.
- Check level frequently: After every few tiles, run a straight edge across the floor to catch lippage early.
- Work in small sections: Don’t spread more adhesive than you can tile in 15-20 minutes. Skinned adhesive creates uneven beds.
- Don’t walk on new tiles for 48 hours: Wait for full adhesive cure before foot traffic.
For Large Format Tiles Specifically:
Read our dedicated large format tiles installation guide for additional requirements including back-buttering, larger trowel notches, and specialized leveling systems.
📏 Special Considerations for Large Format Tiles
Large format tiles (600x600mm and larger) are especially prone to tile lippage. Here’s why and what to do:
Why Large Format Tiles Are More Difficult:
- Longer edges mean any height difference is more noticeable
- Natural tile warpage (bowing) is more pronounced
- Requires flatter subfloor (2mm over 2 meters vs 3mm for standard tiles)
- Heavier – harder to adjust once placed
- Requires back-buttering for full coverage
Essential for Large Format Success:
- Subfloor must be perfectly flat – use self-levelling compound without exception
- Use a premium tile leveling system – required, not optional
- Use 8-10mm notched trowel and back-butter every tile
- Consider using a tile lippage correction system that allows post-installation adjustment
- Hire an installer with specific large format experience
For complete guidance, read our large format tiles installation guide.
💰 Tile Lippage Repair Cost Guide
Here’s what you can expect to pay for tile lippage fix in South Africa:
| Repair Type | Cost Range | What’s Included |
|---|---|---|
| Professional grinding (per m²) | R150 – R300 | Diamond grinding, dust extraction, polishing |
| Single tile removal and re-install | R800 – R1,500 | Remove tile, fix subfloor, re-bond, grout |
| Multiple tiles (3-5 tiles) | R2,000 – R4,000 | Per job – includes all materials |
| Large area lippage correction (10m²+) | R5,000 – R15,000 | Depends on severity and cause |
| Full floor replacement (due to lippage) | R15,000 – R40,000+ | Complete tear-out and re-installation |
| Professional inspection | R0 – R500 | Free inspections available |
For a complete breakdown of tile removal and replacement costs, read our tile removal and replacement cost guide.
🚫 Common Mistakes to Avoid with Tile Lippage
⚠️ Warning: These Mistakes Make Lippage Worse
Avoid these errors when dealing with tile height difference.
- Ignoring minor lippage: What’s barely noticeable today becomes a trip hazard as grout wears and edges chip. Address lippage early.
- Grinding porcelain tiles yourself: Porcelain is extremely hard. DIY grinding scratches and damages the surface permanently. Leave porcelain grinding to professionals.
- Re-grouting without fixing the height difference: New grout over lippage edges will crack quickly because the underlying height difference remains.
- Not using a leveling system during installation: “I’m experienced enough” is not an excuse. Leveling systems eliminate lippage that even master tilers can’t avoid with large format tiles.
- Skipping subfloor levelling: “It looks flat enough” is the #1 cause of lippage. Always measure with a straight edge.
- Walking on tiles too soon: Even if tiles feel set, adhesive hasn’t fully cured. Wait 48 hours minimum.
- Using the wrong trowel notch size: Too small = insufficient coverage (tiles sink unevenly). Too large = excessive squeeze-out and inconsistent height.
- Assuming all lippage is an installation defect: Subfloor movement, settling foundations, or water damage can cause lippage months after installation. Diagnose the root cause before blaming the installer.
❓ Frequently Asked Questions About Tile Lippage
What is tile lippage and why is it bad?
Tile lippage is when adjacent tiles are not flush – one tile sits higher than its neighbour. It’s bad because it creates trip hazards, catches dirt and moisture, looks unprofessional, and the raised edges are vulnerable to chipping. Industry standards limit acceptable lippage to 0.5mm-1mm depending on tile type.
How do I fix lippage on floor tiles without replacing them?
For minor lippage under 1.5mm, professional grinding can level the raised edge. For ceramic tiles only, DIY sanding is possible (removes glaze). For lippage over 2mm, or for porcelain tiles, professional uneven tile repair requires removing and re-installing the affected tiles – grinding won’t be enough.
What causes tile lippage after installation?
Lippage causes include: uneven subfloor (most common), no tile leveling system used, tile warpage (especially large format), improper adhesive application, walking on tiles before adhesive cured, or subfloor movement/settlement after installation. Often multiple factors combine.
How much does it cost to fix lippage on floor tiles?
Tile lippage fix costs: professional grinding R150-R300 per m², single tile removal and re-install R800-R1,500, multiple tiles R2,000-R4,000, large area correction R5,000-R15,000, full floor replacement R15,000-R40,000+. Get a free quote from verified specialists through ServiceLink SA for accurate pricing.
Is tile lippage covered under installation warranty?
Yes – if lippage exceeds industry standards (0.5mm for rectified/large format, 1mm for standard tiles) and was caused by poor installation (not subfloor movement), it should be covered. Check your warranty terms. Document lippage with measurements and photos before contacting your installer.
Can I use self-levelling compound to fix lippage?
No – self-levelling compound is applied BEFORE tiling to create a flat subfloor. It cannot fix lippage after tiles are installed. Once tiles are down, lippage repair requires grinding (for minor cases) or removal and re-installation (for significant cases).
Are large format tiles more prone to lippage?
Yes. Large format tiles (600x600mm and larger) are significantly more prone to tile height difference because: their longer edges magnify any height variation, they have natural warpage (bowing), they require flatter subfloors (2mm over 2m vs 3mm), and they’re harder to adjust once placed. A tile leveling system is non-negotiable for large format installation.
How can I prevent lippage when tiling my floor?
Prevent tile lippage by: ensuring subfloor is perfectly flat (use self-levelling compound), using a tile leveling system, back-buttering large format tiles, using correct trowel notch size, beating tiles in with a rubber mallet, and waiting 48 hours before foot traffic. Read our floor leveling guide for complete preparation steps.
✅ Final Thoughts: Don’t Live with Uneven Tiles
Tile lippage isn’t just an aesthetic problem – it’s a safety hazard that affects your daily life. That raised edge you’ve been ignoring? It’s catching your toes, collecting dirt, and slowly chipping away. Eventually, someone will trip – and that trip could mean a fall, an injury, and an emergency room visit.
The good news? Most lippage is fixable. Minor cases (under 1.5mm) can often be ground down professionally. Moderate cases (1.5mm-3mm) may require removing and re-installing affected tiles. And severe cases (over 3mm) need professional assessment – but even full replacement is better than living with dangerous, ugly floors.
Key takeaways for tile lippage:
- Acceptable lippage: 0.5mm for rectified/large format, 1mm for standard tiles
- Over 2mm is a trip hazard – repair required
- Minor lippage can be ground down (professionally for porcelain)
- Moderate to severe lippage requires tile removal and re-installation
- Prevention is best: flat subfloor + leveling system + proper technique
- Large format tiles require stricter standards and leveling systems
Your next step: If you have uneven tiles that bother you – whether it’s a minor annoyance or a serious trip hazard – get free quotes from verified tiling specialists. They can diagnose the cause, measure the severity, and recommend the most cost-effective repair.
Ready to Fix Your Uneven Tiles?
Get free quotes from verified tiling specialists who can diagnose your tile lippage and provide professional uneven tile repair.
📞 Call us: 073 138 4726 to discuss your uneven floor.
📚 Official resources & standards referenced:
- SANS 10400 – South African National Standard for tile leveling standards, subfloor flatness requirements, and installation specifications.
- Tile Association of South Africa – Industry guidelines for acceptable lippage, leveling systems, and large format tile installation standards.
Information provided for general guidance. Always consult a qualified professional for lippage assessment and repair.
Written by: Innocent T Hanyani
Construction & Home Services Industry Specialist | 21+ Years Experience
Innocent T Hanyani has over two decades of experience working across South Africa’s construction and home improvement sectors. Throughout his career, he has inspected thousands of tile installations and diagnosed countless cases of tile lippage. His practical experience helps homeowners understand the difference between acceptable variation and dangerous defects. He has seen how proper subfloor preparation and leveling systems prevent lippage, and how ignoring tile height difference leads to trip hazards, cracked tiles, and expensive repairs across Gauteng and beyond.
For more information about tile lippage and leveling, explore our related resources: tile spacers and leveling systems explained, self-levelling compounds for tile floors, floor leveling and surface preparation, and large format tiles installation guide. Learn about our process on what is ServiceLink SA and how we verify contractors. Find tilers in your area: Gauteng, Johannesburg, and Midrand. For related services, see our flooring services and building construction guides.