Planning a Mosaic Tile Project?
Get free quotes from verified tiling specialists who have experience with intricate mosaic installations. Compare prices and hire with confidence.
Get Free Quotes from Mosaic Specialists
Servicing Gauteng, Johannesburg, Pretoria, and across South Africa
Mosaic Tile Installation Guide: Step-by-Step for Beginners SA
✨ Everything you need to know about installing mosaic tile sheets – from prep to perfect grout lines
There’s something magical about mosaic tiles. Those tiny pieces of glass, ceramic, or stone come together to create stunning patterns, shimmering accent walls, and intricate designs that elevate any room. I still remember the first time I installed a mosaic backsplash in my own kitchen – the way the light caught the glass tiles made the whole space feel alive.
But here’s the thing that scares most homeowners: mosaics look complicated. All those little tiles. The mesh backing. Cutting through sheets without destroying the pattern. It can feel overwhelming.
The truth? Mosaic tile installation is actually one of the most forgiving tiling projects for beginners. The small tiles hide minor imperfections, the mesh sheets make installation faster than individual tiles, and the results are absolutely stunning. In this complete mosaic installation guide, I’ll walk you through everything – from choosing the right materials to cutting sheets to achieving perfect grout lines.
Whether you’re in Johannesburg, Pretoria, or anywhere in Gauteng, this guide will help you transform your space with beautiful mosaics. For cost information, check out our tiling installation cost guide and for material selection, read glass tiles for kitchens and bathrooms.
📋 Table of Contents – Mosaic Tile Installation Guide
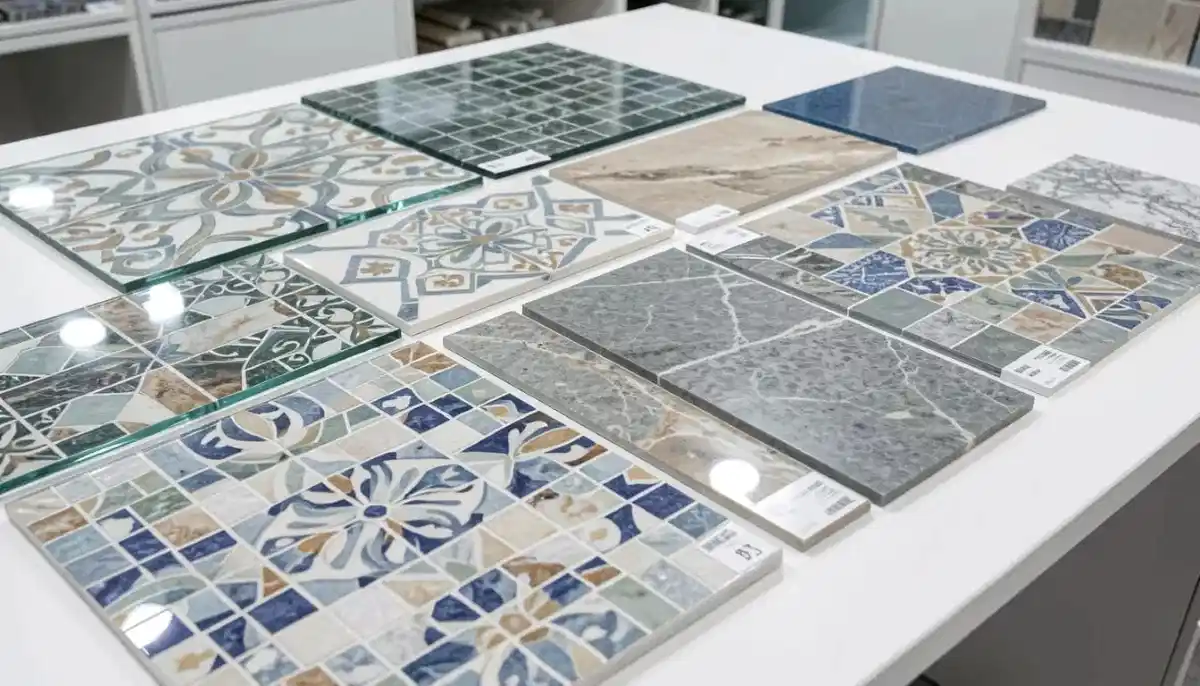
🎨 What Are Mosaic Tile Sheets?
Before we dive into tile mosaic how to techniques, let’s understand what you’re working with.
Mosaic tiles are small tiles (typically 10mm to 50mm) that come pre-attached to a flexible mosaic mesh backing. The mesh holds the tiles in a specific pattern with consistent spacing – usually 2-3mm gaps. This allows you to install an entire sheet at once rather than placing each tiny tile individually.
Typical sheet sizes: 300 x 300mm (most common) or 300 x 600mm
Why mosaics are popular:
- Create stunning visual interest and texture
- Work well on curved surfaces (shower niches, arched walls)
- Available in endless materials, colours, and patterns
- Relatively easy for DIYers (once you know the tricks)
- Perfect for accent areas, backsplashes, and shower floors
The mesh backing is what makes how to install mosaic tile sheets different from standard tiling. You’re not placing individual tiles – you’re placing flexible mats that need to be pressed evenly into adhesive.
🧩 Types of Mosaic Tiles – Which to Choose
Not all mosaics are created equal. Here’s how popular options compare:
| Material | Cost/m² | Pros | Cons | Best For |
|---|---|---|---|---|
| Glass Mosaic | R400 – R1,000+ | Stunning light reflection, waterproof, easy to clean | Shows grout lines, harder to cut, can be slippery | Backsplashes, accent walls, pools |
| Ceramic Mosaic | R150 – R400 | Affordable, easy to cut, many colours | Less durable than porcelain, can chip | Walls, backsplashes, dry areas |
| Porcelain Mosaic | R250 – R600 | Very durable, low water absorption, hard-wearing | Harder to cut, higher cost | Floors, showers, high-traffic areas |
| Natural Stone Mosaic | R500 – R1,500+ | Unique, luxurious, timeless | Requires sealing, porous, expensive | Feature walls, luxury bathrooms |
| Metal Mosaic | R600 – R1,200 | Modern industrial look, durable | Can scratch, shows water spots | Accent walls, modern kitchens |
For more on glass options, read our dedicated glass tiles guide.
🛠️ Tools & Materials You’ll Need for Mosaic Installation
Gather these items before starting your mosaic installation guide project:
Essential Tools:
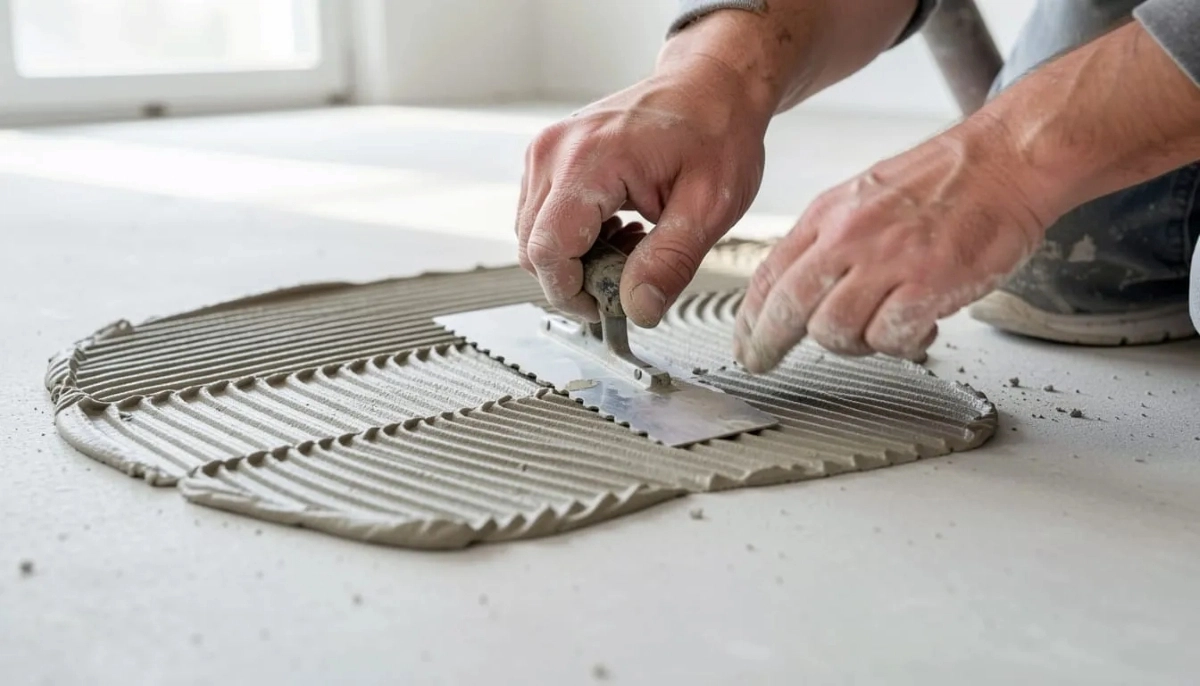
- Notched trowel (4-6mm): Smaller notches than standard tiling – crucial for preventing adhesive from squeezing up through grout lines
- Rubber grout float: For applying grout without scratching tiles
- Tile cutter or wet saw: For cutting mosaic sheets
- Utility knife: For cutting the mesh backing
- Tile spacers (2-3mm): Between mosaic sheets
- Level and measuring tape
- Rubber mallet and beating block: For seating sheets evenly
- Grout sponge and buckets
- Safety glasses and gloves
Materials:
- White thin-set adhesive: White is better than grey for glass mosaics (grey can show through)
- Sanded or unsanded grout: Unsanded for joints under 3mm, sanded for 3mm+
- Primer (if needed for your substrate)
- Mosaic tile sheets (buy 10-15% extra for waste)
For more on adhesives, read our tile adhesives explained guide.
🏗️ Surface Preparation for Mosaic Tiles
Proper preparation is critical for successful mosaic tile installation. Mosaics are thin and flexible – they will follow the contours of your wall or floor.
Step 1: Clean the Surface
Remove all dust, grease, paint, and debris. The surface must be completely clean for adhesive to bond properly.
Step 2: Ensure Surface is Flat
Unlike large format tiles, mosaics can handle minor imperfections. However, significant bumps or dips will show through. Sand down high spots and fill low spots.
Step 3: Apply Primer (If Needed)
Primer improves adhesion, especially on drywall, plaster, or previously painted surfaces. Follow manufacturer instructions.
Step 4: Mark Your Layout
Use a level to draw horizontal and vertical guide lines on the wall. This keeps your mosaic sheets straight. For floors, snap chalk lines.
✅ Pro Tip:
For shower walls or wet areas, ensure proper waterproofing before installing mosaics. Read our waterproofing guide and grouting and waterproofing article for more information.
Need Professional Help for Your Mosaic Project?
While mosaics are DIY-friendly, complex patterns or large areas benefit from professional experience. Get free quotes from verified tiling specialists.
Find Mosaic Specialists Near You
Free quotes. Verified contractors. Workmanship guarantees.
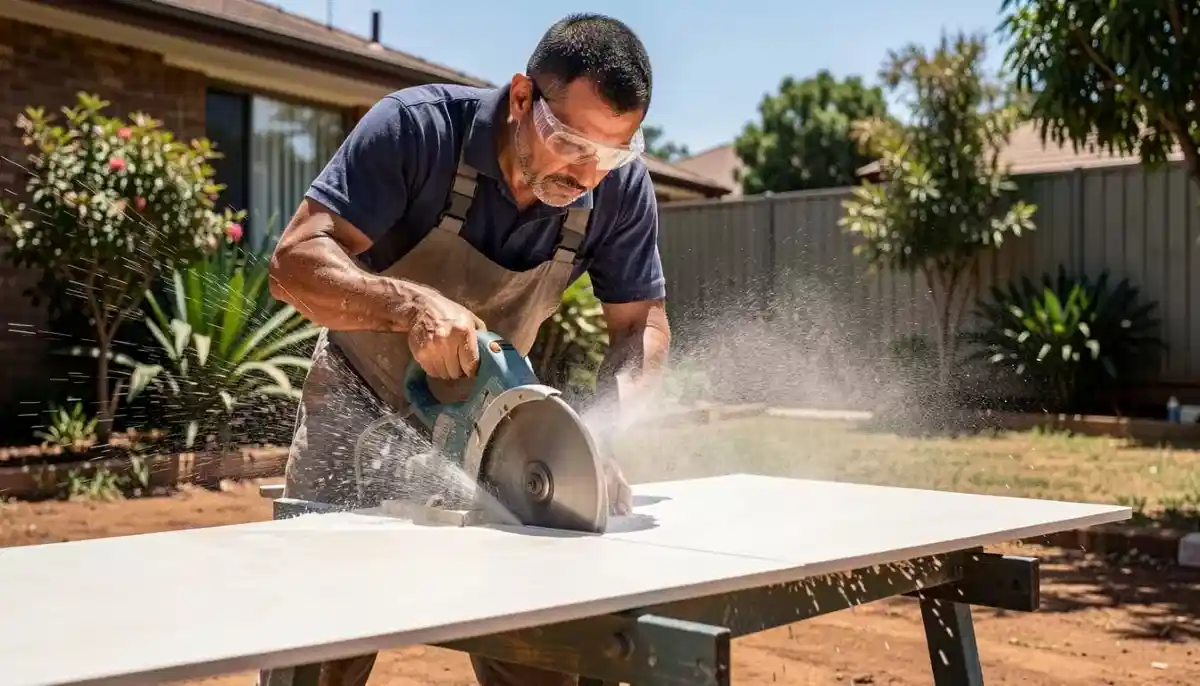
✂️ How to Cut Mosaic Tile Sheets
This is the part that intimidates most beginners. But how to install mosaic tile sheets becomes much easier once you master cutting techniques.
Method 1: Cutting Individual Tiles (For Small Adjustments)
Use a manual tile cutter or tile nippers to cut individual tiles on the sheet. This works for trimming edges or cutting around outlets. Cut each tile separately while they’re still on the mesh.
Method 2: Cutting the Entire Sheet (For Straight Cuts)
Score the sheet along a straight line using a utility knife or straight edge. Cut through the mesh backing between the tiles. Then snap the sheet along the score line – the tiles will separate cleanly. For porcelain or glass, use a wet saw.
Method 3: Wet Saw for Hard Materials
Glass, porcelain, and stone mosaics require a wet saw with a fine diamond blade. Cut through the entire sheet in one pass. Go slowly to prevent chipping.
Method 4: Cutting Curves and Circles
For curved cuts (around pipes), use tile nippers to nibble away small pieces. Remove individual tiles from the mesh, cut them, then re-attach or place them individually.
Pro tip for glass mosaics: Glass chips easily. Use a new, fine-tooth diamond blade on your wet saw. Cut slowly and support the sheet fully to prevent vibration cracks.
📝 Step-by-Step Mosaic Installation Process
Follow these steps for successful mosaic tile installation:
Step 1: Mix Adhesive
Mix thin-set adhesive according to package instructions. Consistency should be like creamy peanut butter. Let it slake (rest) for 10 minutes, then remix.
Step 2: Apply Adhesive to the Surface
Using your 4-6mm notched trowel, spread adhesive onto a small section (about 2-3 sheets wide). Hold the trowel at a 45-degree angle. Only cover area you can tile in 15-20 minutes – adhesive skins over quickly.
Step 3: Press the First Mosaic Sheet
Place the first mosaic sheet into the adhesive, aligning it with your guide lines. Press firmly but evenly. Use a beating block and rubber mallet to tap the sheet into the adhesive – this ensures full contact and consistent height.
Step 4: Check Alignment
Check that the sheet is level and straight. Adjust immediately if needed – the adhesive is still workable.
Step 5: Install Adjacent Sheets
Continue installing sheets, working in small sections. Use tile spacers (2-3mm) between sheets to maintain consistent grout lines. The mesh backing will allow slight movement – adjust as needed.
Step 6: Clean Adhesive from Tile Faces
If adhesive squeezes up between tiles, wipe it away immediately with a damp sponge. Dried adhesive is difficult to remove and will show through grout.
Step 7: Make Cutouts for Outlets and Fixtures
For electrical outlets, measure carefully. Cut the mosaic sheet using your chosen method. Dry-fit before applying adhesive to ensure the cutout is accurate.
Step 8: Let Adhesive Cure
Wait 24 hours minimum before grouting. For glass mosaics or in cold conditions, wait 48 hours.
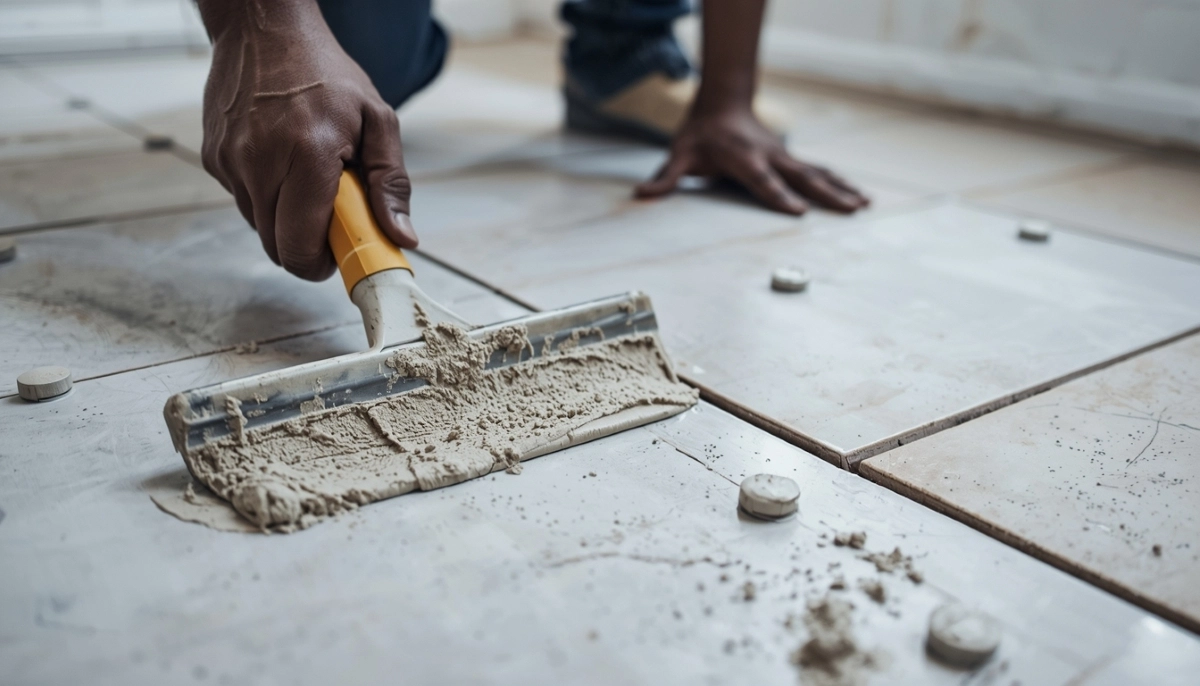
🧹 Grouting Mosaic Tiles – Special Considerations
Grouting is where many DIY mosaic projects go wrong. Here’s how to do it right:
Choose the Right Grout:
- Unsanded grout: For joints under 3mm (most mosaics). Won’t scratch glass or polished tiles.
- Sanded grout: Only for joints 3mm or larger. Can scratch glass – test on a scrap piece first.
- Epoxy grout: Stain-resistant and waterproof, but harder to work with. Best for wet areas.
Grouting Process:
Step 1: Mix grout according to instructions. Consistency should be like toothpaste.
Step 2: Apply grout with a rubber float, holding it at a 45-degree angle. Push grout into all gaps, working diagonally across the tiles.
Step 3: After 15-30 minutes (when grout starts to haze), wipe with a damp sponge. Rinse the sponge frequently. Don’t over-wipe – this pulls grout out of joints.
Step 4: After 2-4 hours, buff off remaining haze with a dry, soft cloth.
Step 5: For glass mosaics, clean the glass surface thoroughly – any grout residue will be visible.
Important: For glass mosaics, use white thin-set adhesive (grey can show through translucent tiles) and unsanded grout to prevent scratching.
🚫 Common Mosaic Tile Installation Mistakes to Avoid
⚠️ Warning: Avoid These Mosaic Mistakes
Even small errors can ruin the look of your mosaic project. Here’s what to watch for.
- Using a trowel with notches that are too large: Standard 10-12mm notches push adhesive up through the grout lines, creating a messy cleanup nightmare. Use a 4-6mm notched trowel specifically for mosaics.
- Not using a beating block: Pressing mosaics by hand doesn’t seat them evenly. A beating block and rubber mallet ensure all tiles are at the same height, preventing lippage.
- Allowing adhesive to skin over: Mosaic sheets need full adhesive contact. If the adhesive has skinned (formed a dry film), new sheets won’t bond properly. Work in small sections.
- Using grey adhesive under glass mosaics: Grey shows through translucent glass tiles, ruining their appearance. Always use white thin-set for glass mosaics.
- Cutting sheets in place: Cutting mosaic sheets after they’re installed is nearly impossible without damaging adjacent tiles. Measure, cut, and dry-fit before applying adhesive.
- Using sanded grout on glass: Sanded grout scratches glass surfaces permanently. Always use unsanded grout for glass mosaics.
- Skipping the layout planning: Starting installation without guide lines almost guarantees crooked rows. Take 10 minutes to mark level lines – it’s worth it.
⭐ Pro Tips for Professional-Looking Mosaic Results
These insider techniques will elevate your mosaic installation guide results:
- Use a grout float with a rubber edge: Metal or hard plastic edges scratch glass and polished mosaics. A quality rubber float protects your tiles.
- Seal natural stone mosaics before grouting: Stone absorbs grout colour and is difficult to clean after grouting. Apply a penetrating sealer before grouting.
- For shower floors, use small mosaics (under 25mm): Smaller tiles follow the shower pan slope better than larger tiles, reducing lippage and improving drainage.
- Keep mosaic sheets wet while cutting: Wet saws cool the blade and reduce chipping. For manual cutting, spray sheets with water.
- Remove individual tiles for outlet cutouts: Instead of cutting the whole sheet, remove individual tiles from the mesh around the outlet, place the sheet, then fit the cut tiles individually.
- Check for sheet-to-sheet colour variation: Mosaic sheets from different batches can have colour differences. Mix sheets from multiple boxes during installation for a blended look.
- Apply grout release to glass mosaics: A grout release product makes cleanup easier and prevents grout haze from sticking to glass surfaces.
🏠 Best Places to Use Mosaic Tiles in Your Home
Mosaics shine in specific applications. Here’s where they work best:
Kitchen Backsplashes: Mosaics are perfect for backsplashes – they’re easy to clean, reflect light beautifully, and create a stunning focal point behind the stove or sink.
Shower Niches and Accent Strips: A mosaic accent strip at eye level adds luxury without breaking the budget. Mosaic-lined shower niches create a spa-like feel.
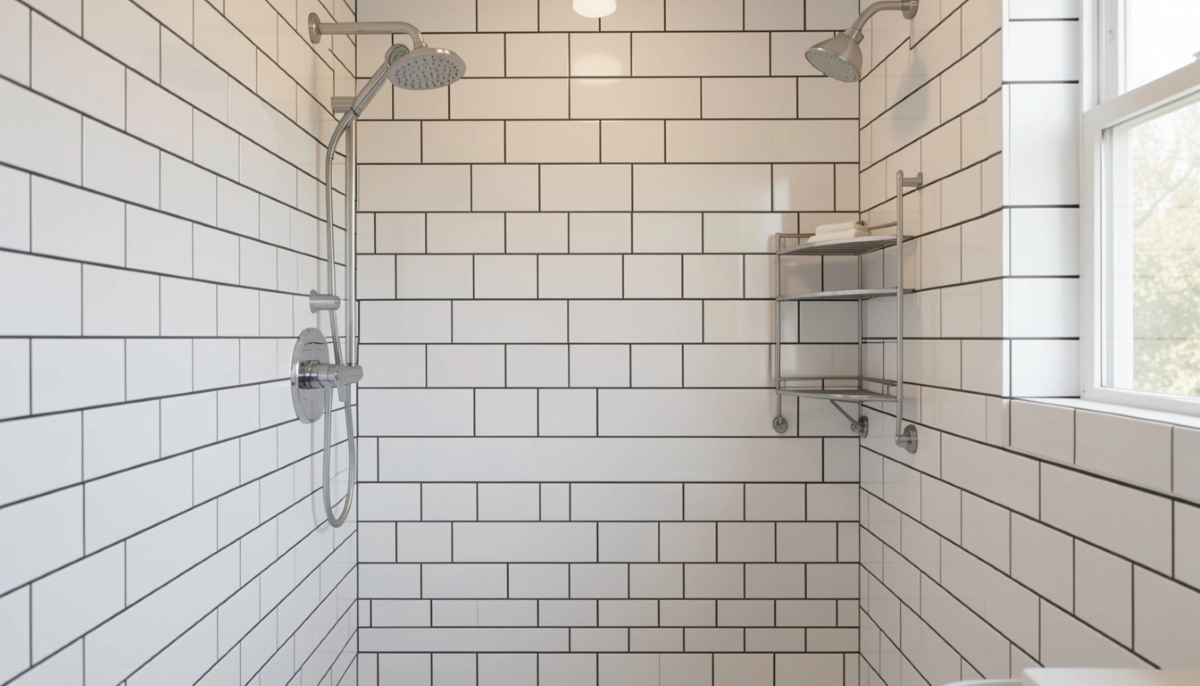
Bathroom Floors (Small Mosaics Only): Small mosaic tiles (under 25mm) work well on shower floors because they conform to the slope. Avoid large mosaics on wet floors – too many grout lines can be slippery.
Fireplace Surrounds: Glass or metal mosaics around a fireplace create a stunning modern focal point. The heat reflection adds drama.
Entryway Floors: A mosaic medallion or patterned entry floor makes a lasting first impression. Use durable porcelain mosaics for high-traffic areas.
Pool and Outdoor Areas: Glass mosaics are ideal for pools, fountains, and outdoor kitchens. They’re waterproof, UV-resistant, and stunning in sunlight.
For more design inspiration, read our guide on hexagon tiles design ideas.
❓ Frequently Asked Questions About Mosaic Tile Installation
Is mosaic tile installation difficult for beginners?
Mosaic tile installation is actually one of the most beginner-friendly tiling projects. The small tiles hide minor imperfections, and the mesh sheets make installation faster. However, cutting sheets and grouting require attention to detail. With proper preparation, most DIYers can successfully install a mosaic backsplash over a weekend.
What size trowel should I use for mosaic tiles?
Use a 4-6mm notched trowel for mosaic tiles. Standard 10-12mm notches are too large – they push adhesive up through the grout lines, creating a messy cleanup. The smaller notches provide enough adhesive coverage without excessive squeeze-out.
How do you cut mosaic tile sheets without breaking them?
For straight cuts, score the mesh between tiles with a utility knife and snap. For hard materials like glass or porcelain, use a wet saw with a fine diamond blade. Cut slowly and support the sheet fully. For curved cuts, use tile nippers to cut individual tiles while they’re still on the mesh.
What’s the best adhesive for glass mosaic tiles?
Use white, polymer-modified thin-set adhesive for glass mosaics. White prevents the grey adhesive from showing through translucent glass tiles. The polymer modification adds flexibility and bonding strength. Never use pre-mixed adhesive (mastic) for glass – it doesn’t dry properly under non-porous tiles. Read our tile adhesives guide for more.
Can you install mosaic tiles over existing tiles?
Yes, but with conditions. The existing tiles must be firmly bonded, clean, and flat. Rough up the surface with sandpaper to help adhesion. However, adding another layer increases wall thickness, affecting trim, outlets, and fixtures. Removal is often better. For more, read our guide on tiling over existing tiles.
Do you need to seal mosaic tiles?
Glass and ceramic mosaics don’t need sealing. Natural stone mosaics (marble, travertine, slate) must be sealed before and after grouting to prevent staining. Grout should also be sealed, especially in wet areas. Sealer prevents discolouration from cooking oils, wine, and coffee.
How do you clean grout haze off glass mosaics?
Grout haze on glass requires gentle removal. Start with a dry microfiber cloth. For stubborn haze, use a grout haze remover specifically formulated for glass – test on a scrap piece first. Avoid abrasive pads or acid-based cleaners – they scratch glass. Wipe with a vinegar-water solution (1:4) for final cleaning.
What’s the best way to cut mosaics for electrical outlets?
Measure the outlet position carefully. Mark the cutting lines on the mosaic sheet. Use a wet saw or tile nippers to cut the individual tiles around the outlet. Dry-fit the sheet before applying adhesive. For complex cutouts, remove individual tiles from the mesh, cut them, then place them individually around the outlet.
✅ Final Thoughts: Create Stunning Spaces with Mosaic Tiles
Mosaic tile installation opens up a world of design possibilities. From shimmering glass backsplashes to durable porcelain shower floors, mosaics add texture, colour, and visual interest that standard tiles simply can’t match.
Yes, there are specific techniques to learn – smaller notched trowels, proper cutting methods, and careful grouting. But with this guide, you have everything you need to succeed. Start with a small project like a backsplash or accent strip, and you’ll gain confidence quickly.
Key takeaways for mosaic success:
- Use a 4-6mm notched trowel – larger notches cause adhesive squeeze-out
- Always use a beating block to seat sheets evenly
- Cut sheets before applying adhesive – dry-fit everything first
- Use white thin-set for glass mosaics (grey shows through)
- Unsanded grout only for glass – sanded grout scratches
- Work in small sections – adhesive skins over quickly
Your next step: Ready to transform your space with beautiful mosaics? Whether you’re tackling a DIY project or hiring a professional, get the help you need.
Ready to Start Your Mosaic Project?
Get free quotes from verified tiling specialists who have experience with intricate mosaic installations. Compare prices and hire with confidence.
📞 Call us: 073 138 4726 to discuss your mosaic project.
Free site inspections •
Workmanship guarantees •
Hiring tips
📚 Official resources & standards referenced:
- SANS 10400 – South African National Standard for mosaic tile installation standards, including substrate requirements and waterproofing in wet areas.
- SABS – South African Bureau of Standards for material quality, including glass mosaic durability and slip resistance testing.
Information provided for general guidance. Always test grout and adhesive on a scrap piece before starting your project, especially with glass mosaics.
Written by: Innocent T Hanyani
Construction & Home Services Industry Specialist | 21+ Years Experience
Innocent T Hanyani has over two decades of experience working across South Africa’s construction and home improvement sectors. Throughout his career, he has specialised in decorative tiling techniques, including glass, ceramic, and natural stone mosaics. He has trained numerous DIY homeowners on proper mosaic installation techniques and has seen firsthand what works – and what doesn’t. His practical experience helps homeowners understand the nuances of cutting mosaic sheets, choosing the right adhesive for glass tiles, and achieving professional grout finishes.
For more information about mosaic tiling, explore our related resources: tiling installation cost guide, tile adhesives explained, tile spacers and leveling systems, glass tiles guide, and hexagon tiles design ideas. Learn about our process on what is ServiceLink SA and how we verify contractors. Find tilers in your area: Gauteng, Johannesburg, and Pretoria. For related services, see our plumbing services and waterproofing guides.