💧 DIY Not Working? Call a Pro
If your DIY repair fails or the leak is beyond your skill level, get quotes from verified plumbers. Fast response, fair pricing.
Servicing Gauteng, Western Cape, KwaZulu-Natal, and across South Africa
How to Fix a Leaking Pipe: DIY Guide for Common Pipe Leaks (Save on Plumber Costs)
🔧 From pinhole leaks to dripping joints—step-by-step DIY fixes that work, plus when to call a professional
It’s Sunday evening. You’re cleaning up after dinner when you notice water pooling under the kitchen sink. Your heart sinks. You know a plumber on a Sunday night means an R850 call-out fee plus overtime rates. But the leak is getting worse. What do you do?
I’ve been there myself—standing in a puddle of water, trying to decide whether to attempt a DIY repair or swallow the cost of an emergency plumber. The truth is, some pipe leaks you can fix yourself in 15 minutes with basic tools. Others require professional expertise—and attempting DIY on the wrong type of leak can turn a R1,500 problem into a R15,000 disaster.
Over two decades of working with homeowners across South Africa, I’ve seen the full spectrum—from brilliant DIY saves to costly mistakes. This guide will teach you exactly how to repair a leaking water pipe for common scenarios, which leaks you can safely fix yourself, and most importantly, when to stop and call a professional.
For related information, read our water leak repair services guide, burst pipe emergency guide, and leak detection services guide. Let’s get that leak fixed.
📋 Table of Contents – How to Fix a Leaking Pipe Guide
⚠️ Safety First: Before You Start Any Pipe Repair
Before attempting to repair leaking pipe issues yourself, follow these critical safety steps:
🚨 STOP: Read This First
If water is near any electrical outlets, appliances, or your distribution board, DO NOT attempt DIY repairs. Call a professional immediately. Water and electricity are deadly.
Step 1: Shut off the water supply – Locate the isolation valve for the specific pipe (under sink, behind toilet) or shut off the main water supply to your house. Never work on a pressurised pipe.
Step 2: Release pressure – Open the nearest tap to drain remaining water from the pipe. This prevents spraying when you open the pipe.
Step 3: Prepare for water – Have towels, a bucket, and a wet/dry vacuum ready. Even after draining, some water will escape.
Step 4: Inspect the damage – Determine the leak type, pipe material, and whether you have the right tools.
Step 5: Know your limits – If you’re unsure at any point, stop and call a professional. A failed DIY attempt costs more than a professional repair.
🛠️ Tools & Materials You’ll Need for Pipe Repair
For most DIY pipe repair jobs, keep these items in your home toolkit:
🔧 Essential Tools
- Adjustable wrench (2x – one to hold, one to turn)
- Pipe cutter or hacksaw (for cutting pipe)
- Plumber’s tape (Teflon tape)
- Pipe repair clamp (R150-R300)
- Silicone repair tape (R80-R150)
- Plumber’s epoxy putty (R100-R200)
- Bucket and towels
🔧 For Specific Repairs
- Soldering kit (copper pipes – advanced DIY only)
- PVC primer and cement (PVC pipes)
- Compression fitting (R50-R200)
- SharkBite/Push-fit fittings (R100-R400 – no tools needed)
- Tap washer replacement kit (R50-R150)
Where to buy: Builders Warehouse, Chamberlains, Leroy Merlin, or your local hardware store.
📋 Types of Pipe Leaks & Which You Can Fix Yourself
Not all leaks are created equal. Here’s what you can safely DIY vs what needs a professional:
| Leak Type | DIY Possible? | Difficulty | Time | When to Call Pro |
|---|---|---|---|---|
| Dripping tap/washer | ✅ Yes | Easy | 30 min | If cartridge is seized or tap is old |
| Loose pipe joint | ✅ Yes | Easy | 15 min | If threads are stripped or pipe is damaged |
| Pinhole leak (accessible) | ⚠️ Temporary only | Moderate | 30 min | For permanent repair (solder or replace) |
| Leaking isolation valve | ⚠️ Sometimes | Moderate | 1 hour | If valve is old or corroded |
| Burst pipe (gushing) | ❌ No | N/A | N/A | Call emergency plumber immediately |
| Leak inside wall/ceiling | ❌ No | N/A | N/A | Call professional for detection & repair |
| Geyser leak (tank) | ❌ No | N/A | N/A | Call professional immediately |
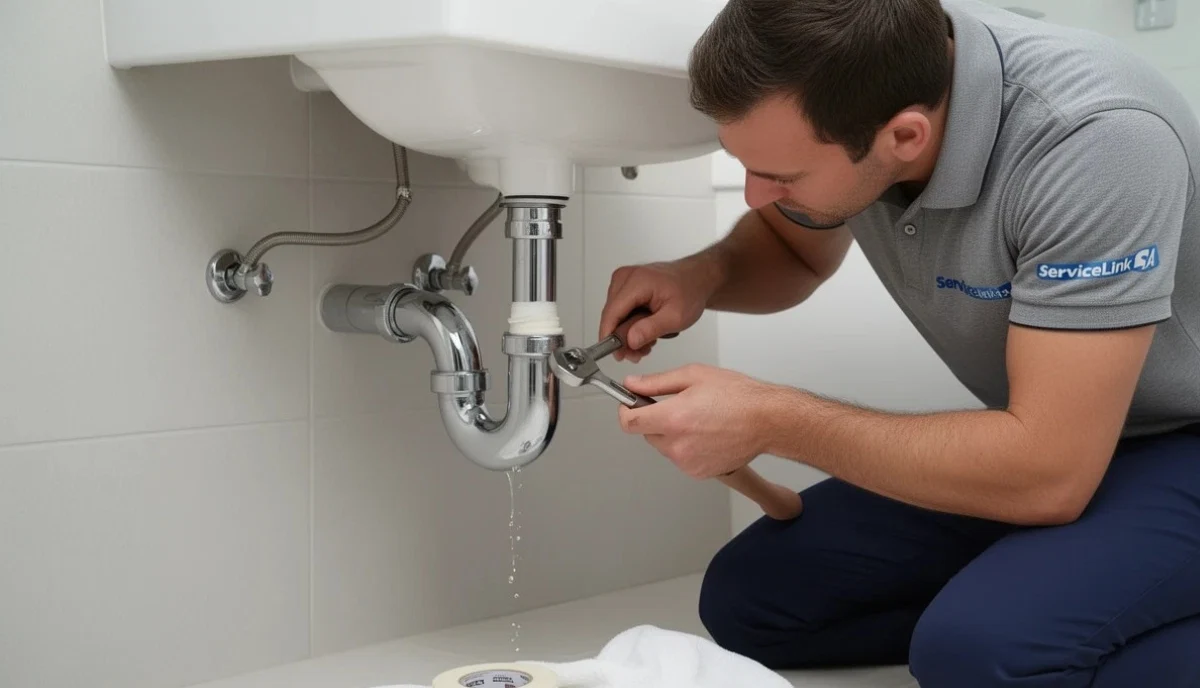
🔧 Fix #1: Leaking Pipe Joint (Compression or PVC)
One of the most common leaks—and easiest to fix leaking pipe issues—is a dripping joint under a sink.
What you’ll need: Adjustable wrenches (2x), plumber’s tape, bucket, towels.
Step-by-step instructions:
- Shut off water – Close the isolation valve under the sink or shut off main water.
- Place bucket under the joint – Expect water to drip when you loosen the fitting.
- Loosen the compression nut – Use one wrench to hold the fitting body, another to turn the nut counter-clockwise.
- Clean the threads and ferrule – Remove old tape, debris, or damaged ferrule.
- Apply fresh plumber’s tape – Wrap Teflon tape 3-5 times clockwise around the threads.
- Re-tighten the compression nut – Hand-tighten first, then use wrenches for 1/4 to 1/2 turn more. Don’t overtighten.
- Turn water back on and test – Check for drips. If still leaking, the ferrule may need replacement.
💡 Pro Tip:
Don’t overtighten compression fittings. “Hand tight plus 1/4 turn” is usually enough. Overtightening can crack the ferrule or fitting, making the leak worse.
💧 Fix #2: Pinhole Leak in Copper or PVC Pipe
A pinhole leak (small hole spraying water) requires a temporary fix unless you have advanced DIY skills for soldering copper.
Temporary fix (will last months, not years):
- Shut off water and drain pipe – Open nearest tap to release pressure.
- Dry the pipe surface – Use a towel. Epoxy needs a dry surface to bond.
- Apply epoxy putty – Knead the two-part putty until uniform colour. Press firmly into the hole and smooth over the area.
- Wait for cure time – Typically 5-30 minutes depending on product.
- Turn water back on slowly – Check for leaks.
Alternative temporary fix (pipe repair clamp):
- Place rubber pad over the pinhole.
- Wrap the repair clamp around the pipe and tighten bolts evenly.
- Works for small to medium holes.
⚠️ Important:
Epoxy putty and repair clamps are TEMPORARY fixes. They will last months, but not years. Schedule a professional pipe repair to permanently fix the leak (soldering copper or replacing the pipe section).
💧 DIY Not Working? Call a Pro
If your DIY repair fails or the leak is beyond your skill level, get quotes from verified plumbers. Fast response, fair pricing.
Free quotes • Verified plumbers • Beat Your Quote guarantee
🚰 Fix #3: Dripping Tap or Showerhead
A dripping tap isn’t just annoying—it wastes 11,000 litres of water per year. Here’s how to stop pipe leak at the tap:
For traditional taps (rubber washer):
- Shut off water to the tap (isolation valve under sink or main water).
- Remove the tap handle (screw under decorative cap).
- Unscrew the valve stem using a wrench.
- Replace the rubber washer at the bottom of the stem (R5-R20).
- Reassemble in reverse order.
For modern mixer taps (ceramic cartridge):
- Shut off water.
- Remove handle and decorative cap.
- Unscrew the cartridge retaining nut.
- Pull out the cartridge (take it to the hardware store for matching replacement).
- Install new cartridge (R150-R500).
- Reassemble.
Read our water leak repair services guide for more on tap repairs.
🔧 Fix #4: Leaking Isolation or Gate Valve
Valves leak from the stem (handle) or the body. Here’s how to repair leaking pipe valves:
Leaking from the stem (packing nut):
- Shut off water to the valve (main water supply).
- Tighten the packing nut (the nut behind the handle) slightly—1/4 to 1/2 turn.
- If still leaking, the packing material needs replacement (more complex).
Leaking from the body (cracked valve): Replace the entire valve. This requires cutting pipe and installing a new valve. If you’re not comfortable soldering or using compression fittings, call a professional.
🚨 Temporary Emergency Fixes (Stop the Leak Now)
When you need to stop pipe leak immediately while waiting for a plumber, use these methods:
🎯 Silicone Repair Tape
Self-fusing tape that bonds to itself. Wrap tightly around the leak with 50% overlap. Works on wet pipes. Effective for pinhole leaks and small cracks. Temporary fix lasting days to weeks.
🔧 Pipe Repair Clamp
Rubber pad with metal clamp. Place pad over leak, tighten bolts. Available at hardware stores. Works for small to medium leaks. Temporary fix lasting weeks to months.
🧱 Epoxy Putty
Knead two-part putty, press into leak. Hardens in 5-10 minutes. Best for pinhole leaks. Temporary fix lasting months.
🔄 Rubber & Hose Clamps
Cut rubber from inner tube or garden hose. Place over leak. Secure with hose clamps on both sides. Old-school but effective.
📋 Important:
These are TEMPORARY fixes only. After stopping the immediate leak, schedule a professional pipe repair for a permanent solution. Temporary fixes can fail over time.
📞 When to Call a Professional (Don’t DIY These)
Knowing when to stop trying to fix leaking pipe issues yourself is just as important as knowing how to DIY. Call a professional for:
- Burst pipes – Gushing water, especially behind walls or in ceilings
- Leaks inside walls or ceilings – Requires opening the wall and proper repair
- Geyser leaks – Pressurised system, electrical risk, requires COC
- Underground pipe leaks – Requires detection equipment and excavation
- Gas pipe leaks – Extremely dangerous. Evacuate and call from outside.
- Main water line leaks – Between meter and house, often requires excavation
- If your DIY attempt made it worse – Stop and call a professional
⚠️ The Cost of a DIY Mistake:
A R200 DIY attempt to fix a leaking pipe can lead to a R50,000+ insurance claim for water-damaged ceilings, walls, and flooring. When in doubt, call a pro. ServiceLink SA connects you with verified plumbers who can fix it right the first time.
Read our how to choose a plumber guide and licensed plumbers guide for help finding a professional.
💰 DIY vs Professional: Cost Comparison
Here’s how DIY pipe repair compares to hiring a professional:
| Leak Type | DIY Cost | DIY Time | Professional Cost | Verdict |
|---|---|---|---|---|
| Dripping tap (washer) | R50-R150 | 30 min | R400-R900 | ✅ DIY if confident |
| Loose pipe joint | R50 (tape) | 15 min | R600-R1,200 | ✅ DIY |
| Pinhole leak (temporary) | R100-R300 | 30 min | R1,500-R3,500 | ⚠️ DIY temporary, then call pro |
| Pinhole leak (permanent solder) | R500-R1,000 (tools) | 2-3 hours | R1,500-R3,500 | ❌ Call pro unless skilled |
| Burst pipe | N/A | N/A | R2,000-R5,000+ | ❌ Always call pro |

🛡️ Preventing Future Pipe Leaks
The best way to avoid needing to repair leaking pipe issues is prevention:
🔧 Annual Inspections
Schedule annual professional plumbing inspections to catch developing issues before they become leaks. Use our free inspection service.
🎛️ Pressure Regulation
Install a pressure reducing valve if your water pressure exceeds 500kPa. High pressure stresses pipes and joints.
🧊 Pipe Insulation
Insulate exposed pipes to prevent freezing in winter. Read our pipe insulation guide.
📊 Monitor Your Water Meter
Check your meter monthly. A sudden unexplained increase is your earliest warning of any leak.
For a complete maintenance schedule, download our Home Plumbing Maintenance Checklist.
❌ 5 DIY Mistakes That Make Pipe Leaks Worse
Mistake #1: Overtightening Fittings
“Tighter is better” is wrong. Overtightening compression fittings cracks the ferrule or fitting. Overtightening threaded fittings strips threads. Hand-tight plus 1/4 turn is usually enough.
Mistake #2: Using the Wrong Type of Tape
Plumber’s tape (Teflon) is for threaded fittings only. Never use it on compression fittings (the seal is the ferrule, not the threads). Using tape on compression fittings actually causes leaks.
Mistake #3: Not Shutting Off Water Completely
Working on a pressurised pipe is dangerous and impossible. Ensure water is fully off and pressure is released by opening a tap. Don’t rely on “mostly off.”
Mistake #4: Ignoring Pipe Material
Different pipes need different repair methods. What works for copper doesn’t work for PVC. What works for PVC doesn’t work for PEX. Know what you’re working with.
Mistake #5: Calling Epoxy a Permanent Fix
Epoxy putty and repair tape are TEMPORARY fixes. They will fail eventually—often at the worst time. Always schedule a professional permanent repair after a temporary fix.
❓ Frequently Asked Questions About Fixing Leaking Pipes
How to fix a leaking pipe without replacing it?
How to repair a leaking water pipe without replacement depends on the leak type. For pinhole leaks: epoxy putty or pipe repair clamp (temporary). For loose joints: tighten or re-tape. For leaking valves: tighten packing nut. However, these are often temporary fixes. For a permanent solution without full replacement, a plumber can cut out the damaged section and install a new piece using couplings—this is still “replacing” the damaged section but not the whole pipe.
Can I use Flex Tape to fix a leaking pipe?
Flex Tape and similar products can work as a TEMPORARY emergency fix for small leaks. Wrap tightly with 50% overlap. However, these are not permanent solutions. The tape will degrade over time, especially on hot water pipes. Use it only to stop the leak while you wait for a professional pipe repair. For permanent fixes, use epoxy putty, repair clamps, or call a plumber.
How to stop a pipe leak temporarily before the plumber arrives?
To stop pipe leak temporarily: 1) Shut off main water supply, 2) For small pinhole leaks, apply silicone repair tape or epoxy putty, 3) For larger leaks, use a pipe repair clamp, 4) For leaking joints, tighten gently with a wrench, 5) Place a bucket under the leak. These temporary fixes will reduce or stop water flow until a professional arrives. Never attempt temporary fixes on gas pipes or leaks near electrical sources.
What is the best temporary pipe repair tape?
Silicone self-fusing tape (brands like Rescue Tape, X-Treme Tape) is the best temporary pipe repair tape. Unlike duct tape or electrical tape, silicone tape bonds to itself when stretched, creating a waterproof seal. It works on wet pipes, withstands pressure, and can be applied in minutes. Apply with 50% overlap for best results. It’s temporary—schedule a permanent repair within weeks.
Can I use epoxy putty on a leaking copper pipe?
Yes, epoxy putty works well on small pinhole leaks in copper pipes as a TEMPORARY fix. Ensure the pipe is dry before application (shut off water, drain pipe). Knead the two-part putty until uniform colour. Press firmly into the hole and smooth over the area. Allow full cure time (typically 5-30 minutes). This will stop the leak for months, but eventually the epoxy may fail. Schedule professional soldering or pipe replacement for a permanent fix.
How to fix a leaking pipe joint without cutting the pipe?
For a leaking threaded joint (metal or PVC): shut off water, loosen the joint, clean threads, apply fresh plumber’s tape (3-5 wraps clockwise), and retighten. For a leaking compression joint: tighten the compression nut slightly (1/4 turn). If still leaking, the ferrule may be damaged—requires disassembly and replacement. For soldered copper joints: you cannot repair without cutting—call a plumber.
When should I call a plumber instead of DIY?
Call a plumber immediately if: the pipe is burst or gushing water, the leak is inside a wall or ceiling, your geyser is leaking, you smell gas, the leak is near electrical sources, your DIY attempt failed or made it worse, or you’re unsure about the repair. A R1,500 professional repair leaking pipe service is cheaper than R50,000 in water damage from a failed DIY attempt. Read our licensed plumbers guide for help finding a professional.
How to fix a leaking pipe under a sink?
To fix leaking pipe under a sink: 1) Clear out the cabinet and place a bucket underneath, 2) Identify the leak source (joint, valve, or pipe), 3) Shut off water (isolation valve under sink or main), 4) For loose compression joints: tighten gently, 5) For leaking valves: tighten packing nut or replace valve, 6) For pinhole leaks: apply temporary epoxy or repair clamp, then call a plumber for permanent fix. Most under-sink leaks are DIY-friendly.
✅ Final Thoughts: Fix It Right, Fix It Once
Learning how to fix a leaking pipe is a valuable homeowner skill that can save you hundreds in emergency call-out fees. Tightening a loose joint, replacing a tap washer, or applying a temporary patch are all within reach of most DIYers.
But knowing your limits is equally important. A failed DIY attempt on a complex leak can turn a small problem into a catastrophic insurance claim. When in doubt, call a professional.
Key takeaways for South African homeowners:
- DIY fixes for: Dripping taps, loose joints, accessible pinhole leaks (temporary)
- Call a pro for: Burst pipes, wall/ceiling leaks, geyser leaks, underground leaks
- Temporary fixes work – epoxy, repair clamps, silicone tape buy you time
- Always shut off water first – never work on a pressurised pipe
- Don’t overtighten – “hand tight plus 1/4 turn” is usually enough
- Know your pipe material – copper, PVC, PEX need different approaches
- When in doubt, call a pro – a R1,500 service call is cheaper than R50,000 in damage
Your action plan: Build a basic plumbing toolkit (wrenches, tape, epoxy, repair clamp). Learn where your main water shut-off valve is. For simple leaks, try the DIY fixes above. For anything beyond your comfort zone, use ServiceLink SA to find a verified plumber who can fix it right the first time.
💧 DIY Not Working? Call a Pro
If your DIY repair fails or the leak is beyond your skill level, get quotes from verified plumbers. Fast response, fair pricing.
📞 Call us: 073 138 4726 for immediate help finding a plumber near you.
Water leak repair •
Burst pipe emergency •
Leak detection •
Beat Your Quote guarantee
📚 Official resources & standards referenced:
- SANS 10400 – Pipe repair standards and compliance requirements.
- Plumbing Industry Registration Board (PIRB) – Guidelines on when to call a professional plumber.
- South African Bureau of Standards (SABS) – Pipe material and fitting standards.
Information provided for general guidance based on industry research and SANS/PIRB standards. For complex leaks or if you’re unsure, professional pipe repair services are recommended.
Written by: Innocent T Hanyani
Construction & Home Services Industry Specialist | 21+ Years Experience
Innocent T Hanyani has over two decades of experience working across South Africa’s plumbing,
construction, and property maintenance sectors. Throughout his career, he has worked closely
with plumbers, contractors, and homeowners, gaining practical insight into how plumbing
systems are installed, repaired, and maintained. His expertise helps homeowners understand
common plumbing problems, choose the right repair solutions, and find reliable service
professionals for everything from leak detection to full plumbing installations.
For more information about fixing leaking pipes and plumbing repairs, explore our related resources:
water leak repair services guide,
burst pipe emergency guide,
leak detection services guide,
how to fix a leaking pipe guide,
and kitchen sink leak repair guide.
Our how ServiceLink SA works and
avoiding contractor scams pages explain our verification process.
See our service areas page for coverage in your region.