Planning a Subway Tile Project?
Get free quotes from verified tiling specialists who have experience with subway tiles and classic brick bond patterns. Compare prices and hire with confidence.
Get Free Quotes from Tiling Specialists
Servicing Western Cape, Cape Town, Camps Bay, and across South Africa
Subway Tile Installation Guide: Classic Pattern Made Easy SA
🧱 The complete guide to installing subway tiles – from brick bond basics to perfect grout lines
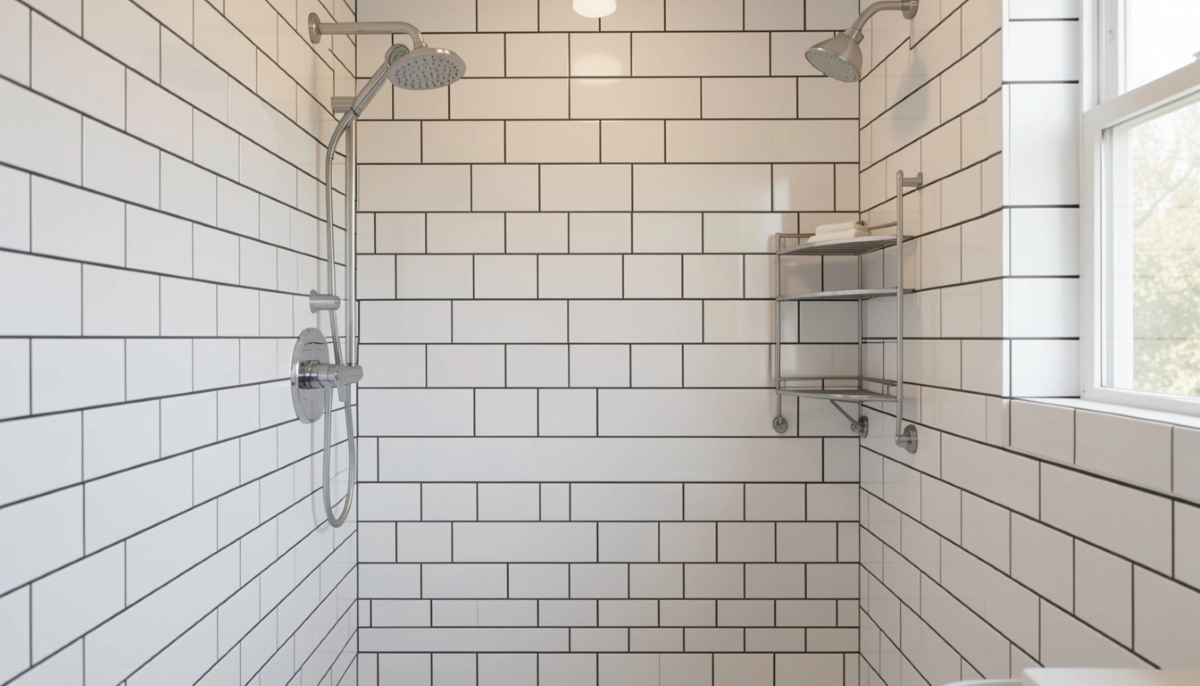
Walk into any design magazine or scroll through Pinterest, and you’ll see them everywhere. Subway tiles. Those classic rectangular tiles, usually white, arranged in that simple brick bond pattern. They’re in million-dollar homes in Camps Bay, cozy cottages in Cape Town, and everywhere in between across the Western Cape.
Why are they so popular? Because they work. Subway tiles are timeless, not trendy. They’re affordable, easy to clean, and surprisingly forgiving for DIY installation. I’ve helped dozens of homeowners tackle their first tiling project with subway tiles – and the results are always stunning.
In this complete subway tile guide, I’ll walk you through everything. You’ll learn the secrets to perfect brick bond tiling, how to cut tiles cleanly, and the grouting techniques that make the difference between amateur and professional. Whether you’re planning a kitchen backsplash or a full bathroom renovation, this subway tile installation guide has you covered.
For more kitchen tiling advice, check out our kitchen backsplash installation guide and best tiles for kitchens and bathrooms.
📋 Table of Contents – Subway Tile Installation Guide
🏠 Why Subway Tiles Are a Timeless Choice
Subway tiles earned their name from the New York City subway system, where they first appeared in the early 1900s. More than a century later, they’re still going strong. Here’s why:
- Timeless appeal: Subway tiles never look dated. They work in Victorian homes, mid-century modern, and contemporary spaces alike.
- Affordable: Basic white ceramic subway tiles are among the most economical tiles available – often R150-R250 per square meter.
- Easy to clean: The smooth, glazed surface wipes clean easily. Perfect for kitchens and bathrooms.
- Light-reflective: White subway tiles bounce light around, making small spaces feel larger and brighter.
- DIY-friendly: The rectangular shape and brick bond pattern is forgiving for beginners – small alignment issues are less noticeable than with large format tiles.
- Endless variations: While classic white is most common, subway tiles now come in every colour, finish (glossy, matte, textured), and size imaginable.
For a complete look at metro tiles (another name for subway tiles) in modern design, explore our tile patterns for small bathrooms guide.
📏 Subway Tile Sizes & Styles – What’s Available
Modern subway tiles come in many sizes beyond the classic 75x150mm. Here’s what’s available:
| Size | Common Name | Best For | Difficulty |
|---|---|---|---|
| 75 x 150mm | Classic Subway | Traditional bathrooms, small backsplashes | Easy |
| 100 x 200mm | Standard Subway | Most common size, versatile for any space | Easy |
| 75 x 300mm | Long Subway | Modern looks, makes spaces feel larger | Moderate |
| 100 x 300mm | Jumbo Subway | Contemporary bathrooms, feature walls | Moderate |
| 150 x 300mm | Large Subway | Modern minimalism, fewer grout lines | Moderate |
Finish options:
- Glossy: Classic look, reflects light, easy to clean. Shows water spots more.
- Matte: Modern, hides water spots, less slippery when wet. Popular for floors.
- Beveled: Edge detail creates shadows and texture. More expensive but luxurious.
- Handmade look: Slight variations in colour and edge – very trendy for rustic or farmhouse styles.

🔄 Brick Bond and Other Subway Tile Patterns
While brick bond (also called running bond) is the classic pattern, subway tiles offer several layout options:
1. Standard Brick Bond (1/2 Offset)
Each row is offset by half a tile. This is the classic subway look. Start the first row with a full tile, second row with a half tile, third row with a full tile, and so on. This pattern is the most forgiving for DIY.
2. 1/3 Offset (Stretcher Bond)
Rows offset by one-third of a tile rather than half. Creates a more subtle, modern pattern. Requires more cutting but looks sophisticated.
3. Vertical Stack (Straight Stack)
Tiles aligned directly above each other with no offset. Creates a grid pattern. Modern and minimalist. Requires perfectly level installation – any errors show immediately.
4. Herringbone
Tiles laid at 45-degree angles to create a V-shaped pattern. Stunning but complex. Not recommended for beginners. Read our herringbone tile pattern guide for details.
5. Vertical Subway
Tiles installed vertically instead of horizontally. Elongates the look of walls, making ceilings appear higher. Trendy in modern bathrooms.
For more pattern inspiration, read our guide on best tile patterns for small bathrooms.
🛠️ Tools & Materials for Subway Tile Installation
Gather these items before starting your subway tile guide project:
Essential Tools:
- Manual tile cutter or wet saw: Subway tiles cut easily with a manual snap cutter – one of the reasons they’re DIY-friendly
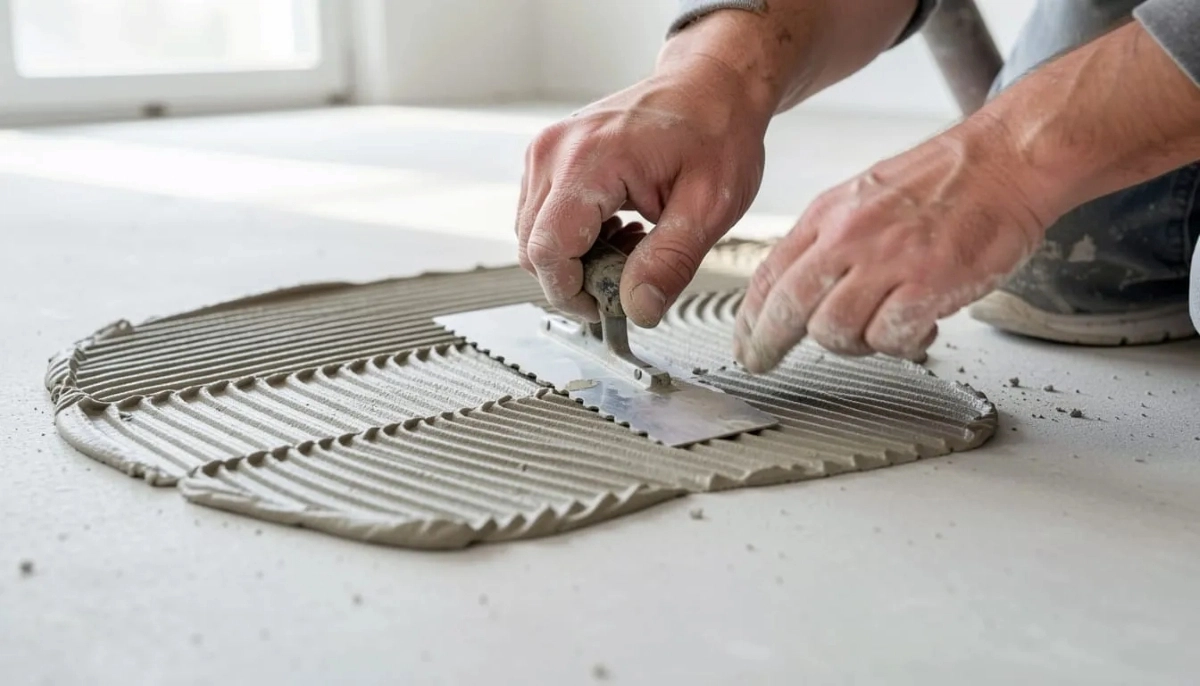
- Notched trowel (6mm): Perfect size for subway tiles
- Tile spacers (2-3mm): For consistent grout lines
- Level (at least 600mm long)
- Measuring tape and pencil
- Rubber mallet and beating block
- Rubber grout float
- Grout sponge and buckets
- Tile nippers (for small cuts around outlets)
- Safety glasses and gloves
Materials:
- Subway tiles (buy 10% extra for cuts and waste)
- Thin-set adhesive (white for light-coloured tiles, grey for dark)
- Primer (if needed for your substrate)
- Grout (sanded or unsanded depending on joint size)
- Grout sealer (especially for light-coloured grout)
For more on adhesives, read our tile adhesives explained guide.
Want a Flawless Subway Tile Installation?
While subway tiles are DIY-friendly, professional installation ensures perfect alignment and grout lines. Get free quotes from verified tiling specialists.
Find Tiling Specialists Near You
Free quotes. Verified contractors. Beat Your Quote guarantee.
🏗️ Surface Preparation for Subway Tiles
Proper preparation ensures your how to install subway tile backsplash project succeeds:
Step 1: Clean Thoroughly
Remove all grease, dust, paint, and debris. For kitchen backsplashes, use a degreaser to remove cooking residue. Any contamination prevents adhesive from bonding.
Step 2: Check for Flatness
Subway tiles are small enough to handle minor imperfections, but significant bumps or dips will show. Sand down high spots and fill low spots with joint compound.
Step 3: Apply Primer (If Needed)
Primer improves adhesion on drywall, plaster, or painted surfaces. It’s especially important for kitchen backsplashes where grease residue might remain.
Step 4: Mark Your Layout Lines
Use a level to draw horizontal lines where the first row of tiles will sit. Also mark vertical lines at the center point of your wall. This keeps everything straight.
Important for backsplashes: Your countertop might not be perfectly level. Don’t use it as your guide – use a level to draw a straight line slightly above the counter, then cut bottom tiles to fit any gaps.
📐 Layout Planning – The Secret to Professional Results
Good layout planning prevents the dreaded “sliver cut” at corners. Here’s how to do it:
Step 1: Find the Center
Measure your wall width and mark the center point. Draw a vertical line. This is your starting reference.
Step 2: Dry-Lay a Row
Lay a row of tiles along the counter (without adhesive) from center to both ends. See how cuts will fall at corners and around outlets.
Step 3: Adjust Your Starting Point
If the cuts at corners are tiny (less than half a tile), shift your starting point by a quarter tile. This ensures cuts are at least half a tile wide, which looks much better.
Step 4: Mark Your First Row Height
Measure up from the counter (or floor) the height of one tile plus a small gap. Use a level to draw a straight line. This is where your first full row will sit – you’ll cut bottom tiles to fit any unevenness.
Taking 20 minutes for layout planning saves hours of frustration and prevents ugly sliver cuts.
✂️ How to Cut Subway Tiles
Subway tiles are among the easiest tiles to cut – another reason they’re perfect for DIY.
Straight Cuts (Manual Snap Cutter):
Manual snap cutters work perfectly for ceramic subway tiles. Score the tile along the cutting line, then snap down on the cutter’s breaking mechanism. For 75x150mm tiles, a small cutter is fine. For longer tiles (300mm), use a larger cutter.
L-Shaped Cuts (Around Outlets):
Use a tile nipper or angle grinder with a diamond blade. Cut from the edge of the tile to the corner of the cutout, then nibble away small pieces. Go slowly to avoid cracking.
Curved Cuts (Around Pipes):
Use a diamond hole saw for circles. For smaller curves, tile nippers work – nibble small pieces until you reach the line.
Cutting Porcelain Subway Tiles:
Porcelain is harder than ceramic. You’ll need a wet saw for clean cuts. A manual cutter may work but expect more waste.
Pro tip for cutting: Mark your cut line with a pencil. For dark tiles, use a white gel pen or masking tape. Measure twice, cut once – especially with expensive glass or porcelain subway tiles.
📝 Step-by-Step Subway Tile Installation Process
Follow these steps for successful subway tile installation:
Step 1: Mix Adhesive
Mix thin-set adhesive according to package instructions. Consistency should be like creamy peanut butter. Let it slake (rest) for 10 minutes, then remix.
Step 2: Apply Adhesive
Using your 6mm notched trowel, spread adhesive onto a small section (about 0.5 square meters). Hold the trowel at a 45-degree angle. Only cover what you can tile in 15-20 minutes.
Step 3: Install First Row
Starting from your center line, place the first tile. Press firmly. Use a slight twisting motion to bed it into the adhesive. Insert spacers. Continue placing tiles, working outward in both directions.
Step 4: Check Level Frequently
After every few tiles, check that they’re level and aligned with your guide line. Adjust immediately if needed – the adhesive is still workable.
Step 5: Install Second Row (Brick Bond)
For standard brick bond, start the second row with a half tile. If you don’t have half tiles pre-cut, cut full tiles in half. Offset each row by half a tile. Use spacers between rows.
Step 6: Continue Installing
Work in small sections, maintaining the offset pattern. Keep checking level. Wipe any adhesive that squeezes onto tile faces immediately with a damp sponge.
Step 7: Cut and Fit Edge Tiles
When you reach corners, measure carefully. Cut tiles to fit. For outside corners, use tile edging for a professional finish.
Step 8: Make Cutouts for Outlets
For electrical outlets, measure the position on the tile. Cut the opening using your chosen method. Dry-fit before applying adhesive.
Step 9: Let Adhesive Cure
Wait 24 hours minimum before grouting. For larger tiles or in cool conditions, wait 48 hours.
🎨 Grouting Subway Tiles – Colour Matters More Than You Think
Grout colour dramatically changes the look of your subway tile installation. Here’s how to choose:
White or Light Grey Grout:
Creates a seamless, clean look. The tiles blend together. Makes small spaces feel larger. Shows dirt and stains more easily. Best for traditional, classic bathrooms.
Dark Grey or Black Grout:
Highlights each individual tile. Creates a striking, modern contrast. Hides dirt and stains well. Popular for kitchen backsplashes and modern bathrooms. The dark lines create a grid pattern that adds visual interest.
Coloured Grout (Blue, Green, etc.):
Adds a fun, custom element. Coordinates with tile colour or creates contrast. Requires careful planning – grout colour is permanent.
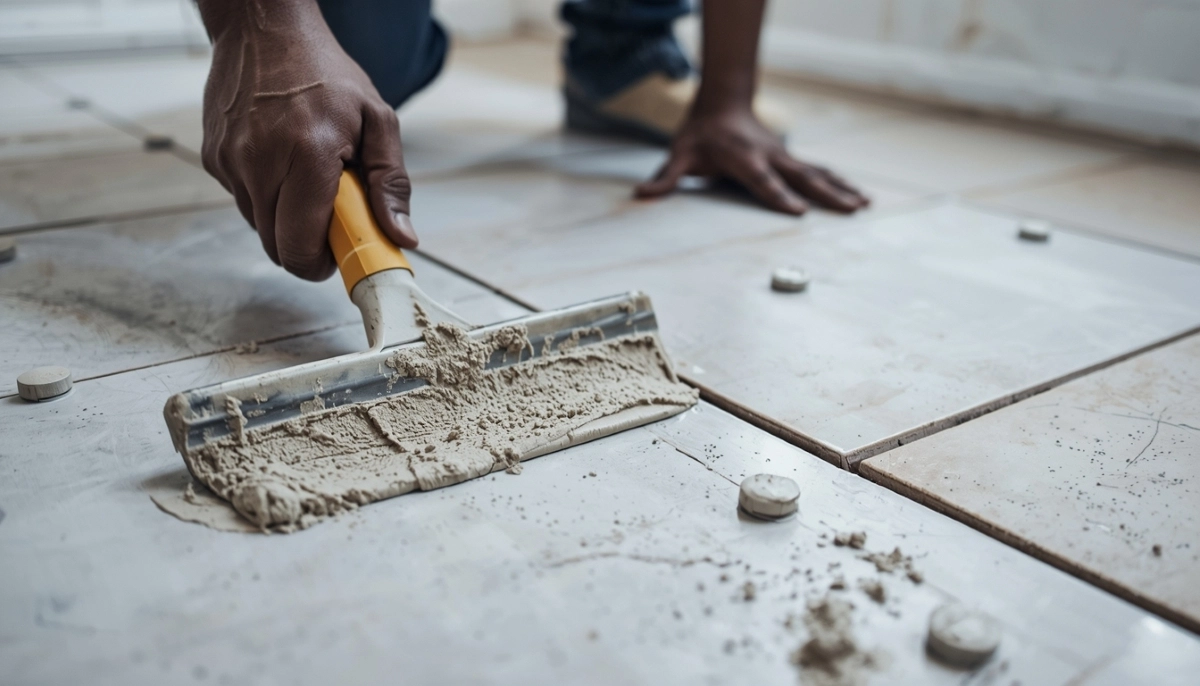
Grouting Process:
Step 1: Mix grout according to instructions. For narrow joints (2-3mm), use unsanded grout.
Step 2: Apply grout with a rubber float, holding at a 45-degree angle. Push grout into all joints, working diagonally across the tiles.
Step 3: After 15-30 minutes (when grout starts to haze), wipe with a damp sponge. Rinse the sponge frequently.
Step 4: After 2-4 hours, buff off remaining haze with a dry, soft cloth.
Step 5: Seal grout after 72 hours, especially in kitchens and bathrooms.

🚫 Common Subway Tile Installation Mistakes to Avoid
⚠️ Warning: Avoid These Subway Tile Errors
These mistakes are responsible for most DIY subway tile failures.
- Using the countertop as a level guide: Counters are rarely perfectly level. Use a spirit level to draw a straight line – cut bottom tiles to fit any gaps.
- Not using spacers: “I can eyeball the gaps” never works. Spacers ensure consistent grout lines – the hallmark of professional work.
- Starting at the corner instead of the center: This guarantees uneven cuts at the opposite corner. Always start from the center and work outward.
- Rushing the layout planning: Skipping the dry-lay step leads to sliver cuts at corners and misaligned patterns. Take 20 minutes to plan.
- Using too much adhesive: Adhesive squeezing through grout lines creates a messy cleanup. Use the correct trowel size (6mm) and don’t overspread.
- Not back-buttering tiles: For large subway tiles (300mm+), back-butter each tile to ensure full coverage and prevent hollow spots.
- Grouting too soon: Adhesive needs 24 hours minimum to cure. Grouting too early can shift tiles out of alignment.
- Choosing the wrong grout colour: White grout on a kitchen backsplash stains quickly. Consider medium or dark grey for busy cooking areas.
⭐ Pro Tips for Professional-Looking Subway Tile Results
These insider techniques elevate your subway tile guide results:
- Use a laser level for perfect alignment: A laser level projects a straight line across your entire wall – worth the investment for larger projects.
- Create a tile cutting station: Set up your tile cutter, water bucket, and measuring tools in one area. This saves time and keeps your workspace organized.
- Number your cut tiles: When cutting multiple tiles for corners or outlets, number them with a marker and lay them out in order. This prevents confusion during installation.
- Use tile edging for exposed corners: Metal or PVC edging creates a clean, professional finish at outside corners. Don’t just butt tiles together – it looks unfinished.
- For beveled subway tiles, use contrasting grout: The grout colour will be more visible in the beveled edges. Dark grout with white beveled tiles creates dramatic shadow lines.
- Seal light-coloured grout: White or light grey grout absorbs stains easily. Apply a penetrating sealer after grouting – reapply every 1-2 years in kitchens.
- Keep tiles wet while cutting: Spraying water on tiles during cutting reduces dust and keeps blades cool. For wet saws, this happens automatically.
❓ Frequently Asked Questions About Subway Tile Installation
Is subway tile installation difficult for beginners?
No – subway tile installation is one of the most beginner-friendly tiling projects. The tiles are small and lightweight, they cut easily with a manual cutter, and the brick bond pattern is forgiving. Most DIYers successfully install a subway tile backsplash over a weekend. Just focus on layout planning and using spacers.
What size trowel should I use for subway tiles?
Use a 6mm notched trowel for standard subway tiles (75x150mm or 100x200mm). This provides enough adhesive without excessive squeeze-through. For larger subway tiles (300mm+), use an 8mm notched trowel. Always use the correct trowel size – too much adhesive creates messy cleanup.
What’s the best grout colour for white subway tiles?
White or light grey grout creates a seamless, classic look. Dark grey or black grout creates striking contrast – very popular for modern kitchens. For backsplashes behind stoves, medium grey hides stains better than white. Test grout colours on a sample board before committing.
How do you cut subway tiles for electrical outlets?
Mark the outlet position on the tile. Use a tile nipper or angle grinder to cut from the edge of the tile to the corner of the cutout. Nibble away small pieces until you reach the line. For round outlets, use a diamond hole saw. Always dry-fit before applying adhesive.
Do I need to seal subway tiles?
Glazed ceramic subway tiles don’t need sealing – the glaze is already waterproof. However, unglazed subway tiles (matte or handmade look) need sealing to prevent staining. Grout should always be sealed, especially in kitchens and bathrooms. Read our tile sealing guide for more.
What’s the difference between ceramic and porcelain subway tiles?
Ceramic subway tiles are softer, easier to cut, and more affordable (R150-R250/m²). Porcelain subway tiles are denser, more durable, and less porous – better for wet areas and floors – but harder to cut and more expensive (R250-R500/m²). For kitchen backsplashes, ceramic is fine. For bathroom floors, use porcelain.
Can I install subway tiles over existing tiles?
Yes, but only if existing tiles are firmly bonded, clean, and flat. Rough up the glossy surface with sandpaper to help adhesion. However, removing old tiles is often better – it reduces weight and allows you to check the substrate condition. For more, read tiling over existing tiles.
How long does subway tile installation take?
A standard kitchen backsplash (2-3 square meters) takes a DIYer 1-2 days for tiling, plus another day for grouting. A professional tiler completes the same project in 4-6 hours for tiling, plus a return visit for grouting. Larger projects like full bathroom walls take proportionally longer.
✅ Final Thoughts: Master the Timeless Subway Tile
Subway tile installation is the perfect gateway into tiling. The tiles are affordable, the pattern is classic, and the techniques are beginner-friendly. With proper preparation, careful layout planning, and attention to grout colour, you can achieve professional-looking results that will last for decades.
Whether you choose classic white with contrasting dark grout, or something more unique like blue glass subway tiles, this timeless style never goes out of fashion. Your kitchen backsplash or bathroom renovation will look as fresh in ten years as it does today.
Key takeaways for subway tile success:
- Use a 6mm notched trowel – not too much, not too little adhesive
- Always start from the center, not the corner
- Use spacers – never eyeball grout lines
- Level your first row – don’t trust the countertop
- Choose grout colour carefully – it transforms the look
- Seal grout in kitchens and bathrooms
Your next step: Ready to transform your space with beautiful subway tiles? Whether you’re tackling a DIY project or hiring a professional, get the help you need.
Ready to Start Your Subway Tile Project?
Get free quotes from verified tiling specialists who have experience with subway tiles and brick bond patterns. Compare prices and hire with confidence.
📞 Call us: 073 138 4726 to discuss your subway tile project.
Free site inspections •
Beat Your Quote guarantee •
Why choose us
📚 Official resources & standards referenced:
- SANS 10400 – South African National Standard for subway tile installation standards, including substrate requirements for wet areas.
- SABS – South African Bureau of Standards for tile quality, including dimensional tolerances for ceramic subway tiles.
Information provided for general guidance. Always test grout colour on a sample board before committing to your entire project.
Written by: Innocent T Hanyani
Construction & Home Services Industry Specialist | 21+ Years Experience
Innocent T Hanyani has over two decades of experience working across South Africa’s construction and home improvement sectors. Throughout his career, he has specialised in classic tiling techniques, including subway tile and brick bond installations. He has trained numerous DIY homeowners on proper subway tile installation methods and has seen firsthand how proper layout planning and grout selection transform results. His practical experience helps homeowners understand why subway tiles remain popular and how to install them for lasting beauty.
For more information about subway tile installation, explore our related resources: kitchen backsplash installation guide, herringbone tile pattern guide, tile patterns for small bathrooms, tile adhesives explained, and best tiles for kitchens and bathrooms. Learn about our process on what is ServiceLink SA and how our service works. Find tilers in your area: Western Cape, Cape Town, and Camps Bay. For related services, see our plumbing services and painting services.