
Planning a Tile Installation Project?
Get free quotes from verified tiling specialists who come equipped with all the professional tiling equipment needed for a flawless finish.
Servicing Gauteng, Johannesburg, Pretoria, Sandton, and across South Africa
Essential Tools for Professional Tile Installation: Complete Guide SA
🔧 From cutters to leveling systems – everything you need in your tiling toolkit
You’ve chosen your tiles. You’ve prepared your subfloor. You’re ready to start tiling. But do you have the right tools? I’ve seen too many DIY projects fail – not because of lack of skill, but because of lack of proper equipment. A dull blade, the wrong trowel, or no leveling system can ruin an otherwise beautiful tile installation.
Over two decades of tiling across Gauteng, from Johannesburg to Pretoria and Sandton, I’ve built my tiling toolkit to include exactly what’s needed for professional results. And I’ve learned that the right tools don’t just make the job easier – they make it possible.
In this complete guide to essential tools for tile installation, I’ll walk you through every tool you need – from basic essentials to advanced equipment. I’ll answer the question what tools do you need for tile installation for beginners, DIY enthusiasts, and professionals alike. You’ll learn about cutting tools, adhesive application tools, leveling systems, measuring tools, safety equipment, and more. By the end, you’ll know exactly what to buy, rent, or hire a professional for.
For more detailed guidance on specific tools, check out our guides on tile adhesives explained, wet tile saw vs manual cutter, tile spacers and leveling systems explained, and self-levelling compounds for tile floors. For cost information, read our tile installation cost per square meter guide.
📋 Table of Contents – Tile Installation Tools Guide
✂️ Tile Cutting Tools – From Manual to Power
Cutting tools are arguably the most important part of your tiling tools needed list. Here’s what you need:
Manual Tile Cutter (Snap Cutter) – R500 – R2,000
Essential for straight cuts on ceramic and some porcelain tiles. Works by scoring the tile surface and snapping along the score line. Best for tiles up to 600mm. For larger tiles, you’ll need a bigger cutter. Read our wet saw vs manual cutter comparison.
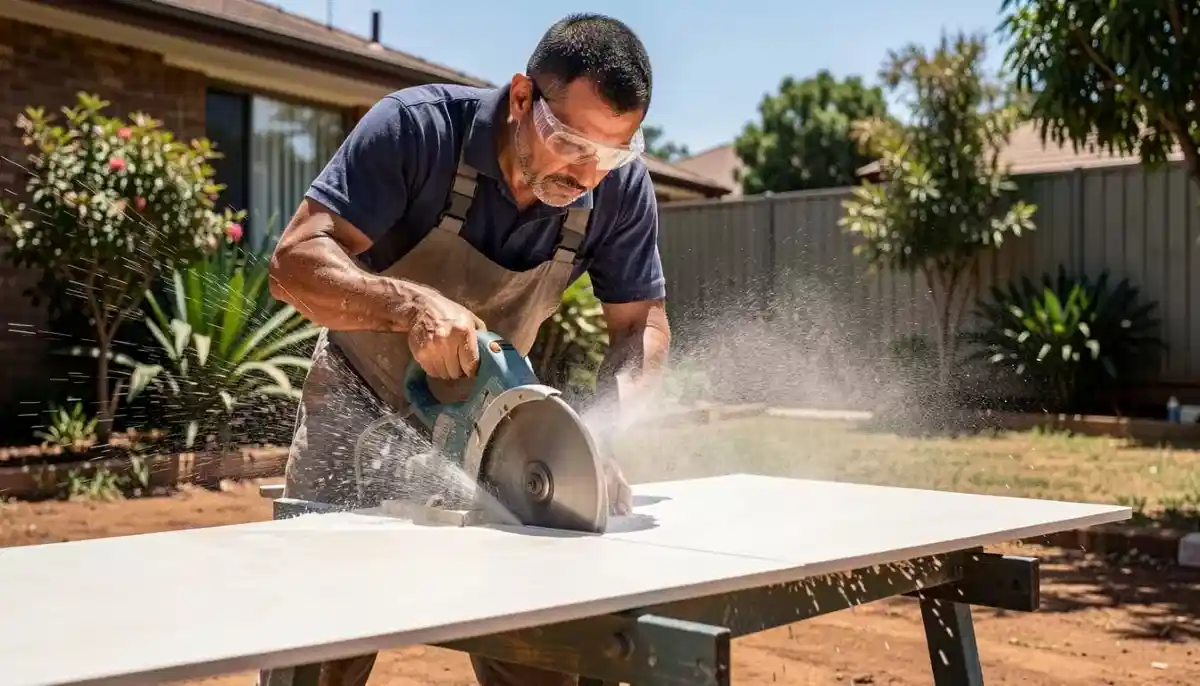
Wet Tile Saw (Bridge Saw) – R2,000 – R10,000+ (rental available)
The professional’s choice for all tile types, especially porcelain, natural stone, and large format tiles. Uses a diamond blade with water cooling for clean, chip-free cuts. Essential for L-shaped cuts, diagonal cuts, and tiles over 600mm.
Angle Grinder with Diamond Blade – R500 – R1,500
Versatile tool for making curved cuts, cutouts for outlets, and trimming edges. Creates significant dust – use with dust shroud or work outdoors. Essential for complex cuts that a wet saw can’t handle.
Tile Nippers – R150 – R400
Hand tool for nibbling away small pieces of tile. Essential for curves, irregular shapes, and small adjustments on mosaics. Works best on ceramic – porcelain is too hard for most nippers.
Diamond Hole Saw – R200 – R600 per size
Drills perfect circles for pipes, shower fixtures, and electrical outlets. Essential for clean holes in porcelain and natural stone. Use with water for cooling and dust control.
Oscillating Multi-Tool (with grout blade) – R800 – R2,500
Excellent for removing old grout, cutting under door frames (under-cutting), and making precise cuts in tight spaces. Very versatile for renovation work.
For more on cutting techniques, read our large format tiles installation guide.
🩹 Adhesive Application Tools – Trowels and Mixers
Proper adhesive application is critical for a lasting installation. Here’s your tiling toolkit for adhesives:
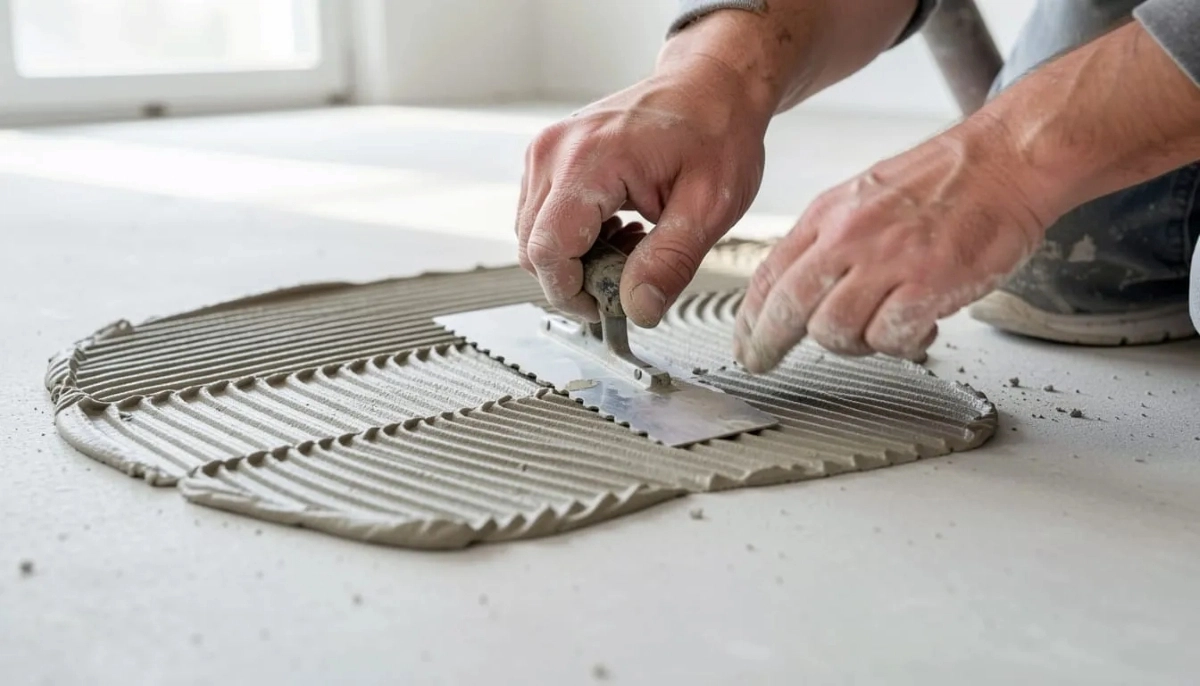
Notched Trowels – R100 – R300 each
Different notch sizes for different tile sizes:
- 4-6mm (U-notch or square-notch): Mosaic tiles and small tiles (under 150mm)
- 6-8mm (square-notch): Standard tiles (150-300mm)
- 8-10mm (U-notch or slant-notch): Large format tiles (300-600mm)
- 10-12mm (U-notch): Extra large tiles (600mm+) and uneven substrates
For more on trowel selection, read our tile adhesives explained guide.
Margin Trowel – R80 – R150
Small rectangular trowel for mixing small batches of adhesive or grout, spreading in tight corners, and scraping buckets. Very handy for detail work.
Mixing Paddle (Drill Attachment) – R150 – R400
Attaches to a heavy-duty drill (minimum 600W) for mixing thin-set adhesive and grout. Essential for consistent, lump-free mixing. Don’t use a standard drill – it will burn out. Use a dedicated mixing drill or heavy-duty hammer drill in drill mode.
Mixing Bucket – R50 – R100
20-litre bucket specifically for mixing adhesive. Mark the water level on the side for consistent batches. Never use a bucket that previously contained oil or chemicals.
Knee Pads – R150 – R400
Essential for floor tiling – you’ll be on your knees for hours. Quality knee pads save your knees and your back. Don’t skip these.
📐 Tile Leveling Systems – Eliminating Lippage
For large format tiles and perfect flat floors, a tile leveling system is essential professional tiling equipment:
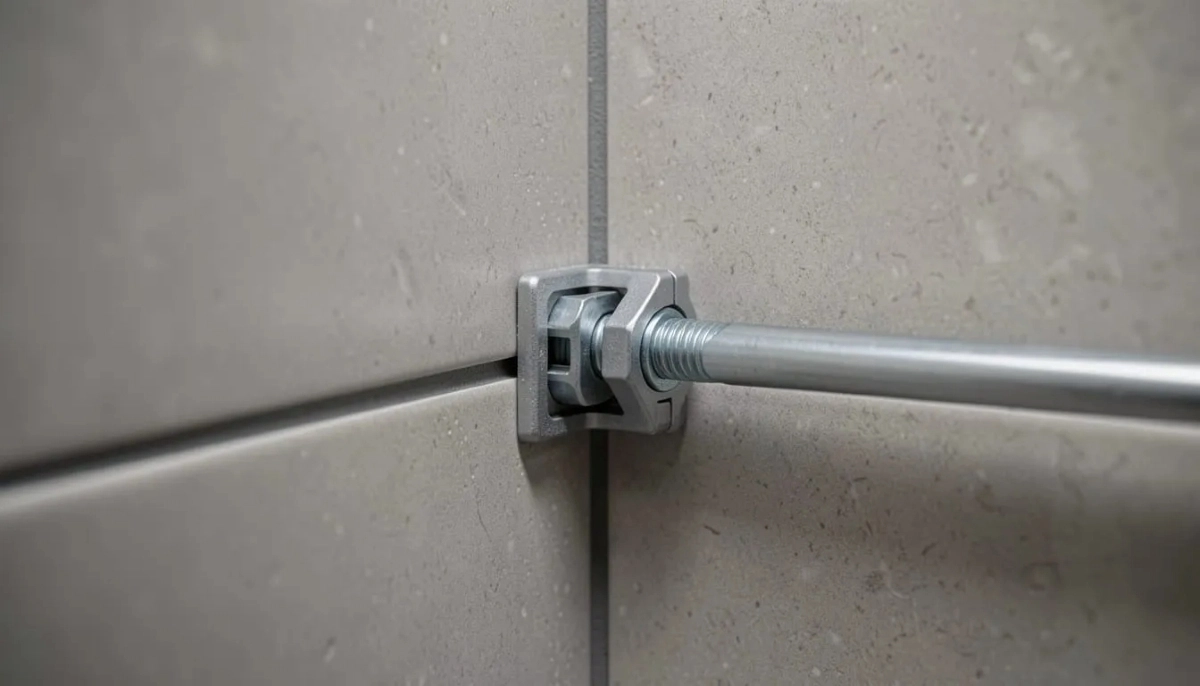
What Is a Tile Leveling System?
A system of clips and wedges (or caps) that pulls adjacent tiles flush, eliminating lippage (height differences). Essential for large format tiles (300x300mm+) and highly recommended for all floor tiles.
Popular Leveling Systems:
- Clip and wedge systems: Clip goes between tiles, wedge tightens to pull tiles flush. Most common. Reusable wedges, disposable clips.
- Cap and base systems: Base clips between tiles, caps screw or snap on top. More expensive but very effective.
- Spin systems: Plastic bases with threaded posts and spinning caps. Very precise but slower.
Cost: R300 – R1,000 per 100 clips (reusable wedges). Worth every cent for large format tiles.
Leveling Pliers / Tensioning Tool – R150 – R400
Special pliers used to tighten wedges in clip-and-wedge leveling systems. Essential for achieving proper tension. Some systems have a gun-style applicator.
For complete guidance, read our tile spacers and leveling systems explained guide.
Don’t Have the Right Tools?
Get free quotes from verified tiling specialists who come fully equipped with all essential tools for tile installation – including professional leveling systems and wet saws.
Find Professional Tilers Near You
Free inspections available. Beat Your Quote guarantee.
📏 Spacers and Alignment Accessories
Consistent grout lines require quality spacers:
Tile Spacers – R50 – R150 per bag
Small plastic crosses that maintain consistent grout line width. Available in sizes: 1.5mm, 2mm, 3mm, 4mm, 5mm, 6mm. Choose based on tile type and desired look:
- 1.5-2mm: Rectified tiles, modern minimal look
- 3-4mm: Standard floor tiles, most common
- 4-5mm: Outdoor tiles, natural stone, rustic look
Wedge Spacers – R100 – R250 per bag
Adjustable spacers that can fine-tune alignment. Useful for correcting small discrepancies in tile size. Also used in leveling systems.
Beating Block (Tamping Block) – R100 – R250
A flat block (often rubber-faced or plywood) used with a rubber mallet to seat tiles evenly into adhesive. Essential for ensuring full contact and consistent height. Can be DIY-made from a piece of plywood wrapped in carpet.
Rubber Mallet – R100 – R250
Used with beating block to tap tiles into place. The rubber head prevents tile damage. Essential for all floor tiling.
Straight Edge / Level – R200 – R600
At least 1.2m long (2m is better). Used to check floor flatness during installation. Essential for large format tiles.
📐 Measuring and Layout Tools
Precision layout prevents crooked tiles and poor cuts:
Measuring Tape – R50 – R150
At least 5m long. Essential for measuring rooms, planning layouts, and marking cut lines.
Chalk Line – R100 – R250
Snaps straight lines across the floor for layout guidelines. Essential for keeping rows straight. Use blue chalk (red can stain some tiles).
Laser Level – R500 – R2,500
Projects straight lines across walls and floors. Much more accurate than chalk lines for large areas. Essential for professional results. A cross-line laser (horizontal and vertical) is most useful.
Speed Square / Rafter Square – R100 – R200
For marking 45 and 90-degree angles. Essential for diagonal layouts and herringbone patterns.
Combination Square – R80 – R150
For measuring and marking straight lines, checking squareness.
Pencil / Marker – R10 – R30
For marking cut lines. Use a soft pencil on light tiles, wax pencil or marker on dark tiles. Some tilers use crayon.
🧹 Grouting and Finishing Tools
Finishing tools for the final step:
Rubber Grout Float – R80 – R200
Rubber-faced float for pushing grout into joints. The rubber won’t scratch tiles (unlike metal). Essential for all grouting.
Grout Sponge – R30 – R80
Large, dense cellulose sponge for cleaning excess grout from tile surfaces. Rinse frequently. Have 2-3 on hand.
Grout Finishing Tool / Profile Striker – R50 – R120
Tool for shaping grout joints to a consistent concave profile. Creates professional-looking joints. Optional but recommended.
Buckets (2-3) – R30 – R80 each
One for mixing grout, one for clean water, one for rinsing sponge. Essential for efficient grouting.
Microfiber Cloths – R50 – R100 per pack
For final cleaning and removing grout haze after sponging. Soft and lint-free.
Grout Sealer Applicator – R50 – R100
Small roller or brush for applying grout sealer. Some use a foam brush or small paintbrush.
🛡️ Safety Equipment – Protecting Yourself
Tile installation creates hazards. Protect yourself with these tiling tools needed for safety:
Safety Glasses – R50 – R150
Essential when cutting tiles – shards and dust fly everywhere. Use for wet saw, grinder, and manual cutter.
Dust Mask / Respirator – R50 – R300
Tile dust (especially from porcelain and cement) contains silica – harmful to lungs. N95 mask minimum; use respirator for extensive cutting or mixing.
Knee Pads (mentioned above) – R150 – R400
Your knees will thank you. Don’t skimp on quality – you’ll be on them for hours.
Work Gloves – R50 – R150
Protects hands from sharp tile edges, adhesive, and grout. Also provides better grip on wet tiles.
Ear Protection – R50 – R200
Wet saws and angle grinders are loud. Prolonged exposure can damage hearing. Use earplugs or earmuffs.
Work Boots – R500 – R1,500
Steel-toe boots protect feet from dropped tiles. Also provide better grip on slippery surfaces.
Dust Extraction System (for wet saws) – R500 – R2,000
Some wet saws have dust ports. Connecting a vacuum reduces silica dust significantly.
Comply with SABS safety standards for all equipment.
🛠️ DIY vs Professional – Which Tools to Buy vs Rent
Not everyone needs to own every tool. Here’s my advice for what tools do you need for tile installation based on your approach:
| Tool Category | DIY – Buy | DIY – Rent | Professional – Buy |
|---|---|---|---|
| Manual tile cutter | ✓ (up to 600mm) | — | ✓ (large format) |
| Wet saw | — | ✓ | ✓ (bridge saw) |
| Leveling system | ✓ (rent clips, buy wedges) | — | ✓ (bulk) |
| Mixing drill | Rent or borrow | ✓ | ✓ (heavy-duty) |
| Laser level | — | ✓ | ✓ (professional grade) |
| Hand tools (trowels, spacers) | ✓ | — | ✓ (multiple sizes) |
Tool Rental Costs in South Africa (approximate):
- Wet saw: R200 – R400 per day
- Laser level: R150 – R300 per day
- Mixing drill: R100 – R200 per day
- Tile cutter (large format): R100 – R200 per day
For a single room DIY project, renting large equipment saves money. For whole-house tiling or professional work, buying is more economical.

🎒 Building Your Tiling Toolkit – By Budget
Here’s how to build your tiling toolkit at different budget levels:
Basic DIY Toolkit (R1,000 – R2,500):
- Manual tile cutter (R500-800)
- Notched trowel (R100-150)
- Margin trowel (R80-100)
- Tile spacers (R50-100)
- Rubber mallet (R100-150)
- Beating block (DIY from plywood – R50)
- Level (1.2m) (R200-300)
- Measuring tape and chalk line (R150-200)
- Rubber grout float (R80-100)
- Grout sponge (R30-50)
- Knee pads (R150-200)
- Safety glasses and dust mask (R100)
- Buckets (R50)
- Total: approx R1,500 – R2,500
Enthusiast DIY Toolkit (R3,000 – R6,000):
- Basic toolkit contents above, plus:
- Angle grinder with diamond blade (R500-800)
- Tile leveling system (R300-500 for starter kit)
- Leveling pliers (R150-200)
- Laser level (basic) (R500-800)
- Mixing paddle for drill (R150-200)
- Diamond hole saw set (R300-500)
- Tile nippers (R150-200)
- Total: approx R3,500 – R6,000
Professional Toolkit (R10,000 – R25,000+):
- All enthusiast tools, plus:
- Wet saw (bridge saw) (R5,000-10,000)
- Large format manual cutter (R2,000-4,000)
- Professional laser level (R2,000-5,000)
- Heavy-duty mixing drill (R1,500-3,000)
- Multiple trowels (all sizes) (R500-1,000)
- Oscillating multi-tool (R1,500-2,500)
- Dust extraction system (R1,000-3,000)
- Quality respirator (R300-500)
- Tool bag / storage system (R500-1,500)
- Total: R10,000 – R25,000+
🚫 Common Tool Mistakes to Avoid
⚠️ Warning: These Tool Mistakes Ruin Tile Installations
Avoid these errors when assembling your essential tools for tile installation.
- Wrong trowel notch size: Using notches that are too small = insufficient coverage (hollow tiles). Too large = adhesive squeeze-out (messy, uneven tiles). Match notch size to tile size.
- Dull cutting blades: A dull blade chips tiles, creates rough edges, and takes longer. Replace diamond blades when they stop cutting cleanly.
- No tile leveling system for large tiles: “I’m experienced enough” doesn’t work with large format tiles. The physics of tile warpage requires leveling systems. Use them.
- Using a standard drill for mixing: Burns out quickly. Use a heavy-duty mixing drill or at least a 600W+ hammer drill in drill mode.
- No knee pads: “I’ll be fine” – you won’t. Your knees will hurt for days. Buy quality knee pads.
- Not checking level frequently: Assuming your floor is flat leads to lippage. Check with a straight edge constantly.
- Using the wrong blade for material: Porcelain requires a diamond blade. Glass requires a fine-tooth diamond blade. Standard blades chip.
- No dust protection: Silica dust is dangerous. Use wet cutting methods or dust extraction + respirator.
❓ Frequently Asked Questions About Tile Installation Tools
What are the essential tools for tile installation for a beginner?
For a beginner DIYer, essential tools for tile installation include: manual tile cutter (for ceramic), notched trowel (6mm), margin trowel, tile spacers (3mm), rubber mallet, beating block (DIY from plywood), level (1.2m), measuring tape, chalk line, rubber grout float, grout sponge, knee pads, safety glasses, dust mask, and buckets. Budget R1,500-2,500 for a basic kit.
Do I need a wet saw for tile installation?
For ceramic tiles under 300mm, a manual snap cutter works. For porcelain, natural stone, tiles over 300mm, or any L-shaped cuts – yes, you need a wet saw. You can rent one for R200-400 per day. Professional tilers always own a wet saw. Read our wet saw vs manual cutter guide for detailed comparison.
What size trowel do I need for my tiles?
Match trowel notch size to tile size: 4-6mm for mosaics (<150mm), 6-8mm for standard tiles (150-300mm), 8-10mm for large format (300-600mm), 10-12mm for extra large (600mm+). Also consider substrate flatness – uneven floors may need larger notches. Read our tile adhesives guide for more.
Is a tile leveling system necessary?
For tiles 300x300mm and larger – YES, absolutely necessary. For smaller tiles, helpful but not essential. Leveling systems eliminate lippage (height differences between tiles) that even experienced tilers can’t avoid with large format tiles. Cost is R300-500 for a starter kit – worth every cent. Read our tile leveling systems guide.
What’s the best tile cutter for porcelain?
For straight cuts on porcelain, a quality manual snap cutter can work for tiles up to 600mm – but expect occasional uneven breaks. For clean, reliable cuts on porcelain, a wet saw with a continuous-rim diamond blade is best. For curves and L-shaped cuts, wet saw or angle grinder with diamond blade. Porcelain is much harder than ceramic – don’t use standard blades.
Can I use a regular drill to mix thinset?
No – regular drills (under 600W) burn out quickly when mixing thick adhesive. Use a heavy-duty mixing drill (800W+) or a hammer drill in drill mode (non-hammer). Mixing paddles (spiral or cage) are designed for this purpose. A burnt-out drill costs more than renting a proper mixer. For small batches (less than 5L), hand mixing with a margin trowel works.
What safety equipment do I need for tiling?
Minimum: safety glasses (cutting tiles), dust mask (N95 for silica dust), knee pads (floor tiling), work gloves (sharp edges). For extensive cutting: respirator (P100 for silica), ear protection (wet saws are loud), steel-toe boots (dropped tiles). Comply with SABS equipment safety standards. Silica dust is dangerous – don’t ignore dust protection.
Should I buy or rent tile installation tools?
Buy hand tools: trowels, spacers, level, rubber mallet, knee pads – they’re affordable and reusable. Rent large equipment: wet saw, laser level, mixing drill (unless tiling whole house). For a single bathroom, renting saves money. For whole-house tiling or professional work, buying is more economical. Read our cost guide for budget planning.
✅ Final Thoughts: The Right Tools Make All the Difference
The difference between a frustrating, mediocre tile installation and a smooth, professional finish often comes down to tools. The right trowel ensures proper adhesive coverage. A quality wet saw produces clean, chip-free cuts. A leveling system eliminates lippage that would otherwise ruin your floor.
Whether you’re a DIY enthusiast or a professional tiler, investing in quality professional tiling equipment pays off in better results, faster work, and less frustration. For DIYers, rent expensive tools for one-off projects; buy quality hand tools that last a lifetime.
Key takeaways for tile installation tools:
- Match trowel notch size to tile size – critical for coverage
- Use a wet saw for porcelain, large tiles, and L-shaped cuts
- A tile leveling system is essential for large format tiles
- Don’t skip safety equipment – silica dust is dangerous
- Rent expensive tools for single projects; buy quality hand tools
- Quality tools produce quality results – don’t buy the cheapest option
- For professional results without buying tools, hire a verified tiler
Your next step: Ready to start your tiling project? Get free quotes from verified tiling specialists who come fully equipped with all essential tools for tile installation.
Ready to Start Your Tiling Project?
Get free quotes from verified tiling specialists who come fully equipped with all essential tools for tile installation – including professional leveling systems and wet saws.
📞 Call us: 073 138 4726 to discuss your tiling project.
Free inspections •
Beat Your Quote guarantee •
Workmanship guarantees
Are You a Tiling Professional?
Join ServiceLink SA’s network of verified tiling contractors. Get qualified leads and grow your business.
📚 Official resources & standards referenced:
- SANS 10400 – South African National Standard for tool standards, installation requirements, and building regulations.
- SABS – South African Bureau of Standards for equipment safety and quality standards for tiling tools.
Information provided for general guidance. Always use appropriate safety equipment and follow manufacturer instructions for all tools.
Written by: Innocent T Hanyani
Construction & Home Services Industry Specialist | 21+ Years Experience
Innocent T Hanyani has over two decades of experience working across South Africa’s construction and home improvement sectors. Throughout his career, he has used and maintained every tool in this guide – from manual cutters to bridge saws to advanced leveling systems. His practical experience helps DIYers and professionals alike understand which tools are essential, which are optional, and which are worth the investment. He has seen projects fail due to wrong trowel sizes and succeed beautifully with proper leveling systems. His advice emphasises quality tools for quality results.
For more information about tile installation tools and techniques, explore our related resources: tile adhesives explained, wet tile saw vs manual cutter, tile spacers and leveling systems explained, self-levelling compounds guide, and tile installation cost guide. Learn about our process on what is ServiceLink SA and how our service works. Find tilers in your area: Gauteng, Johannesburg, Pretoria, and Sandton. For related services, see our building construction and flooring services guides.