Got Cracked Grout That Needs Repair?
Get free quotes from verified tiling specialists who can diagnose grout failure and fix it permanently. Available for emergency services.
Servicing Gauteng, Sandton, Fourways, and across South Africa
Tile Grout Cracking: Causes & How to Fix It Permanently SA
🔧 From hairline cracks to crumbling grout – everything you need to know about fixing grout failure
You’re cleaning your kitchen floor, and you notice it. Thin, dark lines running through the grout between your tiles. Or worse – chunks of grout crumbling out when you sweep. You wonder: “Is this normal? Do I need to fix it? How bad is this going to be?”
I’ve answered these questions for hundreds of homeowners across Gauteng, Sandton, and Fourways. The short answer: tile grout cracking is never normal in a properly installed floor. And ignoring it is a mistake that will cost you.
Cracked grout isn’t just ugly – it’s a pathway. Water, dirt, bacteria, and even pests can travel through those cracks and reach your subfloor. In bathrooms, that means rot and mould. In kitchens, that means bacteria growth under your tiles. The good news? Most cracked grout repair is DIY-friendly and surprisingly affordable.
In this complete guide to fix grout cracks, I’ll explain why grout fails, how to diagnose the severity of your grout failure, walk you through step-by-step repair methods, and help you understand when you need professional help. By the end, you’ll know exactly why does tile grout crack and how to fix it for good.
For related topics, check out our guides on grouting and waterproofing for durable tiling, grout colour selection guide, and tile maintenance tips.
📋 Table of Contents – Tile Grout Cracking Guide
🔍 Why Does Tile Grout Crack? 7 Common Causes
Understanding why you have tile grout cracking is essential for proper repair. Here are the most common causes of grout failure:
1. Subfloor Movement or Settlement (Most Serious)
If your subfloor is moving, settling, or flexing, grout lines will crack – often in straight lines across multiple tiles. This is the most serious cause and may require building construction assessment. Grout is rigid and can’t accommodate movement; something has to give.
2. Missing or Inadequate Expansion Joints
Tiles expand and contract with temperature changes. Without proper expansion joints at walls and every 5-8 meters, tiles press against each other and grout cracks. This often shows as parallel cracks or tenting (tiles lifting). Required by SANS 10400 standards.
3. Improper Grout Mixing or Application
Too much water makes grout weak and prone to cracking. Too little water makes it difficult to work into joints. Not mixing thoroughly leaves dry pockets. Applying grout when the adhesive hasn’t fully cured also causes failure.
4. Wrong Grout Type for the Application
Using sanded grout in narrow joints (under 3mm) – it won’t penetrate properly. Using unsanded grout in wide joints (over 3mm) – it will shrink and crack. In high-movement areas (like wooden subfloors), standard grout cracks; you need flexible, polymer-modified grout.
5. Tile Movement (Loose or Hollow Tiles)
If tiles are loose or hollow sounding, they move slightly under foot traffic. This movement stresses the rigid grout, causing it to crack. The cracked grout is a symptom – the loose tile is the problem.
6. Heavy Impact or Point Loads
Dropping heavy objects or placing heavy furniture with small legs can crack grout lines around the impact point. This is usually localized to a small area.
7. Age and Wear
Grout typically lasts 8-15 years depending on traffic and maintenance. Over time, grout naturally deteriorates, especially in high-traffic areas and wet environments. Read our tile maintenance tips for longevity advice.
⚠️ Critical Warning:
If you have multiple cracked grout lines in a straight line across your floor, or if cracked grout is accompanied by hollow-sounding tiles, DO NOT just re-grout. This indicates subfloor movement or widespread grout failure that needs professional diagnosis. Re-grouting without fixing the cause means the new grout will crack again – often within weeks.
📊 Types of Grout Cracks – What They Mean
The pattern of your tile grout cracking tells you a lot about the underlying cause:
| Crack Pattern | Appearance | Likely Cause | Urgency |
|---|---|---|---|
| Hairline Cracks (Single) | Thin, barely visible crack in one grout line | Normal settling, minor shrinkage, or age | Low – monitor |
| Hairline Cracks (Multiple) | Several thin cracks across different areas | Subfloor movement, poor grout mix, or age | Medium – repair soon |
| Wide Cracks (Over 2mm) | Visible gap where grout has separated or fallen out | Tile movement, impact, or severe shrinkage | Medium-High |
| Crumbling/Powdering Grout | Grout turns to powder when touched | Wrong grout type, improper mix, or water damage | High – re-grout needed |
| Linear Cracks in a Row | Cracked grout lines forming a straight line across multiple tiles | Subfloor movement or missing expansion joints | High – professional assessment |
| Cracks Around Specific Tiles Only | Grout cracked only around one or two tiles | Those tiles are loose or hollow – loose tile repair needed | Medium-High |
| Cracks in Wet Area Only | Cracked grout only in shower, around tub, or near sink | Water damage, failed waterproofing, or wrong grout type | High – water is penetrating |
For more on identifying grout issues, read our removing stains from tile and grout guide.
Need Professional Grout Repair?
Get free quotes from verified tiling specialists who can diagnose your cracked grout repair needs and fix the root cause – not just the symptom.
Free inspections available. Workmanship guarantees.
🩺 How to Diagnose Your Grout Failure
Before attempting fix grout cracks, determine the severity and cause:
Step 1: Inspect the Pattern
Walk your floor and note where grout is cracked. Is it isolated to one area? Widespread? Following a straight line? The pattern tells you if the problem is localized or systemic.
Step 2: Tap Test Adjacent Tiles
Use a coin or screwdriver to tap tiles next to cracked grout. If they sound hollow or loose, the tile grout cracking is a symptom of loose tiles. Read our hollow tiles guide and loose tile repair guide first.
Step 3: Check for Moisture
In wet areas, press a tissue against the cracked grout. If it comes away damp, water is penetrating. This requires waterproofing assessment before grout repair.
Step 4: Assess Grout Condition
Run your fingernail across the grout. Does it crumble? Is it powdery? That indicates wrong grout type, improper mix, or severe age deterioration. Full re-grouting needed.
Step 5: Check for Subfloor Movement
Stand on the floor and bounce gently. Does the floor feel bouncy or spongy? That indicates subfloor deflection – a structural issue requiring professional building construction assessment.
Based on your diagnosis, choose the appropriate repair method below.
🛠️ DIY Cracked Grout Repair – Step-by-Step
For hairline cracks, small isolated areas, and minor grout failure, you can do cracked grout repair yourself:
Tools and Materials Needed:
- Grout saw or oscillating tool with grout removal blade
- Vacuum
- Grout (matching colour – sanded for joints over 3mm, unsanded for under 3mm)
- Rubber grout float
- Grout sponge and bucket
- Grout sealer
- Safety glasses and dust mask
Step-by-Step Process:
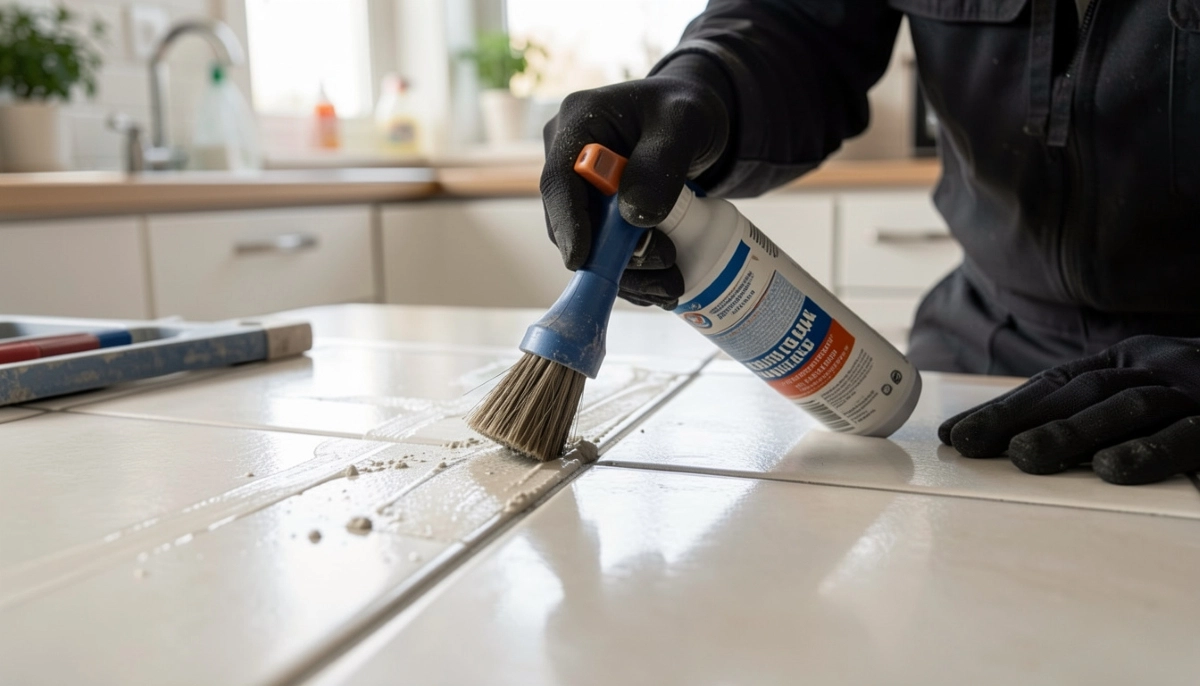
Step 1: Remove Old Grout
Use a grout saw or oscillating tool to remove the cracked grout. You need to remove at least 2mm depth – shallow repairs won’t bond. Be careful not to damage tile edges. Vacuum all dust thoroughly.
Step 2: Clean the Joints
Wipe the joints with a damp sponge to remove dust. Allow to dry completely (at least 2 hours). Any moisture left will weaken the new grout.
Step 3: Mix New Grout
Follow package instructions precisely. Add powder to water (not water to powder). Mix until smooth, like peanut butter. Let it slake (rest) for 10 minutes, then remix. Do not add extra water – this weakens grout and causes future tile grout cracking.
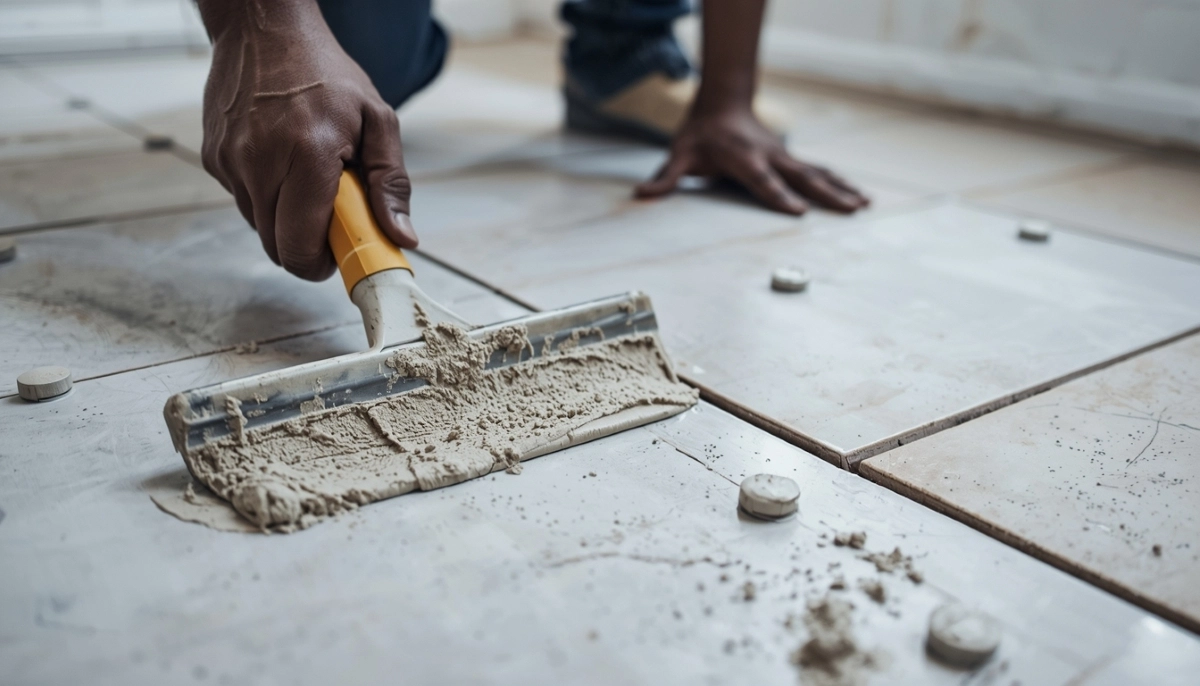
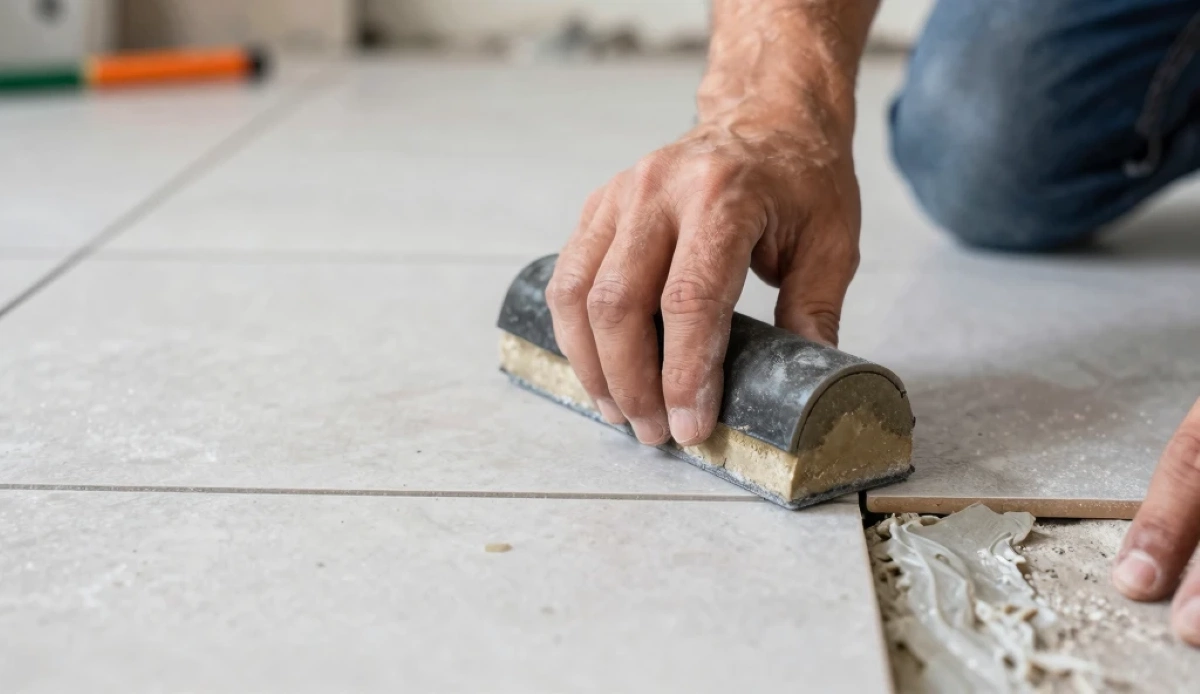
Step 4: Apply Grout
Using a rubber grout float, push grout firmly into the joints at a 45-degree angle. Work diagonally across the tiles. Ensure joints are completely filled – no voids.
Step 5: Remove Excess Grout
After 15-30 minutes (when grout starts to haze), wipe diagonally across tiles with a damp sponge. Rinse the sponge frequently. Don’t over-wipe – this pulls grout out of joints.
Step 6: Final Clean
After 2-4 hours, buff off remaining haze with a dry, soft cloth.
Step 7: Seal the Grout
Wait 72 hours for grout to fully cure, then apply grout sealer. This is critical in kitchens and bathrooms. Sealer prevents stains and water penetration. Read our tile cleaning methods guide for maintenance.
✅ Pro Tip:
For hairline cracks less than 1mm wide, you don’t need to remove old grout. Use a grout colourant or grout paint – it fills the crack and restores colour in one step. This is a cosmetic fix only; it won’t solve structural grout failure.

🔄 Full Grout Replacement – When DIY Spot Repair Isn’t Enough
For widespread grout failure, crumbling grout, or grout that’s heavily stained and cracked, full re-grouting is the answer:
When Full Re-grouting Is Necessary:
- More than 30% of grout lines are cracked or crumbling
- Grout turns to powder when touched
- You want to change grout colour entirely
- Previous spot repairs have failed repeatedly
- Grout is over 15 years old and failing
Full Re-grouting Process:
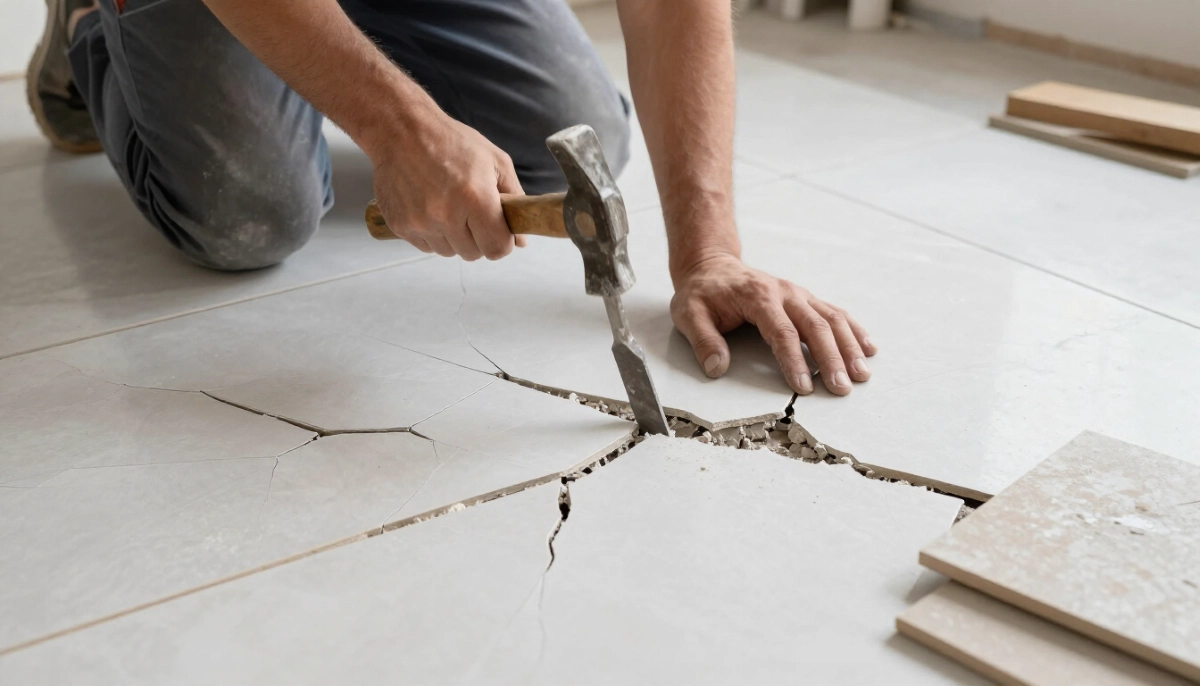
Step 1: Remove All Old Grout
Use an oscillating tool with a grout removal blade or a manual grout saw. Remove grout to a depth of at least 2-3mm. This is the most time-consuming step – expect 4-8 hours for a small bathroom.
Step 2: Thorough Cleaning
Vacuum all dust. Then wash the floor with a grout residue remover to eliminate any old grout haze. Allow to dry completely (24 hours).
Step 3: Mix and Apply New Grout
Follow the same process as DIY repair above, but for larger areas. Work in sections to prevent grout from drying before you can clean it.
Step 4: Seal
After 72 hours cure time, apply high-quality grout sealer. In wet areas, apply two coats.
For professional re-grouting, get a free inspection from a verified tiler through ServiceLink SA.
📞 When to Call a Professional for Grout Repair
Some cracked grout repair situations require professional expertise:
- Cracked grout in a straight line across multiple tiles: Indicates subfloor movement or missing expansion joints. A professional can assess whether structural repairs are needed.
- Cracked grout with hollow or loose tiles: The grout is a symptom. Fixing tiles requires professional removal and re-bonding. See loose tile repair and hollow tiles guide.
- Cracked grout in wet areas (showers, bathroom floors): Water may have penetrated behind tiles. Professional assessment of waterproofing is essential.
- Grout cracks keep returning after DIY repair: This indicates an underlying issue you haven’t addressed.
- You have a large area (over 20m²) needing re-grouting: Professionals have tools that speed up removal (oscillating tools with dust extraction).
- You can’t match the existing grout colour: A professional can help colour-match or recommend a complementary colour.
- The floor is under warranty: DIY repair may void your installation warranty.
ServiceLink SA connects you with verified tiling specialists who carry workmanship guarantees. Learn more about what is ServiceLink SA and how our service works.
🛡️ How to Prevent Tile Grout Cracking in the Future
Preventing tile grout cracking is much easier than repairing it. Here’s how:
During Installation (Most Important):
- Ensure proper subfloor preparation: Flat, stable, and clean substrate prevents movement that cracks grout. Read our floor leveling guide.
- Install expansion joints at walls and every 5-8 meters: Required by SANS 10400 standards. Expansion joints allow tiles to expand and contract without stressing grout.
- Use the correct grout type for your joint width: Sanded for joints over 3mm, unsanded for under 3mm. For high-movement areas (wooden subfloors, outdoors), use flexible, polymer-modified grout.
- Mix grout correctly: Follow package instructions precisely. Too much water weakens grout; too little makes it difficult to apply.
- Allow proper cure time: Don’t walk on freshly grouted floors for 24-48 hours. Don’t expose to water for 72 hours.
After Installation (Maintenance):
- Seal grout every 1-2 years: Grout sealer prevents water penetration and stains. Especially important in kitchens and bathrooms.
- Clean grout properly: Use pH-neutral cleaners. Avoid bleach or acid-based cleaners – they degrade grout over time. Read our tile cleaning methods guide.
- Address loose tiles promptly: A loose tile will crack surrounding grout. Fix loose tiles immediately.
- Fix leaks promptly: Water under tiles destroys grout and adhesive. Address plumbing leaks and waterproofing failures immediately.
- Use felt pads under heavy furniture: Point loads can crack grout around the furniture legs.
For ongoing maintenance, read our tile maintenance tips guide.
💰 Grout Repair Cost Guide
Here’s what you can expect to pay for cracked grout repair in South Africa:
| Repair Type | DIY Cost | Professional Cost | Notes |
|---|---|---|---|
| Grout colourant (hairline cracks) | R100 – R250 | R300 – R600 | Cosmetic fix only |
| Spot grout repair (small area) | R150 – R300 | R500 – R900 | Includes grout and tools |
| Full re-grout (10m² floor) | R500 – R1,000 | R2,500 – R5,000 | Labour intensive |
| Full re-grout (bathroom walls) | R800 – R1,500 | R3,000 – R6,000 | Includes waterproofing check |
| Grout sealing (per m²) | R20 – R40 | R50 – R100 | Sealer cost plus labour |
| Professional inspection | N/A | R0 – R500 | Free inspections available |
For a complete guide to tile and grout maintenance, read our removing stains from tile and grout guide and tile cleaning methods.
🚫 Common Mistakes to Avoid When Repairing Grout Cracks
⚠️ Warning: These Mistakes Make Grout Problems Worse
Avoid these errors when attempting fix grout cracks.
- Applying new grout over old cracked grout: New grout won’t bond properly to old grout. You must remove old grout to at least 2mm depth before applying new.
- Using caulk or silicone instead of grout: Caulk is flexible and collects dirt – it looks terrible and doesn’t match grout texture. Use proper grout for grout lines.
- Adding too much water to grout mix: Extra water weakens grout, causing future cracking and crumbling. Follow package instructions precisely.
- Not sealing grout after repair: Unsealed grout absorbs stains and water, leading to mould and deterioration. Always seal after 72 hours cure time.
- Re-grouting without fixing loose tiles: The new grout will crack again within weeks. Fix the underlying loose tile first. Read loose tile repair guide.
- Using sanded grout on glass or polished tiles: Sanded grout scratches glass and polished surfaces. Use unsanded grout for delicate tile finishes.
- Walking on grout too soon: Grout needs 24-48 hours to cure. Walking early can crack fresh grout and create divots.
- Ignoring linear crack patterns: Straight-line cracks across multiple tiles indicate subfloor movement. Re-grouting without addressing the movement means the cracks will return.
❓ Frequently Asked Questions About Tile Grout Cracking
Why does tile grout crack and how do I fix it?
Tile grout cracking happens due to subfloor movement, missing expansion joints, improper grout mixing, loose tiles, or age. To fix it: remove old grout to 2mm depth, clean thoroughly, apply fresh grout matching existing colour, let cure 24-48 hours, then seal. For hairline cracks, grout colourant works as a cosmetic fix.
Can I just put new grout over old cracked grout?
No. New grout won’t bond properly to old grout – it will crack and fall out within weeks. You must remove old grout to at least 2mm depth before applying new grout. Use a grout saw or oscillating tool for removal. The only exception is grout colourant, which can be applied over hairline cracks as a cosmetic fix.
How much does professional cracked grout repair cost?
Professional cracked grout repair costs R500-R900 for spot repairs, R2,500-R5,000 for full re-grouting a 10m² floor, and R3,000-R6,000 for bathroom walls. Grout sealing adds R50-R100 per m². Get a free quote from verified tilers through ServiceLink SA for accurate pricing.
What’s the difference between sanded and unsanded grout?
Sanded grout contains fine sand particles, making it stronger and less prone to shrinkage. Use for joints 3mm and wider. Unsanded grout is smoother and creamier, use for joints under 3mm. Unsanded is also required for glass, polished marble, or any tile that could be scratched by sand. Using the wrong type causes grout failure.
Why does my grout keep cracking after I fix it?
If fix grout cracks repeatedly fails, you haven’t addressed the underlying cause. Common causes include: subfloor movement (need structural assessment), missing expansion joints (need to cut them in), loose or hollow tiles (need loose tile repair), or water damage (need waterproofing repair). Re-grouting without fixing the root cause guarantees failure.
Can I use caulk instead of grout for cracked joints?
No. Caulk (silicone or acrylic) is flexible and designed for corners and movement joints, not grout lines. Caulk collects dirt, looks different from grout, and doesn’t provide the same structural support. Use proper grout for grout lines. The only exception is at changes of plane (wall-to-wall corners, wall-to-floor corners) where caulk is actually required to accommodate movement.
How do I match grout colour when doing repairs?
Take a sample of existing grout to a tile shop for colour matching. Grout manufacturers offer colour charts. For small repairs, you can buy grout colourant that tints the repair to match. Test colours on a hidden area first – grout dries darker than wet. Read our grout colour selection guide for more tips.
How long does grout last before it starts cracking?
Properly installed and maintained grout lasts 8-15 years. In high-traffic areas, expect 8-10 years. In low-traffic areas (guest bathrooms, bedrooms), 12-15 years. Poor installation (wrong grout type, improper mixing, missing expansion joints) can cause cracking within months. Regular sealing every 1-2 years extends grout life significantly.
✅ Final Thoughts: Fix Grout Cracks the Right Way
Cracked grout might seem like a minor cosmetic issue, but it’s your floor’s warning system. Tile grout cracking tells you something is moving, settling, or failing. Ignoring it means water, dirt, and bacteria reach your subfloor – leading to rot, mould, and expensive repairs.
The good news? Most grout cracks are fixable with basic DIY skills. A grout saw, fresh grout, and a few hours of work can restore your floor. But when cracks keep returning, or when they follow straight lines across multiple tiles, it’s time to call a professional to diagnose the root cause.
Key takeaways for grout repair:
- Hairline cracks: grout colourant for cosmetic fix
- Isolated cracks: remove old grout and re-grout (DIY-friendly)
- Widespread or crumbling grout: full re-grouting needed
- Linear cracks across multiple tiles: professional assessment required
- Always seal grout after repair – critical in wet areas
- Fix loose tiles first – re-grouting won’t solve tile movement
Your next step: If you have cracked grout that needs professional attention, or if you’ve tried DIY repair and the cracks returned, get free quotes from verified tiling specialists. For water-related issues, request a free inspection to assess the full scope.
Need Professional Grout Repair?
Get free quotes from verified tiling specialists who can diagnose your grout failure and fix it permanently – not just patch the symptom.
📞 Call us: 073 138 4726 for immediate assistance with grout emergencies.
📚 Official resources & standards referenced:
- SANS 10400 – South African National Standard for grout standards, expansion joint requirements, and tile installation specifications.
- SABS – South African Bureau of Standards for material standards, including grout strength and durability specifications.
Information provided for general guidance. For widespread grout failure or structural issues, always consult a qualified professional.
Written by: Innocent T Hanyani
Construction & Home Services Industry Specialist | 21+ Years Experience
Innocent T Hanyani has over two decades of experience working across South Africa’s construction and home improvement sectors. Throughout his career, he has diagnosed thousands of tile grout cracking cases – from simple shrinkage cracks to complex subfloor movement issues. His practical experience helps homeowners distinguish between cosmetic grout problems and structural warnings that require professional attention. He has seen how ignoring cracked grout in wet areas leads to mould, subfloor rot, and costly bathroom renovations across Gauteng and beyond.
For more information about grout and tile maintenance, explore our related resources: grouting and waterproofing guide, grout colour selection guide, removing stains from tile and grout, tile maintenance tips, and tile cleaning methods. Learn about our process on what is ServiceLink SA and how our service works. Find tilers in your area: Gauteng, Sandton, and Fourways. For related services, see our waterproofing and cleaning services guides.