Suspect Water Damage Under Your Tiles?
Get free quotes from verified tiling and waterproofing specialists who can detect moisture under tiles and provide professional tile water damage repair. Available for emergency services.
Get Free Water Damage Inspection
Servicing Western Cape, Cape Town, Constantia, and across South Africa
Water Damage Under Tiles: Detection, Repair & Prevention SA
💧 From hidden moisture to full subfloor failure – everything you need to know about water damage under tiles
You notice a musty smell in your bathroom. Or maybe you see a dark stain spreading across your grout lines. Perhaps you hear a squishing sound when you walk on a certain spot. These are the whispers of a silent destroyer – water damage under tiles.
I’ve walked into homes across the Western Cape, from Cape Town to Constantia, where homeowners had no idea water was destroying their floors from below. By the time they noticed, the subfloor was soft, mould was spreading, and repairs cost tens of thousands. One homeowner in Constantia had water damage under her bathroom tiles for over two years before she called for help – the entire wooden subfloor had rotted away.
The scary truth? Moisture under tiles is invisible until it’s almost too late. Water seeps through cracked grout, failed waterproofing, or plumbing leaks. It spreads under your tiles, softening adhesives, rotting wooden subfloors, and creating the perfect environment for toxic mould. And you walk on it every day, completely unaware.
In this complete guide to water damage under tiles, I’ll show you how to detect water damage under floor tiles before it’s catastrophic, walk you through professional repair methods, explain prevention strategies, and help you understand when to file an insurance claim. Your floor’s life depends on catching this early.
For related topics, check out our guides on grouting and waterproofing for durable tiling, tiling insurance claim process, and balcony waterproof tiling systems. For urgent issues, our emergency services are available 24/7.
📋 Table of Contents – Water Damage Under Tiles Guide
⚠️ Why Water Under Tiles Is So Dangerous
Water damage under tiles isn’t just about ruined flooring – it’s a cascade of problems that get worse every day:
1. Subfloor Rot and Structural Damage
Wooden subfloors absorb moisture like a sponge. Once wet, they soften, warp, and eventually rot completely. A rotted subfloor can’t support your tiles – they will crack, shift, and sink. In severe cases, you could literally put your foot through the floor. This requires professional building construction assessment.
2. Adhesive Failure (Loose and Hollow Tiles)
Water dissolves or softens tile adhesive. What starts as moisture under tiles becomes loose tiles and hollow sounding tiles. As the bond fails, tiles move, grout cracks, and more water penetrates – a vicious cycle.
3. Mould and Mildew Growth
Damp, dark spaces under tiles are mould’s paradise. Mould spreads through your subfloor, behind walls, and releases spores into your home. Health effects include respiratory issues, allergies, and asthma exacerbation. Some mould species are toxic.
4. Efflorescence and Tile Damage
As water evaporates, it leaves behind white, powdery salt deposits called efflorescence. These crystals push up from below, cracking grout and even lifting tiles. The SANS 10400 standards require proper waterproofing to prevent this.
5. Pest Infestation
Termites and other wood-boring insects love damp wood. Water-damaged subfloors attract pests that can spread to your entire home’s structure.
6. Health Hazards from Standing Water
Stagnant water under tiles breeds bacteria, fungi, and other pathogens. In severe cases, you may have a hidden swimming pool under your bathroom floor.
⚠️ Critical Warning:
If you hear squishing sounds when walking on tiles, see visible mould, or notice a soft or bouncy floor, STOP walking on the area immediately. You have significant water damage under tiles and the subfloor may be structurally compromised. Call a professional for emergency services right away.
💧 Common Sources of Water Damage Under Tiles
Understanding where water comes from is essential for effective water damage under tiles repair:
1. Failed Waterproofing Membrane (Most Common in Bathrooms)
By South African law (SANS 10252), all wet areas must have a waterproofing membrane under tiles. Over time, these membranes can crack, peel, or be punctured. Once failed, water seeps straight to the subfloor. Read our waterproofing guide for more.
2. Cracked Grout or Tile Cracks
Every crack in your grout or tile is an open door for water. In showers, even small cracks allow gallons of water to reach the substrate over time. See our cracked tile repair and grout cracking repair guides.
3. Plumbing Leaks
Leaking pipes under floors or behind walls are a common source. A slow drip from a plumbing supply line or drain pipe can saturate your subfloor over months. These leaks are often invisible until major damage has occurred.
4. Poor Sealing Around Fixtures
Where toilets, showers, or tubs meet the floor, improper sealing allows water to seep under tiles. A failed wax ring under a toilet is a classic culprit.
5. External Water Intrusion
For ground-floor tiles, rising damp from the soil, poor drainage, or foundation cracks can push moisture up through the concrete slab. For balconies, see our balcony waterproof tiling systems guide.
6. Flooding or Spills
Major spills, burst pipes, or flooding can overwhelm even proper waterproofing. Water finds its way through any opening and spreads under tiles.
7. Condensation and Humidity
In poorly ventilated bathrooms, condensation can accumulate on tiles and seep through grout over time. This is slow but cumulative damage.
🔍 How to Detect Water Damage Under Floor Tiles – 8 Warning Signs
Knowing how to detect water damage under floor tiles early can save you thousands. Watch for these warning signs:
Sign 1: Musty or Mouldy Odours
A persistent damp, earthy smell that won’t go away – even after cleaning – is often the first sign of moisture under tiles. Your nose knows before your eyes see.
Sign 2: Discoloured or Darkened Grout
Grout that appears darker than usual, especially in patches, indicates moisture absorption. Wet grout is darker than dry grout. If it never dries out, water is constantly present.
Sign 3: Efflorescence (White Powder on Grout or Tile Edges)
White, chalky deposits on grout lines or tile surfaces are crystallised salts left behind as water evaporates. This confirms ongoing moisture migration.
Sign 4: Loose or Hollow-Sounding Tiles
Water softens adhesive, causing loose tiles and hollow sounding tiles. Tap your tiles regularly. If new hollow spots appear, investigate for water damage.
Sign 5: Visible Mould or Mildew
Black, green, or dark spots on grout, at tile edges, or along baseboards. Mould needs moisture – its presence confirms water damage.
Sign 6: Squishing Sounds or Bouncy Floor
When you walk on tiles, do you hear squishing? Does the floor feel soft or springy? This indicates a waterlogged subfloor – serious structural damage.
Sign 7: Cracked or Crumbling Grout
While grout cracks have many causes, when combined with other signs, they suggest water damage. Water weakens grout from below.
Sign 8: Peeling or Bubbling Paint on Walls Below Tiled Areas
If you have tiles on an upper floor, water damage may show as peeling paint on the ceiling below. Water travels down through the subfloor and appears on lower levels.
✅ Pro Tip:
Perform a monthly “sniff and tap” inspection in wet areas. Sniff for musty odours, tap for hollow sounds. This 2-minute check can catch water damage under tiles months before visible signs appear.
Suspicious About Moisture Under Your Tiles?
Don’t wait until your subfloor rots. Get free quotes from verified specialists who use professional moisture detection equipment. Emergency services available.
Get Professional Moisture Inspection
Free inspections available. Fully insured contractors.
📊 Water Damage Severity Scale – How Bad Is It?
Not all water damage under tiles is equal. Use this scale to assess urgency:
| Severity Level | Symptoms | Subfloor Condition | Urgency |
|---|---|---|---|
| Mild (Early Stage) | Musty smell, dark grout, slight efflorescence, no loose tiles yet | Damp but structurally sound | Medium – repair within 1-2 months |
| Moderate (Active Damage) | Hollow or slightly loose tiles, visible mould, cracked grout | Softening in spots, some rot beginning | High – repair within weeks |
| Severe (Structural Failure) | Squishing sounds, bouncy floor, multiple loose tiles, visible water when pressing | Rotted, crumbling, or completely failed | Critical – call emergency services now |
For severe cases, stop using the area immediately and call for professional tiling services with water damage expertise.
🔨 DIY Inspection Methods for Moisture Under Tiles
Before calling professionals, you can perform these basic tests to detect moisture under tiles:
Method 1: The Tissue Test
Press a dry tissue firmly against a grout line, especially one that appears darker. Leave for 10 seconds. If the tissue comes away damp, water is present. For better results, tape a tissue over a grout line overnight.
Method 2: The Tape Test
Tape a small square of clear plastic sheeting over a suspicious grout line. Seal all edges with duct tape. Leave for 24-48 hours. If moisture collects on the underside of the plastic, you have active moisture rising from below.
Method 3: The Tap Test
Use a coin or screwdriver to tap tiles. Mark any that sound hollow. Compare to your last inspection – new hollow spots suggest water damage is spreading.
Method 4: Moisture Meter (Homeowner Version)
Pinless moisture meters (R500-R1,500) can scan through tiles to detect subfloor moisture without damaging tiles. Worth the investment if you suspect widespread issues.
Important: These DIY methods can confirm moisture but cannot determine the full extent of damage. For accurate assessment, professional moisture detection is recommended.
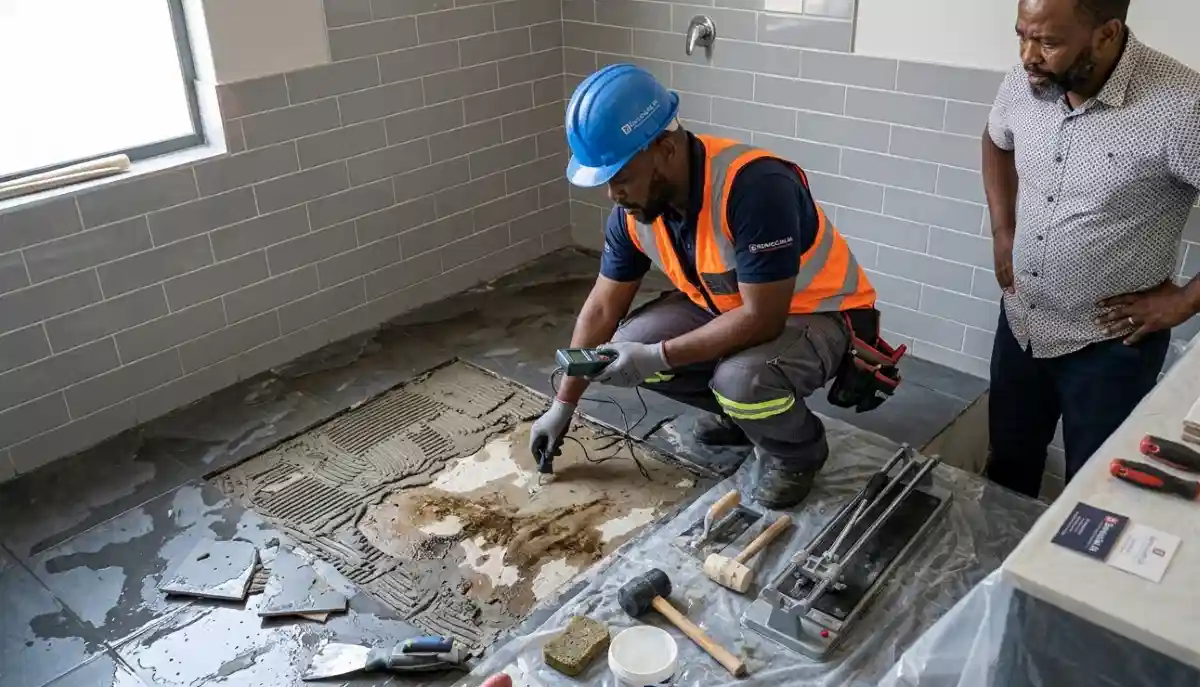
📡 Professional Moisture Detection Methods
For accurate diagnosis of water damage under tiles, professionals use specialized equipment:
Pin-Type Moisture Meters
These meters insert small pins into the subfloor (through drilled holes or after tile removal) to measure moisture content precisely. Readings above 15-20% indicate significant water damage.
Thermal Imaging Cameras
Thermal cameras detect temperature differences caused by evaporating moisture. Wet areas appear cooler than dry areas. This non-invasive method can map the full extent of water damage without removing tiles.
Borescope/Endoscope Inspection
A small camera on a flexible probe can be inserted through a drilled hole to visually inspect the underside of tiles and subfloor condition.
Calcium Carbide Testing
For concrete slabs, this laboratory-grade test measures exact moisture content. Required for insurance claims or legal disputes.
ServiceLink SA’s verified contractors use these professional methods to provide accurate diagnoses. Learn more about how our service works and how we protect homeowners.
🔧 Tile Water Damage Repair – Step-by-Step Professional Process
Professional tile water damage repair follows this systematic process:
Step 1: Identify and Stop the Water Source
Before any repair, the water source must be eliminated. This may involve plumbing repairs, waterproofing replacement, fixing leaks, or improving drainage. No repair will last if water continues to penetrate.
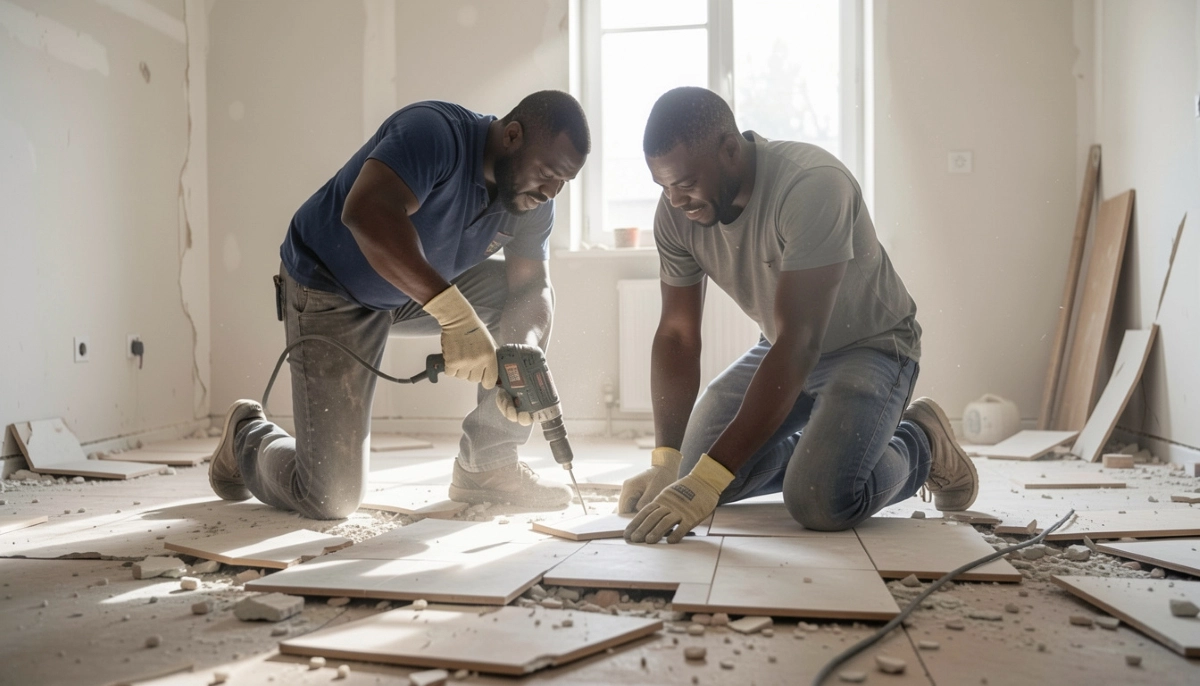
Step 2: Remove Affected Tiles
All tiles in the damaged area must be removed. Water spreads under tiles, so the affected area is usually larger than visible damage suggests. Tiles are carefully removed to salvage as many as possible.
Step 3: Remove Damaged Subfloor
Any rotted, softened, or water-damaged subfloor material is cut out and removed. For concrete slabs, contaminated concrete may need grinding or sealing.
Step 4: Treat for Mould
All affected areas are treated with antimicrobial solutions to kill mould and prevent regrowth. In severe cases, professional mould remediation is required.
Step 5: Dry the Area Thoroughly
Industrial fans, dehumidifiers, and air movers dry the area completely. Moisture content must be below acceptable levels before rebuilding. This can take several days.
Step 6: Replace Subfloor
New subfloor material (plywood, cement board, or backer board) is installed to match original height. For concrete slabs, moisture barriers and self-levelling compounds are applied.
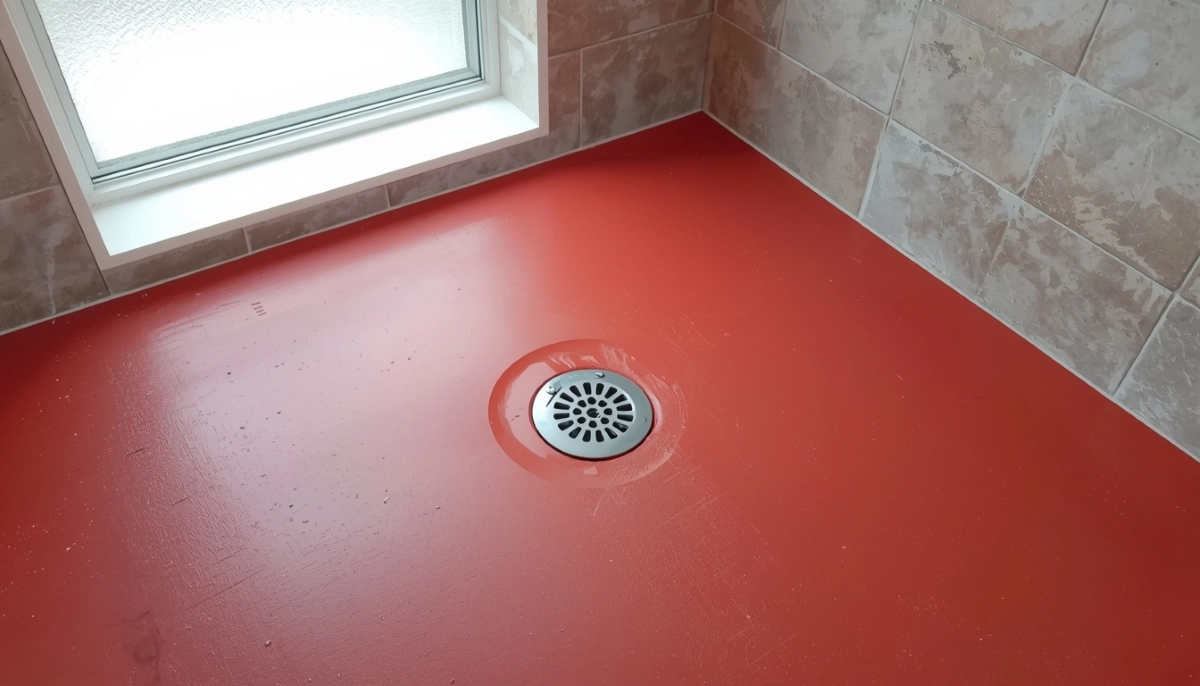
Step 7: Install New Waterproofing Membrane
A new waterproofing membrane is installed according to SANS standards. This is critical for wet areas – do not skip this step. Read our grouting and waterproofing guide.
Step 8: Re-install Tiles
Original tiles (if salvageable) or new matching tiles are installed using proper adhesive and techniques. For large areas, see large format tiles installation.
Step 9: Grout and Seal
New grout is applied and sealed. In wet areas, epoxy grout (which is waterproof) is recommended.
Step 10: Final Inspection and Drying
The repaired area is inspected for proper installation and allowed to cure fully before use (72 hours minimum for wet areas).
For cost details, see our tile removal and replacement cost guide.
🛡️ How to Prevent Water Damage Under Tiles
Preventing water damage under tiles is far cheaper than repairing it. Here’s how:
During Installation (Critical):
- Install proper waterproofing membranes in all wet areas: Required by SANS 10252 standards. Don’t let anyone skip this step.
- Use epoxy grout in showers and wet areas: Epoxy grout is completely waterproof, unlike cementitious grout which is porous.
- Ensure proper sloping to drains: Water should flow to drains, not pool against walls or in corners.
- Seal all penetrations: Where pipes, drains, or fixtures penetrate the waterproofing, use proper seals and collars.
- Use backer board instead of drywall in wet areas: Cement backer board doesn’t absorb water like drywall.
After Installation (Maintenance):
- Seal grout annually: Grout sealer prevents water absorption. In wet areas, reapply every 6-12 months.
- Repair cracked grout and tiles immediately: Every crack is a water pathway. See cracked tile repair and grout cracking repair.
- Maintain proper ventilation: Run bathroom exhaust fans during and after showers to reduce humidity.
- Fix plumbing leaks promptly: Even small drips cause cumulative damage. Use professional plumbing services.
- Inspect caulking around fixtures: Replace cracked or missing caulk around toilets, tubs, and showers annually.
- Monitor for warning signs: Perform monthly sniff and tap inspections.
For balcony and outdoor tiling, read our balcony waterproof tiling systems guide for specific prevention strategies.
📋 Insurance Claims for Water-Damaged Tiles
Understanding your insurance coverage is crucial when facing water damage under tiles:
What’s Typically Covered:
- Sudden and accidental water damage: Burst pipes, overflow from baths/sinks, appliance leaks
- Resulting damage: Tiles, subfloor, and associated repairs from a covered event
- Emergency repairs: Temporary fixes to prevent further damage
What’s Typically NOT Covered:
- Gradual damage: Long-term leaks, failed waterproofing, or poor maintenance
- Groundwater or rising damp: Water entering from outside the home
- Wear and tear: Age-related deterioration of grout, tiles, or waterproofing
- Mould remediation: Often excluded or limited
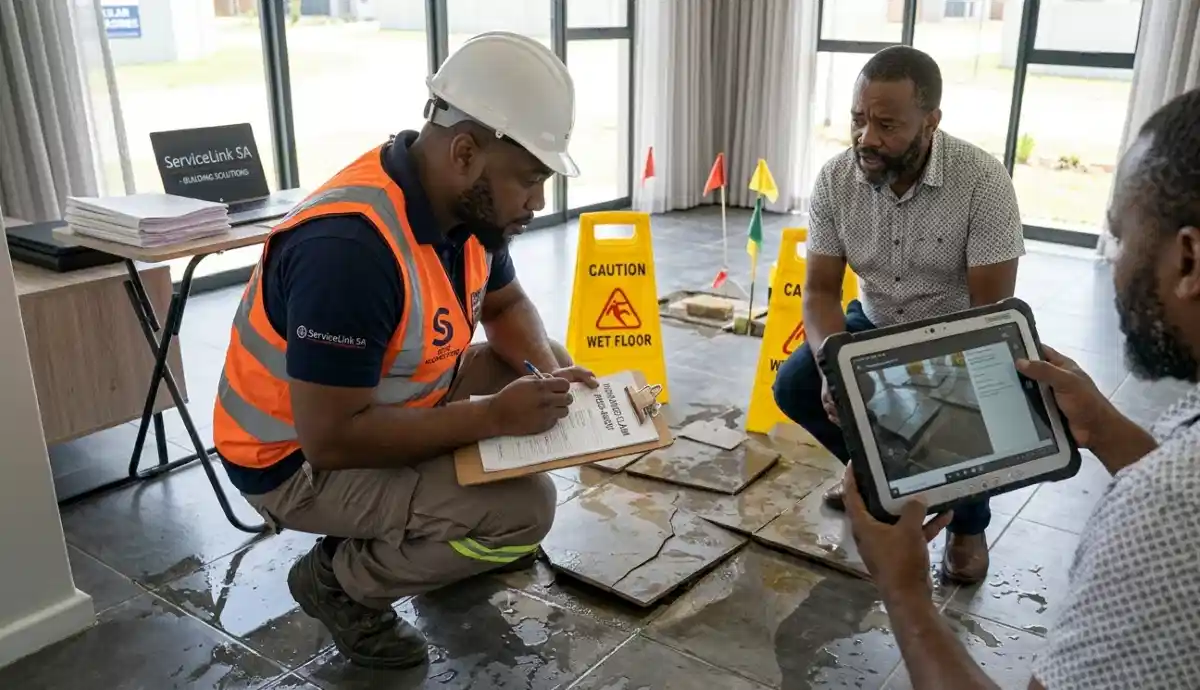
How to File a Claim:
For a complete walkthrough, read our tiling insurance claim process guide. Key steps include:
- Document everything with photos and videos before any repairs
- Get professional moisture detection reports
- Obtain detailed repair quotes from verified tilers
- Work with your insurance assessor (see image above)
- If disputes arise, use our dispute resolution procedure
ServiceLink SA’s contractors provide detailed reports and documentation to support your insurance claim. Learn about our legitimacy and homeowner protections.
💰 Water Damage Under Tiles – Repair Cost Guide
Here’s what you can expect to pay for tile water damage repair in South Africa:
| Repair Type | Cost Range | What’s Included |
|---|---|---|
| Professional moisture inspection | R500 – R1,500 | Thermal imaging, moisture meter readings, detailed report |
| Small area repair (1-2m²) | R3,000 – R6,000 | Remove tiles, dry, replace subfloor, re-tile, grout |
| Medium area repair (3-5m²) | R6,000 – R12,000 | Full water damage restoration process |
| Large area repair (5-10m²) | R12,000 – R25,000 | Includes possible structural repairs |
| Full bathroom re-tile (water damage) | R15,000 – R40,000+ | Complete removal, new waterproofing, full re-tile |
| Mould remediation (additional) | R2,000 – R10,000+ | Professional mould treatment and removal |
| Emergency call-out (after hours) | R500 – R1,500 + repair | See emergency services |
These costs assume professional tiling services with proper waterproofing. Cheap repairs that skip waterproofing will fail and cost more in the long run.
🚫 Common Mistakes to Avoid with Water-Damaged Tiles
⚠️ Warning: These Mistakes Make Water Damage Worse
Avoid these errors when dealing with water damage under tiles.
- Ignoring early warning signs: “It’s just a musty smell” becomes “my subfloor has rotted through” within months. Act on first signs.
- Re-tiling without fixing the water source: New tiles over a leaking waterproofing membrane will fail within weeks. Fix the source first.
- Skipping waterproofing to save money: This is the #1 cause of repeat water damage. Waterproofing is not optional – it’s required by law.
- Not drying the subfloor completely before rebuilding: Trapped moisture continues to rot new materials and grows mould. Drying takes days, not hours.
- Using regular grout instead of epoxy in wet areas: Cementitious grout is porous and will absorb water. Epoxy grout is waterproof – use it in showers and bathroom floors.
- Not documenting damage for insurance: If you start repairs before the assessor visits, your claim may be denied. Document everything first.
- DIY repairs for widespread water damage: Water damage restoration requires professional equipment (industrial driers, moisture meters, thermal cameras). DIY often misses hidden damage.
- Ignoring mould: Mould grows back if moisture remains. Professional mould remediation is essential for health and complete repair.
❓ Frequently Asked Questions About Water Damage Under Tiles
How do I know if there’s water damage under my tiles?
How to detect water damage under floor tiles starts with looking for musty odours, darkened grout, white powdery efflorescence, hollow-sounding tiles, visible mould, squishing sounds, or bouncy floors. Perform monthly sniff and tap inspections. For confirmation, use the tissue test or hire a professional with moisture detection equipment.
Can water under tiles dry out on its own?
No. Once water penetrates under tiles, it cannot evaporate because tiles and grout are not breathable. The water will remain, softening adhesive, rotting subfloors, and growing mould. Professional extraction and drying are required. The only exception is very minor surface moisture that hasn’t penetrated the substrate – but this is rare.
How much does it cost to fix water damage under tiles?
Tile water damage repair costs R3,000-R6,000 for small areas (1-2m²), R6,000-R12,000 for medium areas (3-5m²), and R12,000-R25,000 for large areas (5-10m²). Full bathroom re-tiling due to water damage costs R15,000-R40,000+. Get a free quote from verified specialists through ServiceLink SA for accurate pricing.
Does home insurance cover water damage under tiles?
Home insurance typically covers “sudden and accidental” water damage – burst pipes, overflow, appliance leaks. It typically does NOT cover gradual damage (long-term leaks, failed waterproofing, poor maintenance). Read our tiling insurance claim guide for details. Document everything and get professional moisture reports before filing a claim.
What causes water to get under bathroom tiles?
Common causes: failed waterproofing membrane (most common), cracked grout or tile cracks, plumbing leaks under floors, poor sealing around toilets/tubs/showers, missing or damaged caulking at wall-to-floor junctions, or improper sloping that allows water to pool. Read our waterproofing guide and grouting and waterproofing guide for prevention.
Can I just re-grout over water-damaged tiles?
No. Re-grouting over water-damaged tiles addresses the symptom, not the cause. The water source must be fixed, damaged subfloor replaced, and waterproofing reinstated. New grout over old water damage will crack again quickly as the underlying substrate continues to fail. Proper tile removal and replacement is required.
How long does it take to repair water-damaged tiled floors?
Professional water damage under tiles repair typically takes 1-3 weeks depending on extent. Drying alone takes 3-7 days with industrial equipment. Tile removal, subfloor replacement, waterproofing, and re-tiling add 3-7 more days. Grout needs 72 hours to cure before use. Larger areas or complex structural repairs take longer.
What does mould under tiles look like?
Mould under tiles is usually black, dark green, or grey with a fuzzy or slimy appearance. You may see it growing through grout lines, at tile edges, or along baseboards. A musty, earthy smell often precedes visible mould. If you suspect mould, get professional testing – mould under tiles can be toxic and requires proper remediation with containment and air filtration.
✅ Final Thoughts: Don’t Let Water Destroy Your Floors
Water damage under tiles is one of the most destructive and expensive problems in home maintenance. It’s silent, invisible, and relentless. By the time you see obvious signs, significant damage has already occurred.
But you can beat it. Monthly sniff and tap inspections cost nothing and catch problems early. Annual grout sealing and prompt crack repairs keep water out. Professional waterproofing during installation – never skipped – is your best defence.
If you suspect water damage, act immediately. Call a professional with moisture detection equipment. Document everything for insurance. And never let anyone convince you that skipping waterproofing is acceptable – it’s not just bad practice, it’s against South African building standards.
Key takeaways for water damage under tiles:
- Musty smells, dark grout, and efflorescence are early warning signs
- Hollow tiles, mould, and bouncy floors mean significant damage
- Professional moisture detection is essential for accurate diagnosis
- Proper waterproofing is your best prevention – never skip it
- Repair costs range from R3,000 for small areas to R40,000+ for full bathrooms
- Document everything for insurance claims
Your next step: If you suspect moisture under tiles in your home, don’t wait. Get free quotes from verified water damage specialists who can detect, diagnose, and repair the problem properly. For emergencies, our network includes professionals available 24/7.
Suspect Water Damage Under Your Tiles?
Get free quotes from verified water damage and tiling specialists. Professional moisture detection, proper repair, and workmanship guarantees.
📞 Call us: 073 138 4726 for immediate assistance with water-damaged floors.
Free inspections •
Fully insured contractors •
Dispute resolution
📚 Official resources & standards referenced:
- Department of Water and Sanitation (DWS) – South African water damage guidelines and moisture management standards.
- SANS 10400 – South African National Standard for waterproofing standards, including SANS 10252 for wet area waterproofing requirements.
Information provided for general guidance. Water damage restoration requires professional assessment – do not delay seeking expert help.
Written by: Innocent T Hanyani
Construction & Home Services Industry Specialist | 21+ Years Experience
Innocent T Hanyani has over two decades of experience working across South Africa’s construction and home improvement sectors. Throughout his career, he has managed hundreds of water damage restoration projects – from small bathroom leaks to whole-floor subfloor replacement. His practical experience helps homeowners understand the critical importance of early detection, proper waterproofing, and professional moisture testing. He has seen how ignoring water damage under tiles leads to catastrophic structural failure, toxic mould, and repair costs that could have been avoided with timely action.
For more information about water damage and tile repair, explore our related resources: grouting and waterproofing guide, tiling insurance claim process, tile removal and replacement costs, and balcony waterproof tiling systems. Learn about our process on how ServiceLink SA works and how we protect homeowners. Find specialists in your area: Western Cape, Cape Town, and Constantia. For related services, see our waterproofing and plumbing services guides.